Love this? Save it for later!
Share the inspiration with your friends
Introduction
“I wasn’t expecting to find a dessert recipe tucked inside a worn-out gardening magazine, but there it was—this charming little note scribbled in the margins about a no-bake strawberry lemon cheesecake jar,” I recall, sitting on my porch one unusually breezy Saturday afternoon. The summer sun was just starting to soften, and honestly, I was craving something light yet indulgent. What caught my attention wasn’t just the recipe itself, but the story attached to it—a beekeeper from Vermont claimed it was their go-to treat after a long day tending to hives.
Now, I’m not much of a beekeeper, and my kitchen isn’t exactly a fancy patisserie, but this recipe felt like a perfect fit for those warm evenings when you want something sweet but fuss-free. I jotted it down quickly—right there on the page, next to a photo of wildflowers—and promised myself I’d try it before the summer slipped away. You know that feeling when a simple recipe surprises you? That’s exactly what happened. The combination of fresh strawberries and a zesty lemon twist packed into tiny jars made it feel special yet utterly doable.
Maybe you’ve been there too—wanting a dessert that’s just right for sharing but without the long wait or complicated steps. This recipe has stuck with me through many impromptu get-togethers and quiet solo indulgences. Honestly, it’s the kind of thing that leaves a little mess in the kitchen (because who can resist sneaking a bite before it’s ready?) and a lot of smiles around the table. So, let me tell you about these Easy No-Bake Strawberry Lemon Cheesecake Jars—your soon-to-be favorite summer dessert that’s as charming as it is delicious.
Why You’ll Love This Recipe
After making these strawberry lemon cheesecake jars countless times, I can confidently say they bring together simplicity and flavor in a way that’s hard to beat. Whether you’re a seasoned home cook or just starting out, this recipe is designed to bring joy without stress.
- Quick & Easy: Ready in under 30 minutes, perfect for busy summer days or last-minute dessert plans.
- Simple Ingredients: No need for specialty stores—just pantry staples and fresh fruit you can find anywhere.
- Perfect for Summer Gatherings: Ideal for picnics, potlucks, or casual backyard dinners.
- Crowd-Pleaser: Kids and adults alike fall for the creamy texture combined with the bright, fruity flavors.
- Unbelievably Delicious: The lemon zest cuts through the richness, while the strawberries add a fresh, sweet pop that feels like sunshine in a jar.
This recipe isn’t just a quick fix; it’s my best version of strawberry lemon cheesecake in jars because it balances tang, sweetness, and creaminess perfectly. Plus, no baking means you avoid the heat—trust me, that’s a game-changer when the kitchen feels like a sauna! This recipe has become my secret weapon for impressing guests without breaking a sweat, and honestly, it tastes like a little summer celebration in every bite.
What Ingredients You Will Need
This recipe uses simple, wholesome ingredients to deliver bold flavor and satisfying texture without the fuss. Most are pantry staples, and the fresh strawberries and lemon bring that seasonal brightness that makes it shine.
- For the Crust:
- 1 ½ cups graham cracker crumbs (about 10 full sheets, crushed) — I prefer Honey Maid for the best texture
- 5 tablespoons unsalted butter, melted (adds richness and helps the crust hold together)
- 2 tablespoons granulated sugar (balances the tartness)
- For the Cheesecake Filling:
- 8 oz (225 g) cream cheese, softened (room temperature helps it blend smoothly)
- ½ cup (120 ml) heavy whipping cream (for that dreamy, fluffy texture)
- ⅓ cup (65 g) granulated sugar (adjust to taste if you prefer it sweeter)
- 2 teaspoons lemon zest (freshly grated for the best aroma)
- 2 tablespoons fresh lemon juice (brightens the flavor beautifully)
- 1 teaspoon pure vanilla extract (adds warmth and depth)
- For the Strawberry Topping:
- 1 ½ cups fresh strawberries, hulled and diced (in summer, I like to use local berries for the sweetest taste)
- 2 tablespoons granulated sugar (helps macerate the strawberries)
- 1 teaspoon fresh lemon juice (to enhance the natural berry flavor)
Substitution tips: Use coconut cream instead of heavy cream for a dairy-free option, and gluten-free graham cracker crumbs work well if needed. If fresh strawberries aren’t available, frozen berries thawed and drained make a fine alternative, though the texture will be softer.
Equipment Needed

- Mixing bowls – I like to have a couple on hand for different parts of the recipe.
- Electric mixer or hand whisk – an electric mixer makes the filling silky smooth, but a sturdy whisk works if you don’t have one.
- Measuring cups and spoons – precision helps, especially with the sugar and lemon juice.
- Spatula – great for scraping down the sides of the bowl so no cream cheese gets wasted.
- Small jars or clear dessert cups – I use 8-ounce mason jars for a cute presentation, but any small glass or plastic container will do.
- Food processor or rolling pin – for crushing the graham crackers; a rolling pin and zip-top bag work fine if you don’t have a processor.
For budget-friendly options, you can substitute mason jars with small plastic containers or even old yogurt cups cleaned thoroughly. If you don’t have an electric mixer, letting the cream cheese soften well and whisking vigorously by hand will get you there, just expect a little extra arm workout!
Preparation Method
- Prepare the crust: Place graham cracker crumbs in a medium bowl. Add melted butter and sugar. Stir until the crumbs are evenly coated and the mixture resembles wet sand. This should take about 3 minutes. If the mixture feels too dry, add a teaspoon more melted butter.
- Assemble crust layer: Spoon about 2 tablespoons of the crust mixture into each jar. Press down firmly with the back of a spoon to create a compact base. This helps prevent the crust from falling apart when you dig in. Chill the jars in the fridge while you prepare the filling (about 10 minutes).
- Make the cheesecake filling: In a large bowl, beat softened cream cheese with sugar until smooth and creamy, about 2-3 minutes with an electric mixer. Add lemon zest, lemon juice, and vanilla extract. Mix until combined.
- Whip the cream: In a separate chilled bowl, whip the heavy cream until soft peaks form. This usually takes around 3-4 minutes on medium speed. Be careful not to overwhip, or it can turn grainy.
- Combine filling and whipped cream: Gently fold the whipped cream into the cream cheese mixture using a spatula. Fold until just combined—overmixing can deflate the airy texture. The filling should be light, fluffy, and smooth.
- Fill the jars: Spoon the cheesecake filling over the chilled crust layer in each jar. Smooth the top with the back of a spoon or an offset spatula. Fill to about three-quarters full to leave room for the strawberry topping.
- Prepare the strawberry topping: In a small bowl, combine diced strawberries, sugar, and lemon juice. Stir gently and let sit for 10 minutes to macerate, which draws out the natural juices and sweetens the berries.
- Add strawberry topping: Spoon the macerated strawberries and their juices over the cheesecake filling in each jar. Try not to overload so the layers stay distinct and pretty.
- Chill before serving: Refrigerate the jars for at least 2 hours to let the cheesecake firm up. Overnight chilling works great if you want to prepare ahead. Just remember to cover the jars to prevent any fridge odors sneaking in.
Tip: If your cream cheese isn’t soft enough, pop it in the microwave for 10 seconds before mixing. Also, don’t skip pressing the crust—it keeps the jars neat and prevents crumbling when eating.
Cooking Tips & Techniques
One of the keys to making these no-bake strawberry lemon cheesecake jars turn out perfect is managing the textures. You want the crust to be firm but not rock-hard, and the filling to be airy yet stable enough to hold its shape.
Here are some tips I’ve picked up along the way:
- Softening the cream cheese: Let it sit out for at least 30 minutes before mixing. Cold cream cheese lumps up and ruins the smoothness.
- Folding technique: When combining the whipped cream with the cream cheese, fold gently with a spatula instead of stirring vigorously. This keeps it light and fluffy.
- Strawberry maceration: Don’t skip the resting time for the strawberries after adding sugar and lemon juice. It makes the topping juicy and sweet without extra syrupy mess.
- Chilling time: Patience is key! The cheesecake needs a good chill to firm up. If you rush it, the filling might be too soft and the layers can mix.
- Prevent watery crust: Press the crust firmly into place, and avoid adding too much butter, which can make it soggy.
- Multitasking: While the crust chills, whip the cream and prepare the strawberries to save time.
Honestly, the first time I made these, I forgot to soften the cream cheese and ended up with a lumpy mess—lesson learned! Now, I always double-check my prep steps and it makes a world of difference. You’ll find that once you get a rhythm, this recipe becomes a breeze and you’ll nail it every time.
Variations & Adaptations
This recipe is pretty flexible, so you can tweak it to suit your taste buds or dietary needs.
- Berry swap: Replace strawberries with raspberries, blueberries, or a mix for a different berry flavor. Blackberries add a nice tart contrast.
- Gluten-free crust: Use gluten-free graham crackers or crushed almond flour mixed with a little coconut oil instead of butter.
- Dairy-free option: Substitute cream cheese with a dairy-free cream cheese alternative and use coconut cream instead of heavy cream.
- Herbal twist: Add a teaspoon of finely chopped fresh basil or mint to the strawberry topping for an unexpected fresh note.
- Chocolate layer: For a decadent touch, sprinkle mini chocolate chips or drizzle melted dark chocolate between the crust and filling.
One of my favorite tweaks is adding a bit of crushed pistachios on top for extra crunch and a pop of color—makes the jars feel extra fancy without extra effort. Feel free to experiment and find what works for your palate!
Serving & Storage Suggestions
These cheesecake jars are best served chilled, straight from the fridge. The cool creaminess is refreshing on warm days, and the layered presentation makes them perfect for casual entertaining or a sweet solo treat.
Pair with a light, fruity white wine or an iced herbal tea to complement the lemon and strawberry notes. For a brunch spread, they work wonderfully alongside fluffy vanilla pancakes or a fresh fruit salad.
Store leftover jars tightly covered in the refrigerator for up to 3 days. The crust may soften a bit overnight, but honestly, the flavors meld beautifully, and they taste even more harmonious the next day.
To reheat (if you prefer a less chilled dessert), let the jars sit at room temperature for 15-20 minutes before eating. Avoid microwaving as it can change the texture unfavorably.
Nutritional Information & Benefits
Each serving of these strawberry lemon cheesecake jars clocks in around 250 calories, depending on portion size. They provide a decent amount of calcium and protein from the cream cheese and heavy cream.
The fresh strawberries and lemon add vitamin C and antioxidants, making this dessert a lighter option compared to heavier baked cheesecakes. Using real fruit also means you get natural sweetness and fiber.
For those watching carbs, the recipe is moderate, but swapping the crust for almond flour and using a low-carb sweetener can make it more keto-friendly. Keep in mind it contains dairy and gluten unless substitutions are made.
From a wellness perspective, I appreciate that this recipe balances indulgence with fresh ingredients, making it a satisfying treat that doesn’t weigh you down—perfect for summer vibes.
Conclusion
Easy No-Bake Strawberry Lemon Cheesecake Jars are proof that you don’t need complicated steps or hours in the kitchen to make a dessert that feels special and tastes amazing. This recipe has become my go-to when I want something fresh, bright, and creamy without the fuss.
Feel free to make it your own—swap berries, adjust sweetness, or try a fun topping. Honestly, it’s hard to go wrong with this one. I keep coming back to it because it’s reliable, delicious, and reminds me of those sunny Vermont afternoons and unexpected kitchen finds.
Give it a try, and if you do, I’d love to hear how yours turns out! Share your version, leave a comment, or just drop a note to say hi. Here’s to sweet moments made simple!
FAQs
Can I make these cheesecake jars ahead of time?
Absolutely! They actually taste better after chilling overnight, which lets the flavors meld and the filling firm up nicely.
What can I use instead of graham crackers for the crust?
You can use digestive biscuits, vanilla wafers, or crushed nuts like almonds or pecans for a different texture and flavor.
How long will these cheesecake jars keep in the fridge?
They stay fresh for about 3 days when covered tightly. After that, the crust may get soggy, but the filling remains tasty.
Can I freeze the cheesecake jars?
Freezing is possible but not ideal. The texture might change, especially the cream cheese layer. If you freeze, thaw overnight in the fridge before serving.
Is it necessary to use fresh lemon juice and zest?
For the best flavor, yes! Fresh lemon juice and zest brighten the filling in a way bottled versions just can’t match.
Pin This Recipe!
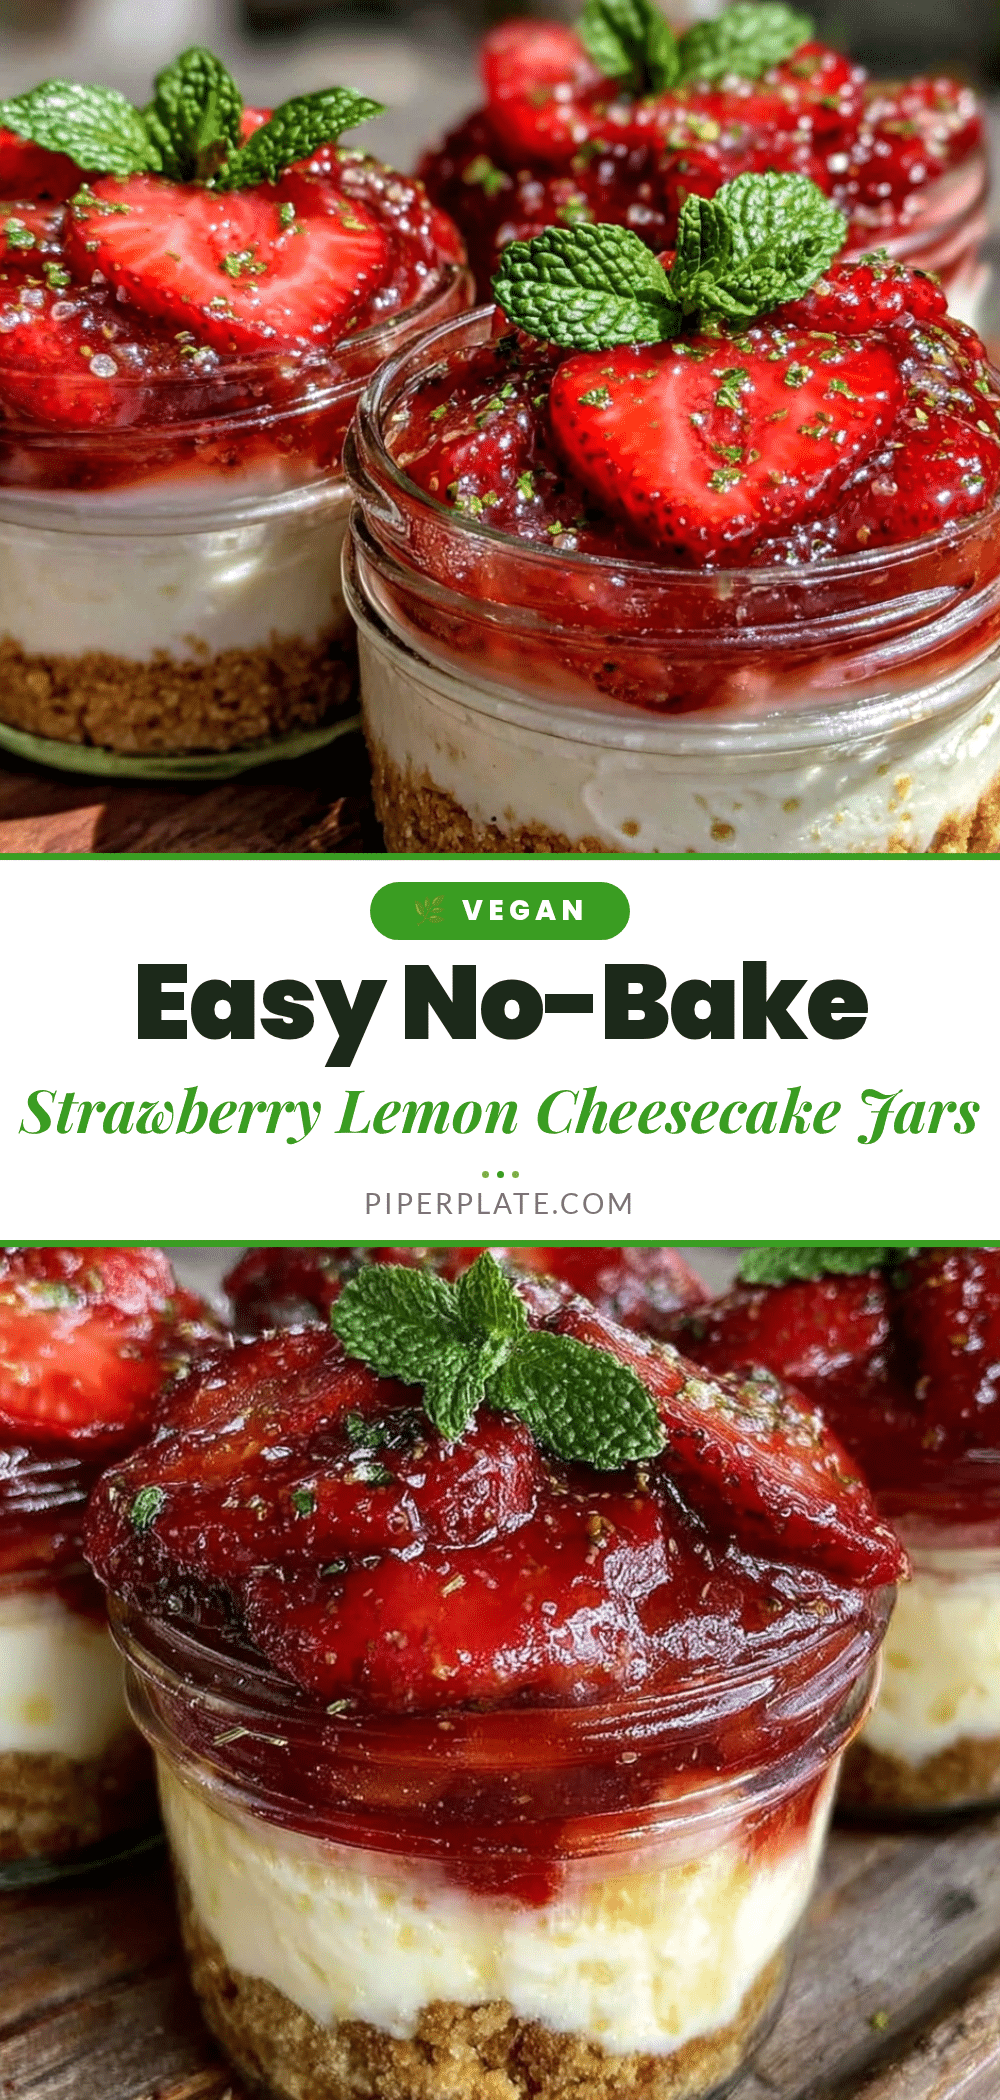
Easy No-Bake Strawberry Lemon Cheesecake Jars
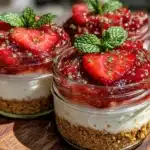
A light and indulgent no-bake dessert featuring creamy cheesecake filling with fresh strawberries and a zesty lemon twist, perfect for summer gatherings.
- Prep Time: 15 minutes
- Cook Time: 0 minutes
- Total Time: 2 hours 15 minutes
- Yield: 6 servings 1x
- Category: Dessert
- Cuisine: American
Ingredients
- 1 ½ cups graham cracker crumbs (about 10 full sheets, crushed)
- 5 tablespoons unsalted butter, melted
- 2 tablespoons granulated sugar
- 8 oz cream cheese, softened
- ½ cup heavy whipping cream
- ⅓ cup granulated sugar
- 2 teaspoons lemon zest
- 2 tablespoons fresh lemon juice
- 1 teaspoon pure vanilla extract
- 1 ½ cups fresh strawberries, hulled and diced
- 2 tablespoons granulated sugar
- 1 teaspoon fresh lemon juice
Instructions
- Place graham cracker crumbs in a medium bowl. Add melted butter and sugar. Stir until the crumbs are evenly coated and the mixture resembles wet sand. If too dry, add a teaspoon more melted butter.
- Spoon about 2 tablespoons of the crust mixture into each jar. Press down firmly with the back of a spoon to create a compact base. Chill the jars in the fridge for about 10 minutes.
- In a large bowl, beat softened cream cheese with sugar until smooth and creamy, about 2-3 minutes with an electric mixer. Add lemon zest, lemon juice, and vanilla extract. Mix until combined.
- In a separate chilled bowl, whip the heavy cream until soft peaks form, about 3-4 minutes on medium speed.
- Gently fold the whipped cream into the cream cheese mixture using a spatula until just combined.
- Spoon the cheesecake filling over the chilled crust layer in each jar, filling to about three-quarters full.
- In a small bowl, combine diced strawberries, sugar, and lemon juice. Stir gently and let sit for 10 minutes to macerate.
- Spoon the macerated strawberries and their juices over the cheesecake filling in each jar.
- Refrigerate the jars for at least 2 hours to let the cheesecake firm up. Overnight chilling is recommended for best results.
Notes
Softening the cream cheese before mixing is essential for a smooth filling. Press the crust firmly to prevent crumbling. Let strawberries macerate to enhance sweetness and juiciness. Chill the jars well to firm up the cheesecake. For dairy-free option, substitute cream cheese and heavy cream with dairy-free alternatives. Gluten-free crust can be made with gluten-free graham crackers or almond flour.
Nutrition
- Serving Size: 1 jar (approximately
- Calories: 250
- Sugar: 14
- Sodium: 150
- Fat: 18
- Saturated Fat: 10
- Carbohydrates: 18
- Fiber: 1
- Protein: 4
Keywords: no-bake cheesecake, strawberry lemon cheesecake, summer dessert, easy dessert, cheesecake jars, no bake, quick dessert