Love this? Save it for later!
Share the inspiration with your friends
“I remember the first time Milo grabbed a piece of avocado from his high chair tray,” I said to my friend over coffee last week. “He squished it all over his face, but then, that little smile made it all worth it.”
It was a chilly Wednesday afternoon when I found myself nervously preparing the very first batch of wholesome baby-led weaning first foods for Milo, who was just turning six months old. Honestly, I wasn’t sure if he’d take to the chunky, soft pieces I’d so carefully selected. You know that feeling when you want to get it just right but also expect a little chaos? That was me—juggling pureed baby food advice with the urge to let him explore flavors and textures himself.
What struck me most was how the process wasn’t just about feeding; it became a sensory adventure for both of us. The way the sweet potato’s softness contrasted with the slight firmness of steamed broccoli florets, or the gentle aroma of ripe pears filling the kitchen—the whole experience felt like rediscovering food from a baby’s perspective. And let me tell you, baby-led weaning isn’t always neat. I forgot to put down a bib once, and Milo’s giggles as he splattered carrot puree everywhere are forever etched in my memory.
Maybe you’ve been there—wondering which foods are safe, nutritious, and actually exciting for your little one. This easy guide to wholesome baby-led weaning first foods for 6-12 months is exactly what I wish I had back then. It’s more than just a list; it’s a friendly companion for your parenting journey that balances nutrition, texture, and fun. So, let me walk you through the best foods, tips, and tricks that made mealtime a joy, not a battle.
Why You’ll Love This Recipe
Honestly, starting baby-led weaning can feel overwhelming, but this guide is designed to make that first tasting experience straightforward and enjoyable. I’ve tested these foods with Milo and several tiny taste-testers over the years, so these aren’t just theoretical picks; they’re family-approved staples that have stood the test of mess and patience.
- Quick & Easy: Most foods can be prepared in under 20 minutes—perfect for busy parents juggling a million things.
- Simple Ingredients: No fancy, hard-to-find items here—mostly fresh, natural, and easy-to-source produce and proteins.
- Perfect for Every Stage: Whether your baby is just starting solids or moving towards more complex textures, these choices grow with them.
- Crowd-Pleaser: These first foods often become family favorites too, getting nods of approval from toddlers and adults alike.
- Unbelievably Nutritious: Each food packs essential vitamins, minerals, and textures that support healthy growth and development.
What makes this guide different? It’s not just about what to feed but how to prepare and present foods that encourage your baby’s independence and curiosity. For example, offering steamed carrot sticks instead of puree helps build hand-eye coordination and chewing skills. Plus, I’ve included practical advice on texture progression and allergy-friendly swaps that make this guide genuinely adaptable.
Feeding your baby doesn’t have to be stressful. This approach turns mealtime into a bonding moment filled with discovery and, yes, a little mess. But that’s part of the fun, right?
What Ingredients You Will Need
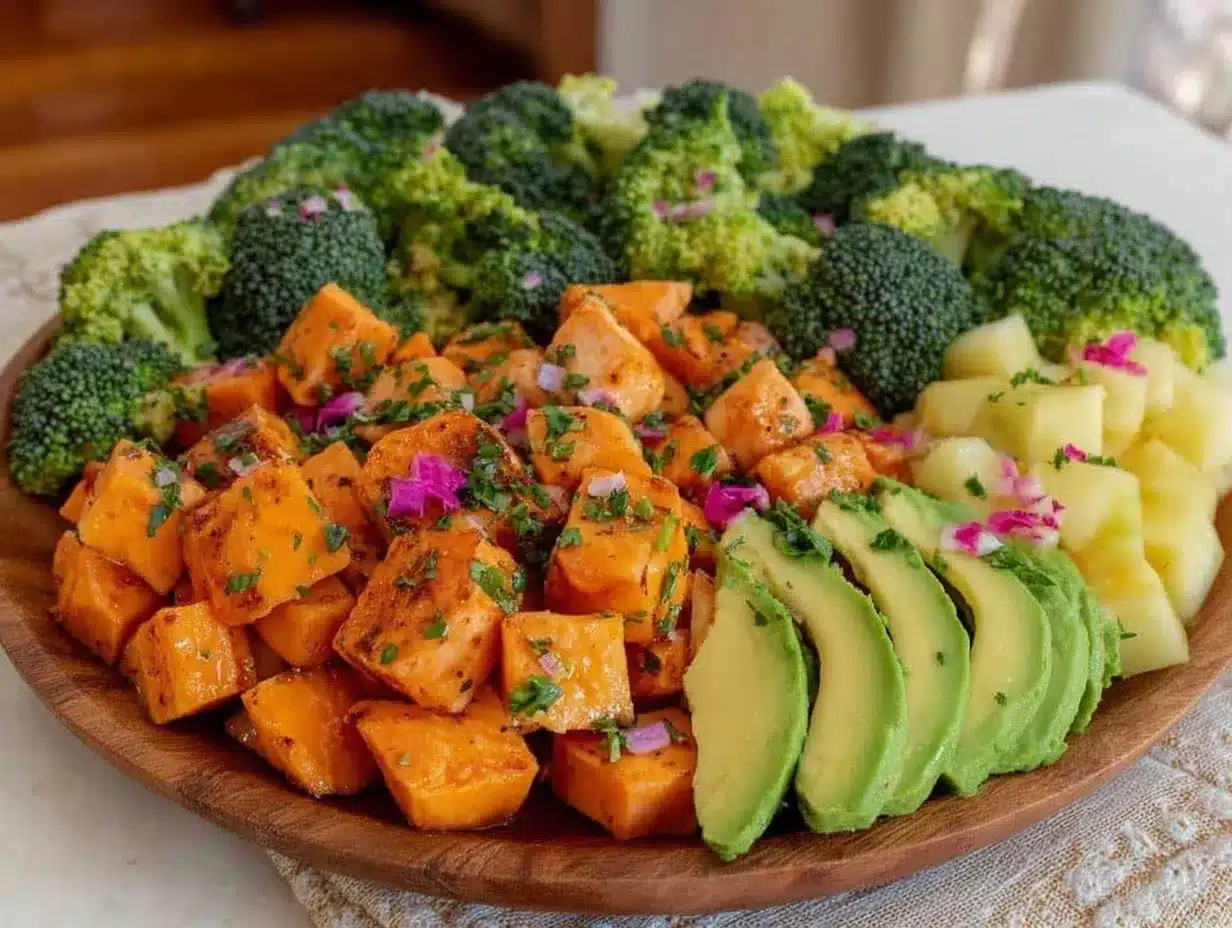
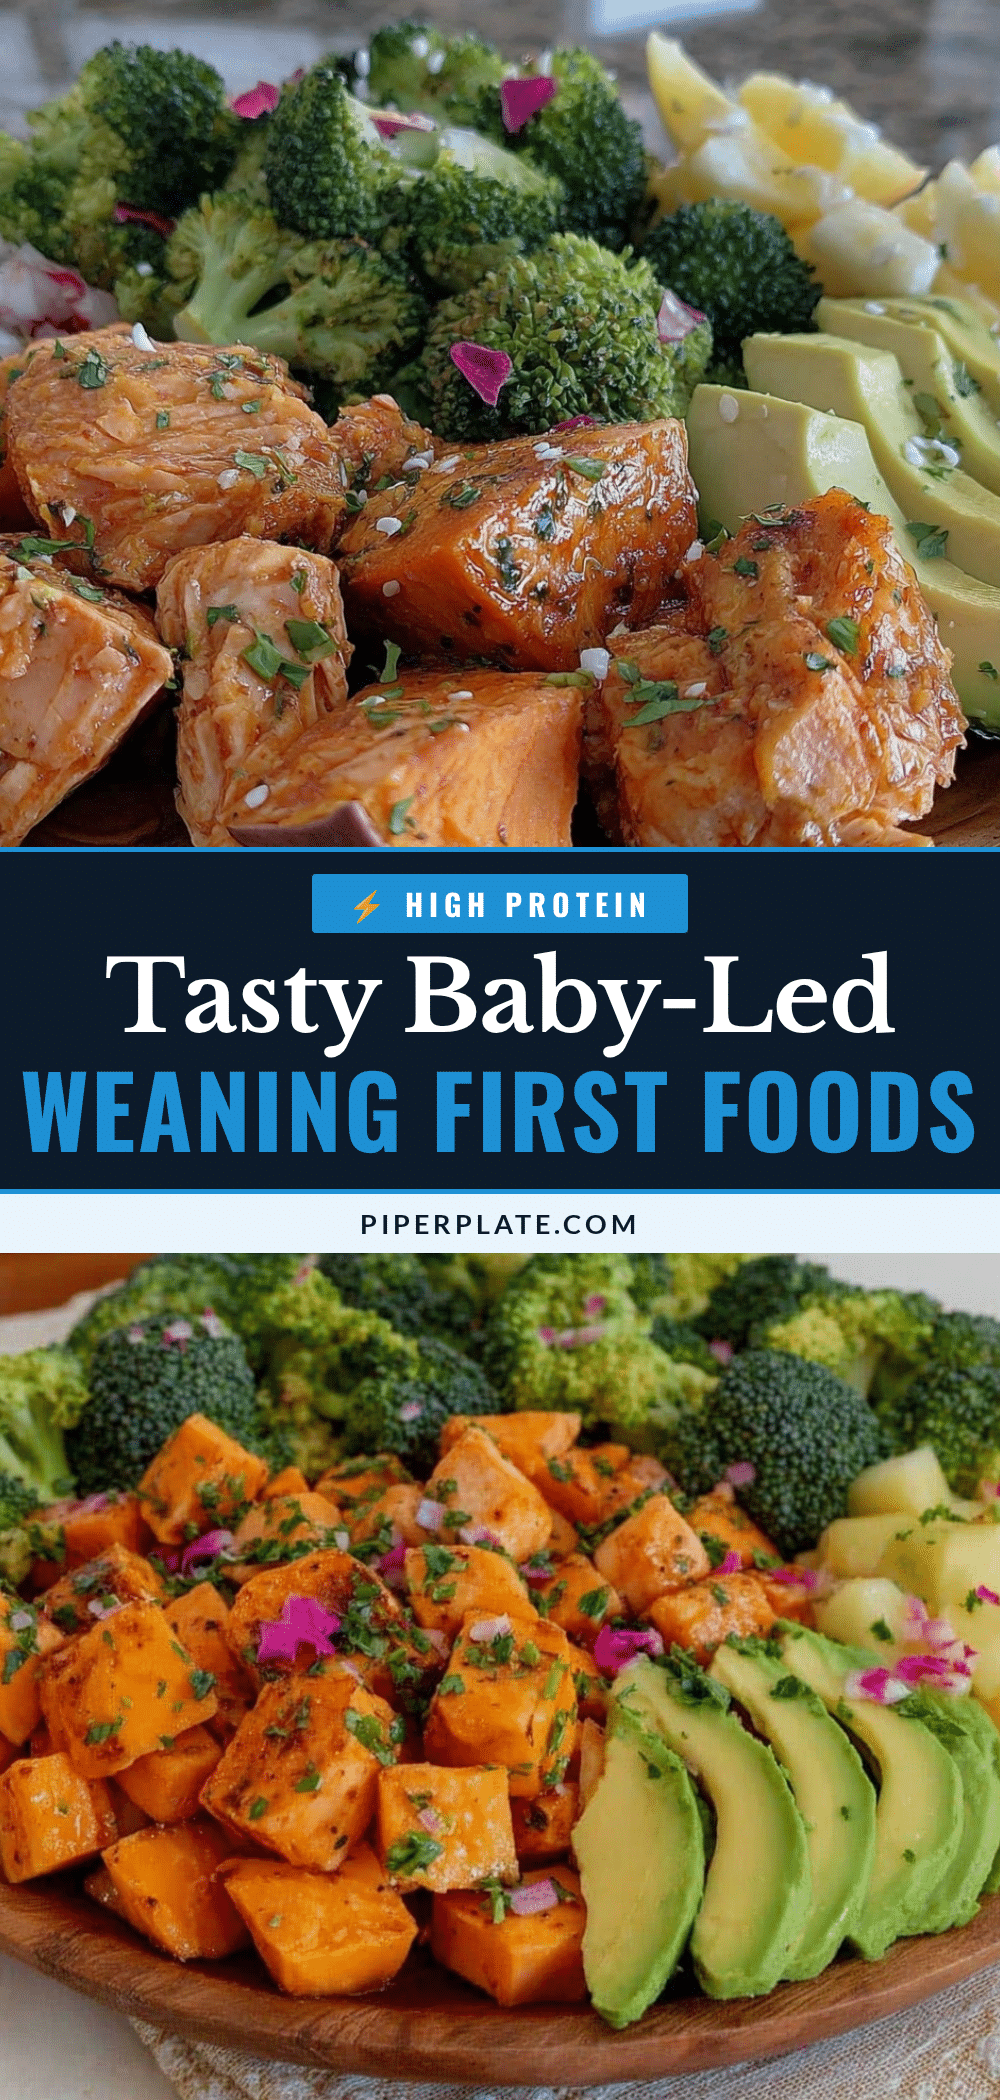
This selection of wholesome baby-led weaning first foods for 6-12 months uses natural, simple ingredients that provide essential nutrients and exciting textures for your baby’s introduction to solids.
- For Soft Vegetables:
- Sweet potatoes, peeled and cut into thick sticks (rich in beta-carotene)
- Carrots, peeled and steamed into finger-friendly shapes (adds natural sweetness)
- Broccoli florets, steamed until tender but still firm (high in fiber and vitamin C)
- Avocado, ripe and sliced into wedges (healthy fats for brain development)
- For Fruits:
- Ripe pears, peeled and sliced (gentle on the tummy)
- Bananas, peeled and cut into manageable chunks (soft and potassium-rich)
- Steamed apple slices, soft but not mushy (great for introducing mild tartness)
- For Proteins:
- Cooked chicken breast, shredded (lean protein for growth)
- Hard-boiled egg yolk, mashed (packed with choline and healthy fats)
- Full-fat plain Greek yogurt (probiotics and calcium)
- Soft cooked lentils or chickpeas, lightly mashed (plant-based protein and fiber)
- For Grains & Carbs:
- Whole grain bread, cut into strips (introduces chewing)
- Cooked quinoa or rice balls (small and easy to hold)
- Oatmeal, thick but spoonable (great for breakfast)
I usually recommend sourcing organic produce when possible, especially for fruits and veggies commonly treated with pesticides. For brands, I personally trust Happy Baby for organic yogurt and Bob’s Red Mill for oats. And if your baby has allergies or sensitivities, swapping dairy yogurt with coconut or almond-based alternatives works well.
Equipment Needed
- Steaming Basket or Steamer: To gently cook veggies and fruits without losing nutrients. A bamboo steamer works great and is budget-friendly.
- Sharp Paring Knife: Essential for cutting soft foods into baby-friendly shapes. I keep a small, sharp knife dedicated to baby food prep to avoid cross-contamination.
- Cutting Board: A sturdy, easy-to-clean board makes slicing safer and more efficient.
- Blender or Food Processor: Optional but handy for making smooth purees or mashing harder foods like lentils.
- High Chair with Tray: A secure seat with a removable tray helps contain the mess and gives your baby their own eating space.
- Silicone Bibs: Easy to clean and catch spills effectively. I love the ones with pockets for catching dropped food.
If you don’t have a steamer, a microwave-safe bowl with a bit of water and a plate on top works in a pinch. Also, a fork or potato masher can be a great alternative if you don’t have a food processor. Keeping your tools clean and sharp makes a big difference—trust me, I learned this the hard way after a dull knife made me nervous during meal prep!
Preparation Method
- Wash and Peel Produce: (10 minutes) Rinse all fruits and vegetables under cold water. Peel where necessary, like sweet potatoes and carrots. Cleanliness is key here to keep everything safe for your baby.
- Cut into Baby-Friendly Shapes: (5 minutes) Slice the veggies and fruits into thick sticks or wedges about 3-4 inches long and 1 inch thick. This size helps your baby grip and explore food safely. For softer items like avocado, simply slice into wedges without peeling.
- Steam the Vegetables and Fruits: (15 minutes) Place your cut produce into a steamer basket over boiling water. Cover and steam until tender but still firm enough for your baby to hold—usually 8-12 minutes depending on the item. For example, carrots and broccoli may take about 10 minutes, while apple slices soften in 6-8 minutes.
- Prepare Proteins: (10 minutes) Cook chicken breast thoroughly and shred into thin pieces. Hard boil eggs by placing them in boiling water for 10 minutes, then cool and mash the yolk. Rinse cooked lentils or chickpeas and lightly mash them to avoid choking hazards.
- Cook Grains: (15-20 minutes) Prepare oatmeal, quinoa, or rice according to package instructions. Let grains cool slightly before shaping rice or quinoa into small balls for easy grasping.
- Assemble the Plate: (5 minutes) Arrange a colorful variety of steamed veggies, fruits, proteins, and grains on a plate or tray. Mixing textures keeps your baby engaged and supports oral development. Remember to always supervise your baby during feeding.
- Introduce and Observe: Let your baby explore the food at their own pace. Expect mess and encourage self-feeding—this is where those silicone bibs earn their keep!
Pro tip: If you notice your baby gagging (which is normal), stay calm and keep offering new textures gradually. I found that alternating softer foods like avocado with slightly firmer steamed veggies helped Milo adjust over time. Also, keep a damp cloth handy—things get messy fast!
Cooking Tips & Techniques
Baby-led weaning is as much about technique as it is about food choice. Here are some tips from my experience that might save you some headaches (or spills!).
- Texture Matters: Start with soft, easy-to-mash foods to prevent choking but aim to gradually introduce firmer textures. The goal is to build chewing skills, so don’t shy away from slightly chunkier pieces as your baby grows.
- Size and Shape: Cut foods into sticks or wedges that babies can easily grasp with their fist. Avoid small, round pieces that could pose choking risks.
- Patience is Key: Your baby won’t eat much at first, and that’s okay. The point is to explore tastes and textures. I remember Milo playing with steamed carrot sticks for nearly 20 minutes before he actually ate a bite.
- Watch for Allergies: Introduce new foods one at a time and wait a few days before trying another to catch any reactions early. For instance, start with avocado or sweet potatoes before moving to eggs or dairy.
- Keep It Safe: Never leave your baby unattended while eating. Make sure they’re sitting upright in a high chair and stay calm if gagging happens—it’s a natural reflex and not the same as choking.
- Multitasking Tips: Prepare batches of steamed veggies and proteins in advance and store them in the fridge for up to 3 days. This saved me many busy mornings and helped maintain variety.
One mistake I made early on was offering foods that were too hard or slippery, like raw apple slices. Milo would just spit them out or get frustrated. So, steaming or softening is the way to go until your baby masters chewing.
Variations & Adaptations
Every baby is unique, and so is every kitchen. Here are some ways to adjust the wholesome baby-led weaning first foods for 6-12 months to fit your needs.
- Allergy-Friendly: If dairy is a concern, swap Greek yogurt with coconut or almond-based yogurts. For egg allergies, substitute with mashed sweet potato or avocado for healthy fats.
- Seasonal Swaps: In summer, try fresh peaches or zucchini sticks instead of pears or carrots. Winter calls for butternut squash or steamed parsnips, which add warmth and comfort.
- Flavor Boosts: Add mild herbs like parsley or basil finely chopped to veggies for an introduction to varied flavors. A tiny drizzle of olive oil can also add richness and help with nutrient absorption.
- Cooking Method: If steaming isn’t an option, roasting veggies at low heat until soft is a tasty alternative. Just remember to cut pieces a bit larger to avoid drying out.
- Personal Favorite: Milo loved when I mixed shredded chicken with mashed avocado—creamy, protein-packed, and easy to hold. It became a go-to when I needed a quick, nutritious snack.
Serving & Storage Suggestions
Serving these wholesome first foods at the right temperature and in fun ways makes a big difference. I always aim to serve foods slightly warm or at room temperature—never hot. This keeps the flavors intact and is safer for delicate baby mouths.
Presentation-wise, placing a colorful variety on the high chair tray in easy-to-grip shapes invites curiosity. Don’t forget to include a few soft finger foods alongside slightly firmer ones to keep textures interesting.
For storage, freshly steamed or cooked batches keep well in airtight containers in the refrigerator for 2-3 days. Freeze portions in silicone trays for up to 3 months—perfect for busy days. When reheating, warm gently in a steamer or microwave, then test temperature before serving.
Flavors often deepen after sitting, so leftovers can taste even better the next day. Just keep an eye on texture changes—some foods like avocado are best fresh.
Nutritional Information & Benefits
These baby-led weaning first foods pack a punch in nutrients essential for growth and development:
- Sweet potatoes and carrots provide beta-carotene, supporting vision and immunity.
- Avocado offers healthy monounsaturated fats crucial for brain development.
- Chicken and eggs supply high-quality protein and choline, important for muscle and brain health.
- Broccoli and lentils add fiber and iron, supporting digestion and oxygen transport.
- Whole grains like quinoa contribute complex carbohydrates and B vitamins for energy.
This recipe is naturally gluten-free if you skip wheat bread, and dairy-free options are easy to swap in, making it accessible for many dietary needs. Just watch for common allergens and introduce them thoughtfully.
Conclusion
Starting your baby on wholesome baby-led weaning first foods for 6-12 months is more than feeding—it’s about encouraging independence, curiosity, and healthy habits from the very beginning. I love this approach because it gives your little one the chance to explore food in their own time and style, with plenty of opportunities for messy, joyful discovery.
Whether you stick to the basics or try some of the variations, customizing this guide to fit your family’s rhythm makes all the difference. Honestly, there’s nothing quite like watching those first confident grasps and delighted tastes.
If you try these first foods with your baby, I’d love to hear how it went! Share your stories, questions, or favorite adaptations in the comments below. Let’s keep this wonderful journey flavorful and fun for both you and your little one.
Happy feeding!
FAQs About Wholesome Baby-Led Weaning First Foods for 6-12 Months
What are safe first foods for baby-led weaning?
Soft, easy-to-grasp foods like steamed carrot sticks, avocado wedges, soft fruit slices, shredded chicken, and cooked grains are excellent starting points. Avoid hard or small round foods that pose choking risks.
How do I know if my baby is ready for baby-led weaning?
Typically, babies show readiness around 6 months when they can sit upright unsupported, have good head control, and show interest in solid foods.
Can I combine purees with baby-led weaning?
Yes! Some parents use a mix of purees and finger foods to ease the transition. Just ensure finger foods are soft and appropriately sized for safe self-feeding.
What if my baby gags during feeding?
Gagging is a normal reflex as babies learn to chew and swallow. Stay calm, offer reassurance, and continue offering safe textures. Avoid foods that are too hard or slippery.
How do I introduce allergenic foods safely?
Introduce allergenic foods like eggs, dairy, or nuts one at a time, in small amounts, and wait 3-5 days before trying another. Always consult your pediatrician if you have concerns.
Pin This Recipe!
Wholesome Baby-Led Weaning First Foods 6-12 Months Easy Guide

A friendly and easy guide to introducing wholesome, nutritious, and safe first foods for babies aged 6-12 months using baby-led weaning principles. This guide balances nutrition, texture, and fun to encourage independence and healthy eating habits.
- Prep Time: 15 minutes
- Cook Time: 30 minutes
- Total Time: 45 minutes
- Yield: 1 baby serving
- Category: Baby Food
- Cuisine: Universal
Ingredients
- Sweet potatoes, peeled and cut into thick sticks
- Carrots, peeled and steamed into finger-friendly shapes
- Broccoli florets, steamed until tender but still firm
- Avocado, ripe and sliced into wedges
- Ripe pears, peeled and sliced
- Bananas, peeled and cut into manageable chunks
- Steamed apple slices, soft but not mushy
- Cooked chicken breast, shredded
- Hard-boiled egg yolk, mashed
- Full-fat plain Greek yogurt
- Soft cooked lentils or chickpeas, lightly mashed
- Whole grain bread, cut into strips
- Cooked quinoa or rice balls
- Oatmeal, thick but spoonable
Instructions
- Wash and peel all fruits and vegetables under cold water. Peel where necessary, like sweet potatoes and carrots.
- Cut the veggies and fruits into thick sticks or wedges about 3-4 inches long and 1 inch thick to help your baby grip and explore food safely. For softer items like avocado, slice into wedges without peeling.
- Place cut produce into a steamer basket over boiling water. Cover and steam until tender but still firm enough for your baby to hold—usually 8-12 minutes depending on the item.
- Cook chicken breast thoroughly and shred into thin pieces. Hard boil eggs by placing them in boiling water for 10 minutes, then cool and mash the yolk. Rinse cooked lentils or chickpeas and lightly mash them.
- Prepare oatmeal, quinoa, or rice according to package instructions. Let grains cool slightly before shaping rice or quinoa into small balls for easy grasping.
- Arrange a colorful variety of steamed veggies, fruits, proteins, and grains on a plate or tray. Mixing textures keeps your baby engaged and supports oral development.
- Let your baby explore the food at their own pace. Expect mess and encourage self-feeding while always supervising.
Notes
Use organic produce when possible. Swap Greek yogurt with coconut or almond-based alternatives for dairy allergies. Always supervise baby during feeding. Introduce allergenic foods one at a time and watch for reactions. Keep foods slightly warm or at room temperature. Store cooked foods in airtight containers in the fridge for 2-3 days or freeze for up to 3 months. Reheat gently and test temperature before serving. Avoid hard or small round foods to prevent choking.
Nutrition
- Serving Size: One baby-sized plate
- Calories: 10015
- Sugar: 5
- Sodium: 50
- Fat: 5
- Saturated Fat: 1
- Carbohydrates: 15
- Fiber: 3
- Protein: 5
Keywords: baby-led weaning, first foods, baby food, 6-12 months, wholesome, nutritious, baby feeding, finger foods, baby-led solids