Love this? Save it for later!
Share the inspiration with your friends
Last Saturday afternoon, my neighbor watched me struggle with a batch of burnt cookies, fiddling with my oven settings, and didn’t say anything at first. Then, like it was the most natural thing in the world, she leaned over the fence and handed me a scrap of paper with a recipe scribbled on it. “Try these,” she said with a smile, “red velvet cheesecake bars. They fix everything.” Honestly, I wasn’t sure what to expect — cheesecake bars with red velvet and white chocolate drizzle? It sounded almost too fancy for my clumsy kitchen sessions. But she’d made them for a community potluck last fall and claimed they were the star of the show.
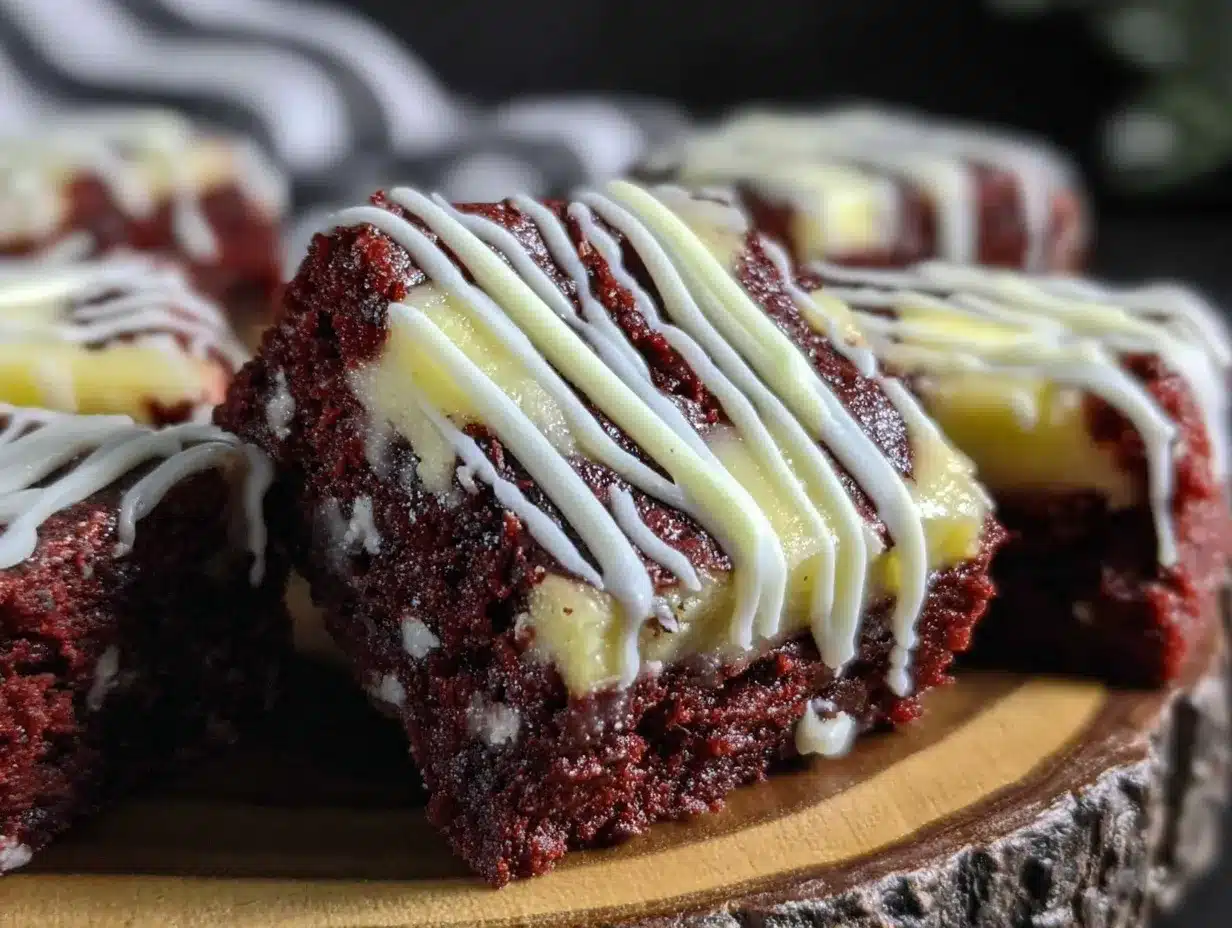
That evening, I gave the recipe a whirl. The way the smooth cream cheese met the tender red velvet cake base was a little moment of magic. Plus, the white chocolate drizzle added a silky, sweet finish that made me want to hide the pan from my roommates. Maybe you’ve been there — that feeling when a dessert hits all the right notes without a fuss. This recipe has stayed with me ever since, not just because it’s delicious but because it came wrapped in kindness and shared like a secret between friends. It’s one of those treats that’s both familiar and a little unexpected, perfect for when you want to impress but keep it real.
Why You’ll Love This Recipe
After testing this decadent red velvet cheesecake bars recipe multiple times, I can honestly say it’s become a staple for celebrations and quiet nights alike. Here’s why it’s a winner in my book:
- Quick & Easy: Comes together in about 45 minutes, making it perfect for last-minute dessert cravings or a sweet weekend project.
- Simple Ingredients: No need for specialty stores — most are pantry staples or easy to find at your local market.
- Perfect for Gatherings: Whether it’s a birthday, holiday, or casual get-together, these bars always wow the crowd.
- Crowd-Pleaser: Kids and adults alike rave about the creamy texture and rich flavor combo — it’s hard not to go back for seconds.
- Unbelievably Delicious: The subtle tang of cream cheese blends beautifully with the cocoa-infused red velvet base, all topped with a luscious white chocolate drizzle that adds just the right touch of sweetness.
This isn’t your usual cheesecake bar. The trick that makes these stand out is the balance — not too rich, not too sweet, and the white chocolate drizzle is homemade, giving it a silky finish that melts in your mouth. I’ve experimented with other toppings, but nothing beats this classic combo. Honestly, it’s comfort food with a little flair, the kind of dessert that makes you close your eyes after the first bite and smile. If you want to try a recipe that feels special but is totally doable, this one is it.
What Ingredients You Will Need
This decadent red velvet cheesecake bars recipe uses straightforward, wholesome ingredients to deliver bold flavor and that signature creamy texture without any fuss. Most of these are pantry staples, and I’ll note a few substitutions just in case.
- For the Red Velvet Base:
- All-purpose flour (1 ½ cups / 190g) – I prefer King Arthur for consistent texture.
- Cocoa powder (2 tbsp / 15g) – unsweetened, to get that subtle chocolate note.
- Baking powder (1 tsp) – helps the base rise just right.
- Granulated sugar (1 cup / 200g)
- Unsalted butter (½ cup / 115g), melted and slightly cooled
- Egg (1 large), room temperature
- Buttermilk (½ cup / 120ml) – adds tenderness, but you can swap with regular milk plus 1 tsp lemon juice if needed.
- Vanilla extract (1 tsp)
- Red food coloring (1 tbsp) – you can use gel or liquid, whichever you have on hand.
- Salt (¼ tsp)
- For the Cheesecake Layer:
- Cream cheese (16 oz / 450g), softened – I recommend Philadelphia for the best creamy texture.
- Sour cream (½ cup / 120ml) – adds a slight tang and creaminess.
- Granulated sugar (¾ cup / 150g)
- Eggs (2 large), room temperature
- Vanilla extract (1 tsp)
- All-purpose flour (2 tbsp / 16g) – helps stabilize the cheesecake layer.
- For the White Chocolate Drizzle:
- White chocolate chips or chopped white chocolate (½ cup / 90g) – I like Ghirardelli’s for meltability and smooth flavor.
- Heavy cream (2 tbsp / 30ml) – makes the drizzle silky and easy to spread.
Feel free to swap the all-purpose flour for almond flour if you want a gluten-free version, though the texture will be slightly different. Also, if dairy is an issue, coconut cream can replace heavy cream, and dairy-free cream cheese brands work well here. In summer, I sometimes add a handful of fresh raspberries on top before drizzling the white chocolate — it adds a nice tart contrast.
Equipment Needed
- 9×9-inch (23×23 cm) square baking pan – I use a nonstick metal pan for even baking and easy cleanup.
- Mixing bowls – one medium and one large, preferably glass or stainless steel.
- Electric mixer or stand mixer – helps get the cheesecake layer silky smooth; you can do it by hand but it’ll take more elbow grease.
- Whisk and spatula – for folding ingredients gently.
- Measuring cups and spoons – accuracy really matters in baking.
- Double boiler or microwave-safe bowl – to melt the white chocolate for drizzle.
- Cooling rack – to let the bars set properly after baking.
If you don’t have a stand mixer, an electric hand mixer works just fine. For the white chocolate drizzle, I usually melt it in the microwave in short bursts, stirring in between to avoid burning. A silicone spatula is my go-to for scraping every last bit of batter from the bowl — trust me, you don’t want to waste that creamy cheesecake mix!
Preparation Method
- Preheat and prepare the pan: Heat your oven to 350°F (175°C). Line the 9×9-inch pan with parchment paper, leaving an overhang on two sides for easy removal later. Lightly grease the paper to prevent sticking. (About 10 minutes)
- Make the red velvet base: In a medium bowl, whisk together the flour, cocoa powder, baking powder, and salt. In another large bowl, mix the melted butter and granulated sugar until combined. Add the egg, buttermilk, vanilla, and red food coloring, mixing well. Gradually stir in the dry ingredients until just combined — don’t overmix! The batter should be smooth and vibrant red. (10 minutes)
- Pour and spread: Spread the red velvet batter evenly into the prepared pan. Use a spatula to smooth the top as much as possible, but it doesn’t have to be perfect.
- Prepare the cheesecake layer: Using a mixer, beat the softened cream cheese on medium speed until smooth and creamy, about 2 minutes. Add the sugar and mix until combined. Beat in the eggs one at a time, then the sour cream and vanilla. Finally, add the flour and mix just until incorporated. This layer should be silky, not too thick. (10 minutes)
- Layer and bake: Carefully pour the cheesecake mixture over the red velvet base. Tilt the pan gently to spread it evenly. Bake for 40-45 minutes or until the cheesecake layer is set but still slightly jiggly in the center. The edges will be lightly golden. (40-45 minutes)
- Cool completely: Remove from the oven and cool on a wire rack for 30 minutes. Then chill in the fridge for at least 4 hours or overnight — this step is key for clean slicing and the best texture.
- Prepare the white chocolate drizzle: Melt the white chocolate and heavy cream together in a double boiler or microwave in 20-second bursts, stirring between. The mixture should be smooth and pourable but not too runny. If it’s thick, add a splash more cream.
- Drizzle and serve: Once the bars are chilled, lift them out using the parchment overhang. Cut into 16 squares with a sharp knife (wipe between cuts for neat edges). Drizzle the white chocolate over the bars using a spoon or piping bag in a zigzag pattern. Let the drizzle set for 10 minutes before serving.
Pro tip: If your cheesecake cracks slightly on top, don’t worry — the drizzle hides imperfections nicely, and the flavor is still amazing. Also, I like to chill the bars in the pan wrapped with foil to keep them moist overnight.
Cooking Tips & Techniques
Making these decadent red velvet cheesecake bars can feel like a balancing act, but a few tricks make it easy to nail every time.
- Room temperature ingredients: Having cream cheese, eggs, and butter at room temp helps the batter blend smoothly without lumps — trust me, cold cream cheese is a nightmare to whisk.
- Don’t overmix: When combining the dry and wet ingredients for the red velvet base, stir just until combined. Overmixing can lead to dense, tough bars.
- Watch the baking time: The cheesecake layer should be mostly set but a little jiggly in the center when you pull it out. It firms up as it cools, so resist the urge to overbake and dry it out.
- Chill well: This step isn’t optional. Chilling overnight helps the flavors meld and makes slicing clean and easy.
- Melting white chocolate: Be gentle with the heat to avoid burning or seizing. Stir often and melt in short bursts.
- Slicing tips: Use a sharp, thin-bladed knife warmed under hot water and dried between cuts for perfect squares.
- Multitasking: While the bars bake, prep the white chocolate drizzle and clean as you go — it makes the whole process less stressful.
Honestly, the first time I tried this I rushed the chilling step and ended up with a crumbly mess. Lesson learned! Patience is your best friend here.
Variations & Adaptations
This recipe is pretty forgiving and lends itself well to tweaks based on your mood or dietary needs.
- Vegan version: Use dairy-free cream cheese and sour cream alternatives, a flax egg in place of regular eggs, and coconut cream for the drizzle. The texture changes slightly but still delicious.
- Berry twist: Add fresh or frozen raspberries or strawberries swirled into the cheesecake layer before baking for a fruity surprise.
- Chocolate lovers: Sprinkle mini dark chocolate chips over the red velvet base before layering the cheesecake for an extra chocolate hit.
- Spiced red velvet: Add a pinch of cinnamon and nutmeg to the red velvet batter for a warm, cozy flavor perfect for fall.
- Alternative drizzles: Swap white chocolate for caramel or dark chocolate ganache depending on your craving.
One time I tried using a gluten-free flour blend and it worked okay, though the bars were a bit more fragile. If you need gluten-free, almond flour is a better bet, paired with an extra egg for binding. Feel free to experiment — this recipe is a fun base for creativity!
Serving & Storage Suggestions
These decadent red velvet cheesecake bars taste best chilled but can be served at room temperature if you prefer a softer bite. I like to plate them with a dusting of powdered sugar or a few fresh berries on the side for a pop of color.
Pair them with a cup of rich coffee or a glass of cold milk — the combo is classic for a reason. They also make a lovely finish to a brunch spread or holiday meal.
Store leftovers in an airtight container in the refrigerator for up to 5 days. They freeze well too; wrap each bar individually in plastic wrap and place in a freezer-safe bag for up to 3 months. To thaw, leave in the fridge overnight and drizzle with fresh white chocolate before serving.
Over time, the flavors deepen and the texture becomes even creamier, so if you can wait, the next day is often better than the first!
Nutritional Information & Benefits
Each serving of these decadent red velvet cheesecake bars (assuming 16 servings) contains roughly:
| Calories | 290 |
|---|---|
| Fat | 18g |
| Carbohydrates | 28g |
| Protein | 5g |
| Sugar | 20g |
The cream cheese provides a good source of calcium and protein, while the cocoa powder in the red velvet base offers antioxidants. Using real butter and full-fat dairy helps keep the texture rich and satisfying, which means a little goes a long way. If you want a lighter option, you can experiment with reduced-fat cream cheese or Greek yogurt in place of sour cream.
This recipe is gluten-containing unless you swap the flour, and it contains dairy and eggs, so keep that in mind if you’re serving guests with allergies. I find that indulging in a homemade treat like this, made with love and quality ingredients, fits nicely into a balanced lifestyle — just savor every bite!
Conclusion
To sum it up, these decadent red velvet cheesecake bars with white chocolate drizzle are a dreamy, crowd-pleasing dessert that manages to be both impressive and totally approachable. The balance of flavors and textures makes it stand out from typical cheesecake bars, and the white chocolate drizzle puts the finishing touch on a dessert worth remembering.
Feel free to tweak the recipe to suit your tastes or dietary needs — it’s forgiving enough to let you make it your own. Honestly, I keep coming back to this recipe because it’s a sweet little moment of joy I can create anytime, no fancy equipment or rare ingredients required.
If you try these bars, I’d love to hear how they turned out for you or any fun twists you add. Drop a comment below or share your photos — let’s keep the kitchen conversations going. Happy baking!
FAQs
Can I make these red velvet cheesecake bars ahead of time?
Absolutely! They actually taste better after chilling overnight, which helps the flavors meld and makes slicing easier.
What’s the best way to store leftover cheesecake bars?
Store in an airtight container in the fridge for up to 5 days or freeze individually wrapped for up to 3 months.
Can I use a different kind of chocolate for the drizzle?
Yes, dark or milk chocolate ganache works well if you want a richer or less sweet topping.
Is there a gluten-free version of this recipe?
Yes, swapping all-purpose flour for almond flour or a gluten-free blend can work. Just note that texture might vary slightly.
Why does my cheesecake layer crack sometimes?
Cracking often happens from overbaking or rapid temperature changes. To avoid this, bake until just set and cool gradually.
For a fun twist on dessert bars, you might also enjoy my crispy garlic chicken recipe for a savory balance or try adding fresh berries as I mentioned earlier!
Pin This Recipe!
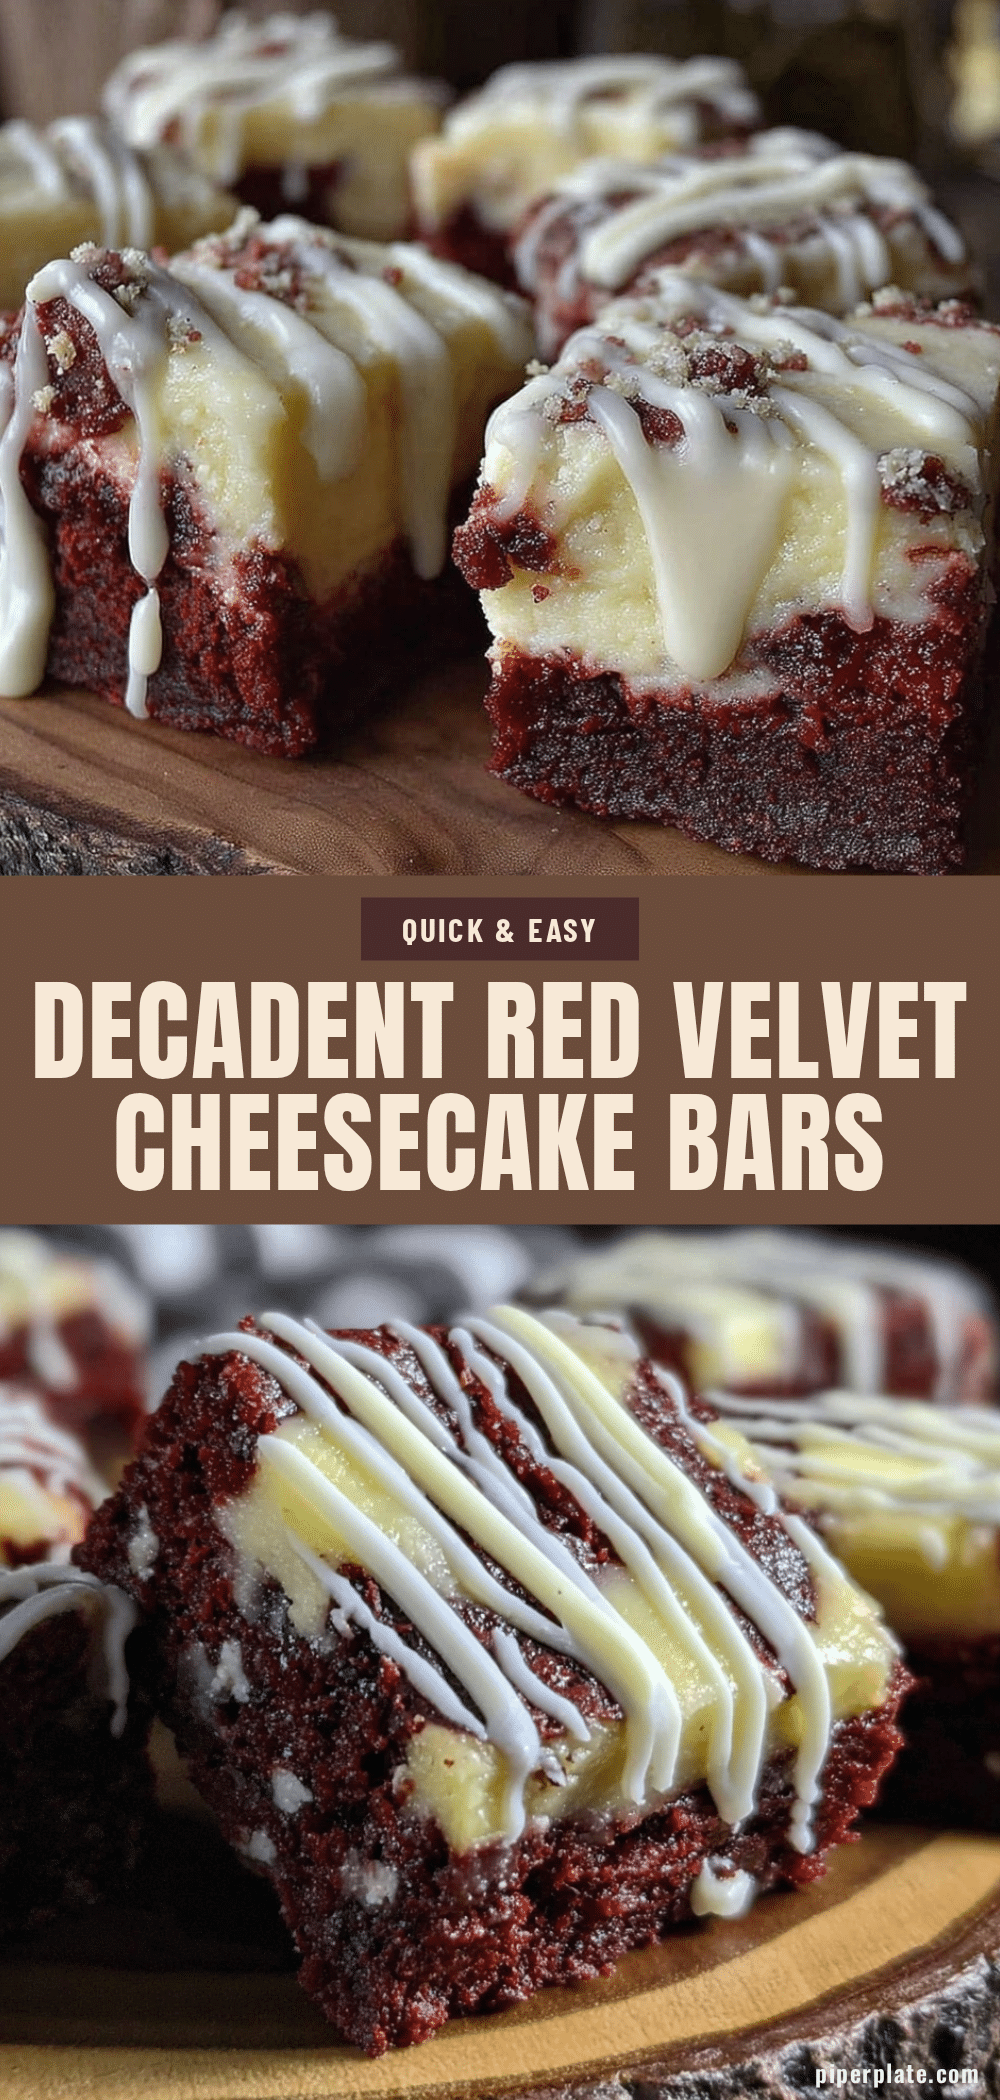
Decadent Red Velvet Cheesecake Bars with White Chocolate Drizzle

These decadent red velvet cheesecake bars combine a tender cocoa-infused red velvet base with a smooth cream cheese layer, topped with a luscious homemade white chocolate drizzle. Perfect for celebrations or quiet nights, they are easy to make and crowd-pleasing.
- Prep Time: 20 minutes
- Cook Time: 45 minutes
- Total Time: 5 hours 5 minutes
- Yield: 16 servings 1x
- Category: Dessert
- Cuisine: American
Ingredients
- 1 ½ cups (190g) all-purpose flour
- 2 tbsp (15g) unsweetened cocoa powder
- 1 tsp baking powder
- 1 cup (200g) granulated sugar
- ½ cup (115g) unsalted butter, melted and slightly cooled
- 1 large egg, room temperature
- ½ cup (120ml) buttermilk (or regular milk plus 1 tsp lemon juice)
- 1 tsp vanilla extract
- 1 tbsp red food coloring (gel or liquid)
- ¼ tsp salt
- 16 oz (450g) cream cheese, softened
- ½ cup (120ml) sour cream
- ¾ cup (150g) granulated sugar
- 2 large eggs, room temperature
- 2 tbsp (16g) all-purpose flour
- ½ cup (90g) white chocolate chips or chopped white chocolate
- 2 tbsp (30ml) heavy cream
Instructions
- Preheat oven to 350°F (175°C). Line a 9×9-inch square baking pan with parchment paper, leaving an overhang on two sides. Lightly grease the parchment.
- In a medium bowl, whisk together flour, cocoa powder, baking powder, and salt.
- In a large bowl, mix melted butter and granulated sugar until combined. Add egg, buttermilk, vanilla, and red food coloring; mix well.
- Gradually stir dry ingredients into wet ingredients until just combined. Batter should be smooth and vibrant red.
- Spread red velvet batter evenly into prepared pan using a spatula.
- Using a mixer, beat softened cream cheese on medium speed until smooth, about 2 minutes. Add sugar and mix until combined.
- Beat in eggs one at a time, then add sour cream and vanilla. Finally, add flour and mix just until incorporated.
- Carefully pour cheesecake mixture over red velvet base and tilt pan to spread evenly.
- Bake for 40-45 minutes until cheesecake layer is set but slightly jiggly in the center and edges are lightly golden.
- Remove from oven and cool on a wire rack for 30 minutes. Chill in refrigerator for at least 4 hours or overnight.
- Melt white chocolate and heavy cream together in a double boiler or microwave in 20-second bursts, stirring between until smooth and pourable.
- Lift bars out using parchment overhang. Cut into 16 squares with a sharp knife, wiping between cuts for neat edges.
- Drizzle white chocolate over bars in a zigzag pattern. Let drizzle set for 10 minutes before serving.
Notes
Use room temperature ingredients for smooth batter. Do not overmix red velvet batter to avoid dense bars. Bake cheesecake layer until mostly set but still slightly jiggly to prevent cracking. Chill bars overnight for best texture and clean slicing. Melt white chocolate gently to avoid burning. Use a sharp knife warmed under hot water and dried between cuts for neat squares. Bars can be stored in the fridge up to 5 days or frozen up to 3 months.
Nutrition
- Serving Size: 1 bar (1/16th of rec
- Calories: 290
- Sugar: 20
- Fat: 18
- Carbohydrates: 28
- Protein: 5
Keywords: red velvet cheesecake bars, white chocolate drizzle, easy dessert, homemade cheesecake bars, crowd-pleaser, celebration dessert