Love this? Save it for later!
Share the inspiration with your friends
My sister-in-law, Jen, wasn’t trying to impress anyone. I had stopped by to drop off a birthday card for my nephew, and the smell of peanut butter and chocolate hit me before I even got my second foot through the door. She was standing in her kitchen, wearing sweatpants and a messy bun, casually rolling these little balls in her hands like it was nothing. I asked what she was making, and she just shrugged and said, “Oh, just some snack things. They keep the kids from raiding the pantry.”
That moment stuck with me. Here she was, with three kids under seven, a full-time job, and a husband who travels for work, and she had somehow figured out a way to make a healthy snack that actually got eaten. Not left to rot in the back of the fridge. Not thrown away after one bite. Eaten. I asked her for the recipe, and she scribbled it on a napkin. It was three lines. That was it. Honestly, I was skeptical. Could something this simple really be that good?
Well, let me tell you—I made a batch that very night. And by the time I went to bed, half of them were gone. These easy no-bake peanut butter protein balls are the kind of recipe you don’t realize you need until you have them. They are the thing you reach for when you are hangry, when you need a post-workout pick-me-up, or when you just want something sweet without the guilt. Maybe you have been there—staring into the fridge, hoping a snack will magically appear. These protein balls are that magic. And the best part? You can make them in five minutes flat.
Why You’ll Love This Recipe
I have tested a lot of protein ball recipes over the years. Some were too dry. Some were so sticky they were impossible to roll. Some tasted like cardboard disguised as health food. This one is none of those things. This recipe has been through the wringer in my kitchen, and it has come out the other side as the version I actually trust.
- Quick & Easy: These come together in about five minutes of active time. No oven. No mixer. No fuss. Just a bowl, a spoon, and your hands.
- Simple Ingredients: You probably already have everything you need in your pantry. No weird health food store finds, no obscure superfood powders. Just real, recognizable ingredients.
- Perfect for Busy Days: Whether you need a pre-workout snack, an afternoon energy boost, or something to throw in a lunchbox, these fit the bill. They are also great for road trips and hiking.
- Crowd-Pleaser: I have brought these to playdates, work potlucks, and family gatherings. They disappear every single time. Kids love them. Adults love them. Even my dad, who claims he doesn’t like “healthy stuff,” asked for the recipe.
- Unbelievably Delicious: This is the part that surprises everyone. They taste like a peanut butter cookie dough, but without the raw eggs and flour. The texture is soft, chewy, and just the right amount of sweet. You won’t feel like you are eating a health food.
What makes this recipe different from the rest? It is the ratio. I have played with the proportions of oats, peanut butter, and honey more times than I can count. This version hits the sweet spot—it holds together perfectly without being greasy, and it has just enough sweetness to feel like a treat. It is comfort food that happens to be good for you. And honestly, that is the kind of recipe we all need in our back pocket.
What Ingredients You Will Need
This recipe uses simple, wholesome ingredients that work together to create a snack that is both satisfying and nourishing. You likely have most of these in your kitchen right now.
- Rolled oats, 1 cup (use certified gluten-free oats if needed)
- Creamy peanut butter, ½ cup (I prefer natural peanut butter with no added sugar—just peanuts and salt. Brands like Justin’s or Smucker’s Natural work great. If your peanut butter is very oily, stir it well before measuring.)
- Honey, ⅓ cup (or maple syrup for a vegan option)
- Mini chocolate chips, ¼ cup (I like Enjoy Life for a dairy-free option, or Guittard for a richer flavor)
- Ground flaxseed, 2 tablespoons (this helps bind the balls and adds a boost of omega-3s. You can skip it or substitute with chia seeds.)
- Vanilla extract, ½ teaspoon
- Pinch of sea salt (omit if your peanut butter is already salted)
That is it. Seven ingredients. No protein powder, no fancy add-ins, no trip to a specialty store. The beauty of this recipe is its simplicity. The oats provide fiber and chew, the peanut butter brings healthy fats and protein, the honey adds natural sweetness, and the chocolate chips are the little moment of joy in every bite.
If you want to get creative, you can swap the chocolate chips for dried cranberries, chopped nuts, or shredded coconut. I have also made these with almond butter and sunflower seed butter for school-safe options. Just keep in mind that different nut butters have different consistencies—almond butter tends to be runnier, so you may need to add a few extra oats to firm up the mixture.
Equipment Needed
You do not need a fancy kitchen to make these protein balls. In fact, the simpler, the better.
- Large mixing bowl – Any bowl will do, but a wider one makes it easier to mix everything together without spillage.
- Measuring cups and spoons – For accuracy. I have eyeballed this recipe before and ended up with a crumbly mess. Trust the measurements.
- Rubber spatula or wooden spoon – For the initial mixing. A spatula is great for scraping the sides of the bowl.
- Clean hands – This is the most important tool. You will need to get in there and mix with your hands to bring the dough together. It is a little messy, but it is the only way to get the right texture.
- Baking sheet or plate – To hold the rolled balls while they chill. Line it with parchment paper for easy cleanup.
- Small cookie scoop (optional) – If you want perfectly uniform balls, a 1-tablespoon scoop is a game-changer. I got mine for five dollars at a kitchen supply store, and it makes the process so much faster.
- Airtight container – For storage. A glass container with a tight-fitting lid works best.
That is really all you need. No food processor, no mixer, no special gadgets. I have made these in a tiny apartment kitchen and in a full-size kitchen, and the process is exactly the same.
Preparation Method
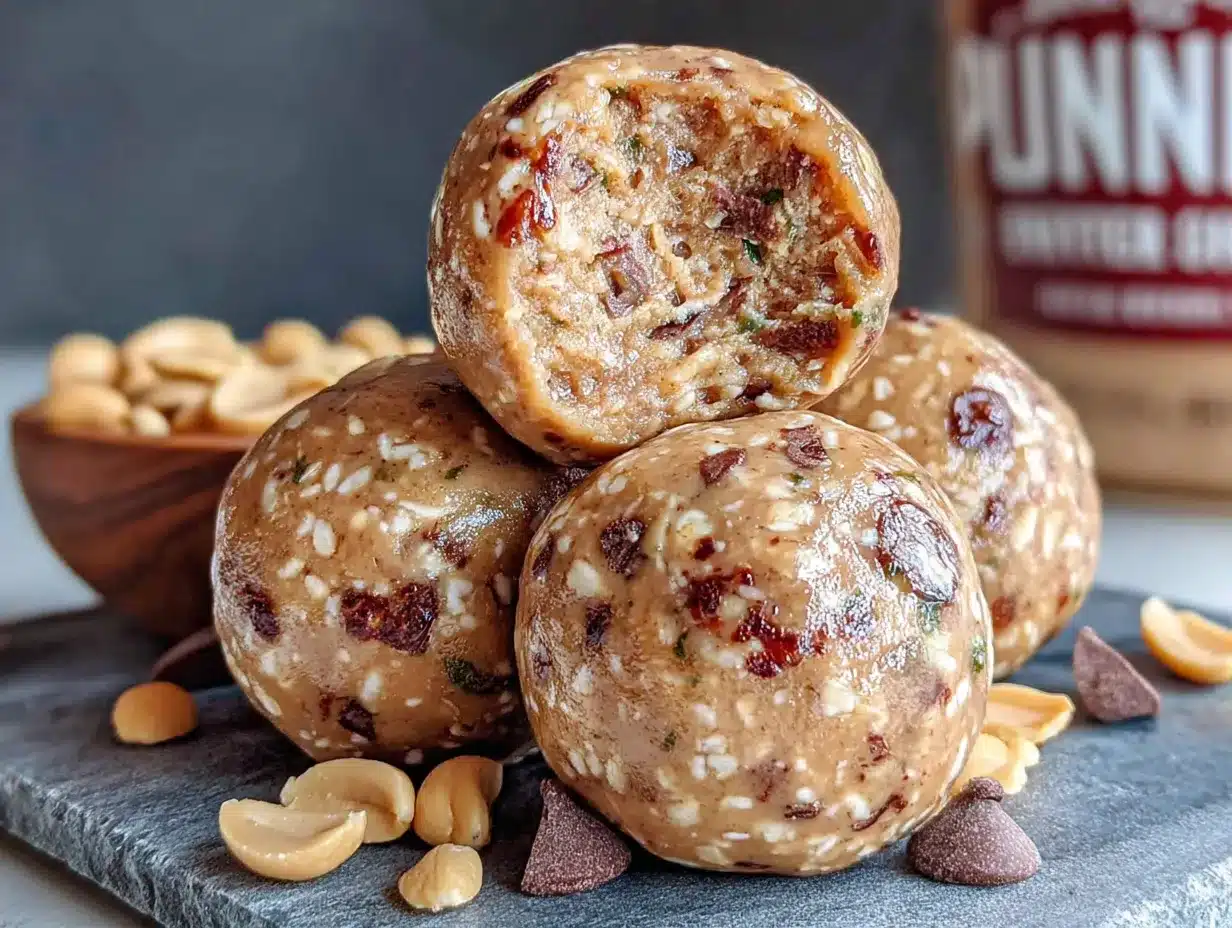
Follow these steps, and you will have a batch of protein balls ready in no time. I have included sensory cues and troubleshooting tips along the way, so you know exactly what to look for.
- Combine the dry ingredients. In a large mixing bowl, add the rolled oats, ground flaxseed, and a pinch of sea salt. Give them a quick stir with your spatula to distribute everything evenly. The oats should look uniform, with no clumps of flaxseed hiding anywhere.
- Add the wet ingredients. Spoon the peanut butter and honey into the bowl. Add the vanilla extract. At this point, the mixture will look messy and uneven—do not worry, that is normal. It should look like a chunky, sticky mess.
- Mix until combined. Start stirring with your spatula. The mixture will be thick and a little stubborn. Keep going until the oats are fully coated and the peanut butter and honey are evenly distributed. This takes about a minute of solid stirring. If you notice dry pockets of oats, keep mixing.
- Add the chocolate chips. Fold them in gently. You want them evenly dispersed throughout the dough, not all clumped together in one spot.
- Get your hands in there. This is the step that makes all the difference. Wash your hands thoroughly, then use your hands to squeeze and knead the mixture together. The heat from your hands will help the peanut butter soften slightly, making the dough easier to work with. You are looking for a texture that holds together when pressed—like a soft play dough. If the mixture is too dry and crumbly, add a teaspoon of honey or a splash of water. If it is too sticky, add a tablespoon of oats.
- Chill the dough (optional but recommended). If your kitchen is warm or your peanut butter was very runny, pop the bowl in the fridge for 15 minutes. This makes the dough firmer and easier to roll. I skip this step in the winter, but in the summer, it is a lifesaver.
- Roll into balls. Using your hands or a small cookie scoop, portion out about 1 tablespoon of dough. Roll it between your palms until it forms a smooth ball. Place each ball on your lined baking sheet. You should get about 16 to 18 balls, depending on how big you roll them.
- Chill to set. Place the baking sheet in the refrigerator for at least 30 minutes. This allows the balls to firm up and hold their shape. If you skip this step, they will be soft and a bit fragile—still delicious, but harder to grab and go.
One thing I learned the hard way: do not overmix. I once got distracted and kept stirring for way too long, and the oats started breaking down, making the mixture gummy. Mix just until everything is combined, then stop.
Cooking Tips & Techniques
I have made these protein balls more times than I can count, and I have definitely made my share of mistakes. Here is what I have learned so you do not have to repeat my errors.
The peanut butter matters more than you think. Natural peanut butter that separates—you know, the kind you have to stir—works beautifully, but only if you stir it really well. If you scoop from the top without stirring, you will get mostly oil, and your balls will be greasy and fall apart. Conversely, if you use a processed peanut butter like Jif or Skippy, the balls will be firmer and sweeter. Both work, but the texture will be slightly different. I prefer natural for a less sweet, more peanut-forward flavor.
Wet hands are your friend. If the dough starts sticking to your palms while you roll, lightly wet your hands with cold water. The moisture creates a barrier, and the dough will roll much more smoothly. This is a trick I picked up from making energy balls for years, and it works every time.
Do not skip the chill time. I know it is tempting to eat them right away—trust me, I have done it. But they are much better after at least 30 minutes in the fridge. The flavors meld together, the texture firms up, and the chocolate chips get that nice, slightly firm bite. They go from good to great with just a little patience.
Use a cookie scoop for consistency. If you want all your balls to be the same size (which helps with even chilling and portion control), a small cookie scoop is worth the investment. I got mine for a few dollars, and it makes the process so much faster. No more guessing if you are making them too big or too small.
Keep them cold. These protein balls are best stored in the refrigerator. At room temperature, they soften and can lose their shape, especially in warm weather. They are perfectly safe to eat at room temperature, but the texture is much better when they are cold.
Variations & Adaptations
One of the best things about this recipe is how easy it is to adapt. I have tried many variations over the years, and here are some of my favorites.
Vegan Version: Swap the honey for maple syrup or agave nectar. The texture will be slightly softer, so you may need to add an extra tablespoon of oats to compensate. Use dairy-free chocolate chips, and you have a fully vegan snack.
Nut-Free Version: Substitute the peanut butter with sunflower seed butter or WowButter. Be aware that sunflower seed butter can react with baking soda (if you ever use it in baked goods) and turn green, but in this no-bake recipe, it is perfectly fine. The flavor will be different, but still delicious.
Add-In Variations: The possibilities are endless. I have made versions with shredded coconut, chopped pecans, dried cherries, cacao nibs, and even a pinch of cinnamon. My personal favorite is adding a tablespoon of chia seeds for extra fiber and a little crunch. You can also swap the mini chocolate chips for white chocolate chips or butterscotch chips for a different flavor profile.
Higher Protein Version: If you want a bigger protein boost, add a scoop of your favorite protein powder. Start with 2 tablespoons and add more if needed. You will likely need to add an extra tablespoon of honey or a splash of milk to balance the dryness. Vanilla or chocolate protein powder works best.
Seasonal Twist: In the fall, I add a teaspoon of pumpkin pie spice and swap the chocolate chips for dried cranberries. In the summer, I use a tablespoon of lime zest and white chocolate chips for a bright, fresh flavor. It is a fun way to keep the recipe feeling new.
Serving & Storage Suggestions
These protein balls are best served cold, straight from the fridge. The texture is firm but chewy, and the chocolate chips have a satisfying snap. I like to eat them as a mid-morning snack or a post-workout refuel. They also make a great lunchbox addition for kids—just pack them with an ice pack to keep them cool.
For a pretty presentation, arrange the balls on a small platter or in a mason jar. They look great on a brunch table or at a party. You can also roll them in shredded coconut, cocoa powder, or crushed nuts for a decorative finish.
Storage: Keep the protein balls in an airtight container in the refrigerator for up to two weeks. I have stored them for three weeks, and they were still good, though the texture started to get a little dry around the edges. If you want to keep them longer, you can freeze them.
Freezing Instructions: Place the rolled balls on a baking sheet lined with parchment paper and freeze until solid, about 1 hour. Transfer them to a freezer-safe bag or container. They will keep for up to three months. To thaw, just move them to the refrigerator overnight, or let them sit at room temperature for 10 to 15 minutes. I love having a stash in the freezer for busy weeks—they are a lifesaver when you need a snack and have zero time.
Reheating: You do not need to reheat these, but if you like a softer texture, let them sit at room temperature for 5 to 10 minutes before eating. I would not recommend microwaving them, as it can melt the chocolate chips and make the balls too soft.
One note on flavor development: these actually get better after a day or two in the fridge. The oats soften slightly, the flavors meld together, and the texture becomes more cohesive. So if you can resist eating them all at once, you will be rewarded.
Nutritional Information & Benefits
These protein balls are a balanced snack that provides a good mix of carbohydrates, protein, and healthy fats. Here is the approximate nutritional breakdown per ball (based on 16 servings):
- Calories: 120
- Protein: 4 grams
- Fat: 6 grams
- Carbohydrates: 14 grams
- Fiber: 2 grams
- Sugar: 8 grams
The rolled oats provide slow-digesting carbohydrates for sustained energy, while the peanut butter offers healthy monounsaturated fats and plant-based protein. The ground flaxseed adds omega-3 fatty acids and extra fiber, which is great for digestion. Honey is a natural sweetener that contains antioxidants, and dark chocolate chips (if you choose a high-quality brand) are rich in flavonoids.
These are naturally dairy-free and can be made gluten-free by using certified gluten-free oats. They are also vegetarian and can be adapted to be vegan. The only potential allergen to note is peanuts, but as mentioned, you can easily swap in a seed butter for a nut-free version.
From a wellness perspective, I love that these are a treat that actually supports my energy levels. They do not cause a sugar crash, and they keep me full until my next meal. It is the kind of snack that makes you feel good about what you are eating—no guilt, just satisfaction.
Conclusion
These easy no-bake peanut butter protein balls are the kind of recipe that makes life a little easier. They are quick, simple, and genuinely delicious. I have made them for my own family, for friends, and for neighbors, and every single time, someone asks for the recipe. That is the mark of a keeper.
I hope you give them a try and make them your own. Add your favorite mix-ins, adjust the sweetness, or double the batch to keep in the freezer. There is no wrong way to make these. And if you come up with a variation I have not tried, I would love to hear about it. Drop a comment below and let me know how yours turned out. Did you add coconut? Did you use almond butter? Did your kids gobble them up? I want to hear it all.
Thank you for stopping by my little corner of the internet. Now go roll some protein balls—you deserve a snack that is both good for you and absolutely delicious. Happy snacking!
Frequently Asked Questions
Can I use old-fashioned oats instead of quick oats?
Yes, old-fashioned rolled oats work perfectly in this recipe. They provide a slightly chewier texture, which I actually prefer. Avoid using steel-cut oats, as they are too hard and will not soften enough.
My mixture is too dry and crumbly. What should I do?
This usually happens if your peanut butter is a bit thick or if you measured the oats generously. Add a teaspoon of honey or a splash of water or milk, then mix again. The dough should hold together when pressed between your fingers.
Can I make these without honey?
Absolutely. You can substitute the honey with maple syrup, agave nectar, or even brown rice syrup. Keep in mind that different liquid sweeteners have different consistencies, so you may need to adjust the oats slightly to get the right texture.
How long do these protein balls last?
Stored in an airtight container in the refrigerator, they will stay fresh for up to two weeks. You can also freeze them for up to three months. Just thaw them in the fridge overnight before eating.
Can I use a different nut butter?
Yes, you can use almond butter, cashew butter, or sunflower seed butter. Just be aware that different nut butters have different fat contents and consistencies. Almond butter is usually runnier, so you may need to add a bit more oats. Sunflower seed butter works well but has a stronger flavor.
PrintEasy No-Bake Peanut Butter Protein Balls: 5-Minute Healthy Snack
These easy no-bake peanut butter protein balls are the perfect healthy snack that comes together in just five minutes. Made with simple pantry ingredients like oats, peanut butter, honey, and chocolate chips, they taste like cookie dough but are packed with protein and fiber.
- Prep Time: 5 minutes
- Cook Time: 0 minutes
- Total Time: 35 minutes (includes 30 minutes chilling time)
- Yield: 16-18 servings 1x
- Category: Snack
- Cuisine: American
Ingredients
- 1 cup rolled oats (use certified gluten-free oats if needed)
- ½ cup creamy peanut butter (natural preferred, like Justin’s or Smucker’s Natural)
- ⅓ cup honey (or maple syrup for vegan option)
- ¼ cup mini chocolate chips (Enjoy Life for dairy-free, or Guittard for richer flavor)
- 2 tablespoons ground flaxseed (or substitute with chia seeds)
- ½ teaspoon vanilla extract
- Pinch of sea salt (omit if peanut butter is salted)
Instructions
- Combine the dry ingredients: In a large mixing bowl, add the rolled oats, ground flaxseed, and a pinch of sea salt. Stir with a spatula to distribute evenly.
- Add the wet ingredients: Spoon the peanut butter and honey into the bowl. Add the vanilla extract. The mixture will look messy and uneven—this is normal.
- Mix until combined: Stir with a spatula until the oats are fully coated and the peanut butter and honey are evenly distributed, about 1 minute. If you notice dry pockets of oats, keep mixing.
- Add the chocolate chips: Fold them in gently until evenly dispersed throughout the dough.
- Get your hands in there: Wash your hands thoroughly, then use your hands to squeeze and knead the mixture together. The heat from your hands will help the peanut butter soften slightly. The texture should hold together when pressed—like soft play dough. If too dry, add a teaspoon of honey or a splash of water. If too sticky, add a tablespoon of oats.
- Chill the dough (optional but recommended): If your kitchen is warm or your peanut butter is runny, refrigerate the bowl for 15 minutes to make the dough firmer and easier to roll.
- Roll into balls: Using your hands or a small cookie scoop, portion out about 1 tablespoon of dough. Roll between your palms to form smooth balls. Place each ball on a parchment-lined baking sheet. You should get about 16 to 18 balls.
- Chill to set: Place the baking sheet in the refrigerator for at least 30 minutes to allow the balls to firm up and hold their shape.
Notes
For best results, use natural peanut butter that has been stirred well. If the dough is too sticky, wet your hands with cold water before rolling. These protein balls are best stored in the refrigerator and actually improve in flavor after a day or two. They can be frozen for up to three months. For a vegan version, substitute honey with maple syrup and use dairy-free chocolate chips. For a nut-free version, use sunflower seed butter.
Nutrition
- Serving Size: 1 ball
- Calories: 120
- Sugar: 8
- Sodium: 50
- Fat: 6
- Saturated Fat: 1.5
- Carbohydrates: 14
- Fiber: 2
- Protein: 4
Keywords: no-bake protein balls, peanut butter protein balls, healthy snack, energy balls, 5-minute snack, gluten-free snack, dairy-free snack, kid-friendly snack


