Love this? Save it for later!
Share the inspiration with your friends
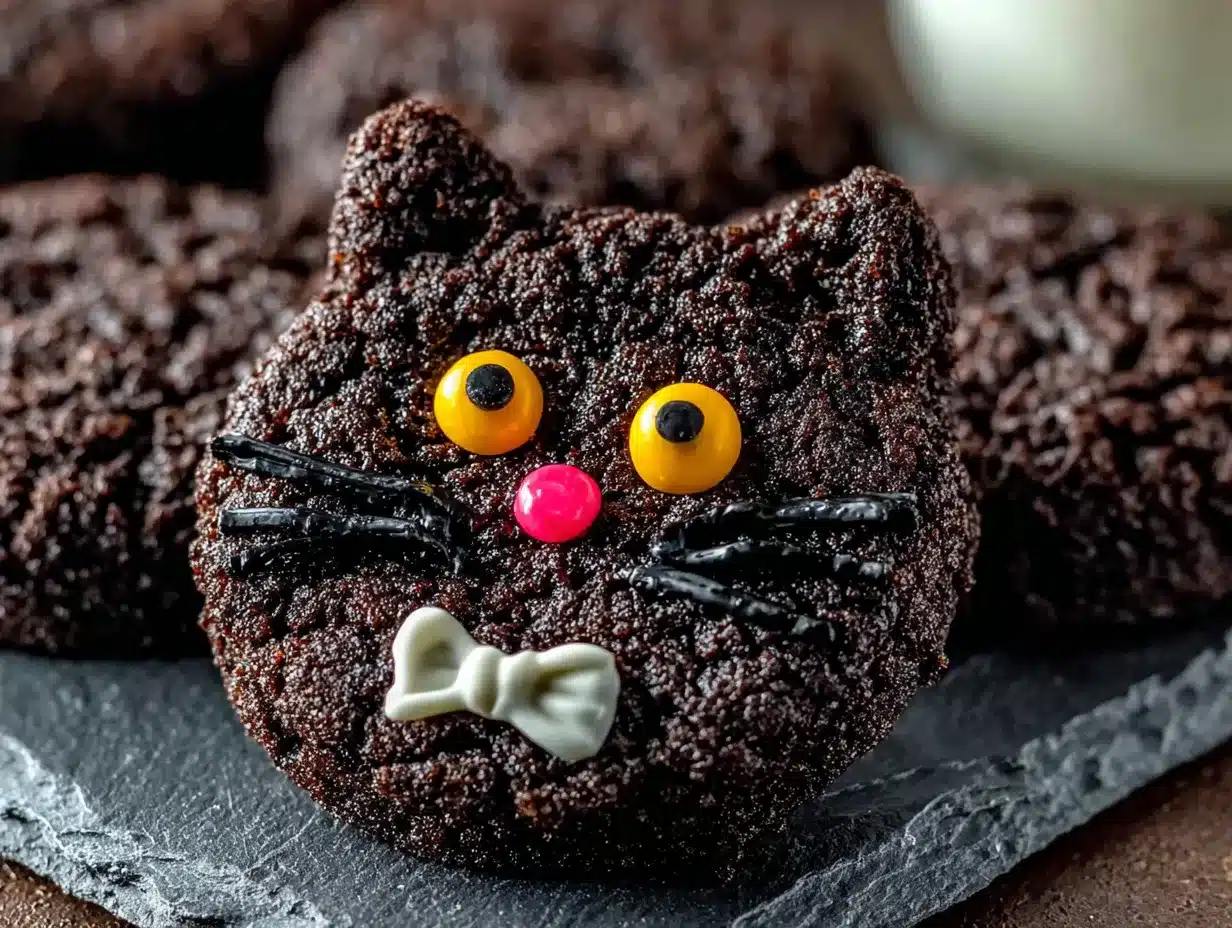
This was supposed to be a batch of simple iced sugar cookies for a Halloween party. I had the royal icing ready, the sprinkles laid out, and a very specific vision of perfectly decorated ghosts and pumpkins. But somewhere between the flour cloud and my third cup of coffee, things went sideways. I grabbed the black food coloring instead of the regular gel, the kitchen timer died mid-bake, and I was already running late because I’d promised to bring three dozen cookies. What came out of the oven was nothing like the plan—a tray of slightly overbaked, pitch-black cat silhouettes that looked like they’d wandered in from a gothic fairy tale. And honestly? They were better. Everyone at that party ignored the carefully iced ghosts and fought over the black cats. I mean, there’s something about a cookie that looks like it might hiss at you that just works for Halloween. Maybe you’ve been there—the moment when a kitchen disaster turns into your new favorite thing. That’s how this recipe for Classic Black Cat Sugar Cookies was born, and I’ve been making them every October since.
Why You’ll Love This Recipe
These aren’t just another sugar cookie. After testing this recipe about seven times (and ruining a perfectly good batch by forgetting the vanilla), I can tell you this version is the one. It’s the kind of cookie that makes people stop mid-conversation and just stare at the plate.
- Quick & Easy: From start to finish, you’re looking at about 45 minutes. The dough comes together in one bowl, and there’s no chilling required if you’re in a hurry.
- Simple Ingredients: No fancy extracts or specialty flours here. You probably have everything but the black food coloring in your pantry right now.
- Perfect for Halloween: These cookies are the star of any spooky gathering. Kids love them, adults sneak them, and they look incredible on a dessert table.
- Crowd-Pleaser: I’ve brought these to three different Halloween parties, and they’ve disappeared every single time. Even people who say they don’t like sugar cookies go back for seconds.
- Unbelievably Delicious: The texture is that perfect balance—crispy edges with a soft, buttery center. And the black color? It’s not just for show. The cocoa powder in the dough adds a subtle richness that makes these cookies taste more grown-up than your average sugar cookie.
What makes this recipe different is the trick of adding a tiny bit of cocoa powder to the dough. It deepens the black color naturally and gives the cookies a warmth that plain sugar cookies just don’t have. This isn’t just another Halloween cookie—it’s the one that makes you close your eyes after the first bite and forget about the mess in your kitchen.
What Ingredients You Will Need
This recipe uses simple, everyday ingredients to create cookies that look spooky but taste like pure comfort. Most of these are probably already in your kitchen, which makes this the perfect last-minute Halloween treat.
- Unsalted butter, softened (1 cup / 2 sticks) – Make sure it’s truly soft, not melted. Room temperature butter creams better and gives you a lighter cookie.
- Granulated sugar (1 cup / 200g) – Regular white sugar works best here. Don’t substitute with brown sugar, as it will change the color and texture.
- Large egg (1, room temperature) – Cold eggs can seize the butter mixture, so let yours sit out for 15 minutes before starting.
- Vanilla extract (1 teaspoon) – Use pure vanilla if you can. It makes a difference in the flavor depth.
- All-purpose flour (2 ½ cups / 312g) – Spoon and level your flour for the most accurate measurement. Scooping directly can pack in too much flour and make dry cookies.
- Unsweetened cocoa powder (2 tablespoons / 10g) – This is the secret ingredient. It deepens the black color without making the cookies taste like chocolate. I prefer Hershey’s or Ghirardelli for consistent results.
- Baking powder (½ teaspoon) – Make sure it’s fresh. Old baking powder won’t give you the right lift.
- Salt (¼ teaspoon) – Fine sea salt is best. It balances the sweetness without being noticeable.
- Black gel food coloring (1-2 teaspoons) – Gel coloring is crucial here. Liquid food coloring won’t give you that deep, true black. I recommend Americolor Super Black or Wilton Color Right Black.
- Powdered sugar (1 ½ cups / 180g) – For the simple glaze that brings the cat faces to life.
- Milk (2-3 tablespoons) – Whole milk works best, but any kind will do. Add it slowly until you get the right glaze consistency.
- Candy eyes (optional, for decoration) – Those little white circles with black pupils. You can find them at any craft store or online.
Ingredient swap tip: If you’re out of cocoa powder, you can omit it, but your black color might lean more toward dark gray. For a dairy-free version, use vegan butter and plant-based milk in the glaze. The texture will be slightly different, but still delicious.
Equipment Needed
You don’t need a professional bakery setup for these cookies. Here’s what you’ll actually use:
- Electric mixer (hand or stand) – A hand mixer works perfectly. I’ve made these with a whisk and some elbow grease too, but it takes longer.
- Large mixing bowl – Glass or metal is fine. Just make sure it’s big enough to hold everything without flour flying everywhere.
- Cat-shaped cookie cutter – This is non-negotiable for the shape. You can find them at craft stores or online. I got mine at a dollar store, honestly.
- Baking sheets (2) – Light-colored sheets work best. Dark sheets can over-brown the bottoms.
- Parchment paper or silicone baking mat – Parchment paper is cheaper and works just as well. Silicone mats are reusable and non-stick.
- Rolling pin – A regular rolling pin is fine. If you don’t have one, a wine bottle works in a pinch (I’ve done it).
- Cooling rack – Essential for getting that crisp edge. If you don’t have one, let the cookies cool on the baking sheet for a few extra minutes.
- Small piping bag or zip-top bag – For the glaze. A zip-top bag with a tiny corner snipped off works perfectly and costs nothing.
Budget tip: Don’t spend money on fancy equipment. A hand mixer from a thrift store, a dollar-store cookie cutter, and a zip-top bag for piping will get you exactly the same result as expensive tools.
Preparation Method
- Cream the butter and sugar. In your mixing bowl, beat the softened butter and granulated sugar together on medium speed until light and fluffy. This takes about 3-4 minutes. Scrape down the sides of the bowl once halfway through. You’re looking for a pale, airy mixture that looks like soft sand.
- Add the egg and vanilla. Crack in the room-temperature egg and pour in the vanilla extract. Beat on low until just combined. Don’t overmix here, or you’ll incorporate too much air and the cookies might puff up unevenly.
- Mix the dry ingredients separately. In a separate bowl, whisk together the flour, cocoa powder, baking powder, and salt. This ensures the cocoa powder is evenly distributed and you don’t get patches of dark color.
- Combine wet and dry. Gradually add the dry mixture to the wet mixture, mixing on low speed. Stop as soon as the dough comes together. If you see a few streaks of flour, that’s okay. Overmixing at this stage develops gluten and makes tough cookies.
- Add the black food coloring. Squeeze in about 1 teaspoon of black gel food coloring. Mix on low until the color is evenly distributed. The dough will look like dark gray at first. Add more coloring, ½ teaspoon at a time, until you reach a deep, true black. I usually end up using about 2 teaspoons total. The cocoa powder helps here—it gives the color something to grab onto.
- Preheat the oven. Set your oven to 350°F (175°C). Line your baking sheets with parchment paper or silicone mats.
- Roll out the dough. Lightly flour your work surface and rolling pin. Roll the dough to about ¼-inch thickness. If the dough feels sticky, dust with a tiny bit more flour. If it’s cracking at the edges, it’s too dry—knead it gently with your hands to warm it up.
- Cut out the cat shapes. Press your cat-shaped cookie cutter firmly into the dough. Give it a little wiggle to release the edges, then lift straight up. Transfer the cut cookies to your prepared baking sheets, spacing them about 2 inches apart. They don’t spread much, so you can fit about 8-10 per sheet.
- Bake. Bake for 8-10 minutes. At 8 minutes, the edges should be just barely set and the centers will still look slightly soft. At 10 minutes, the edges will be golden brown (hard to see on black cookies, I know) and the cookies will be fully set. I prefer 9 minutes for that perfect chewy center. The cookies will continue to firm up as they cool on the sheet.
- Cool completely. Let the cookies cool on the baking sheet for 5 minutes, then transfer them to a wire rack to cool completely. Don’t try to glaze them while they’re warm—the glaze will melt and run off.
- Make the glaze. In a small bowl, whisk together the powdered sugar and milk. Start with 2 tablespoons of milk and add more, ½ teaspoon at a time, until you get a thick but pourable consistency. It should flow like honey—not too runny, not too stiff.
- Decorate the cat faces. Transfer the glaze to a small piping bag or zip-top bag with a tiny corner snipped off. Pipe simple cat faces on each cookie: two small triangles for ears, two dots for eyes, a tiny triangle for a nose, and a little curved line for a mouth. If you’re using candy eyes, press them into the wet glaze gently. Let the glaze set for about 30 minutes before serving.
Cooking Tips & Techniques
I’ve made more batches of these cookies than I care to count, and I’ve learned a few things the hard way. Let me save you some trouble.
Don’t skip the cocoa powder. I tried making these without it once, thinking the black food coloring would do all the work. It didn’t. The cookies came out a weird grayish-green color that looked more like swamp monster than black cat. The cocoa powder gives the color a warm, deep base that the food coloring can build on.
Watch your baking time like a hawk. Black cookies are notoriously hard to judge for doneness because you can’t see the golden edges. I learned this the hard way when I pulled out a batch that looked perfect but was actually rock hard. Set a timer for 8 minutes, check them, and add time in 1-minute increments. The cookies should look set at the edges and slightly soft in the center.
Chill the dough if you have time. While this recipe works without chilling, 30 minutes in the fridge makes the dough easier to handle and helps the cookies hold their shape better. The edges come out cleaner, and the cat shapes look more defined. If you’re in a rush, skip it—the cookies will still taste great, just a little less sharp in the details.
Use a light touch with the rolling pin. Pressing too hard can make the dough uneven, leading to cookies that bake at different rates. Roll gently and check the thickness with your fingers. Aim for an even ¼-inch all around.
Don’t overmix the glaze. Whisk just until the powdered sugar is dissolved and the glaze is smooth. Overmixing can incorporate air bubbles that show up on your cookies as tiny holes. If you do get bubbles, let the glaze sit for 5 minutes before piping.
Variations & Adaptations
One of the best things about this recipe is how easy it is to change up. Here are a few ways I’ve adapted it over the years:
Gluten-Free Version: Swap the all-purpose flour with a 1:1 gluten-free baking flour blend. I’ve used Bob’s Red Mill and King Arthur brands with good results. The texture will be slightly more crumbly, so handle the dough gently. Add an extra tablespoon of milk to the dough if it seems too dry.
Spooky Spider Variation: Instead of cat faces, use the glaze to pipe spiderwebs on the cookies. Just pipe concentric circles and drag a toothpick from the center outward to create the web pattern. Add a candy spider on top. I made these for a Halloween party last year, and they were a huge hit with the kids.
Chocolate Lover’s Twist: Add ¼ cup of mini chocolate chips to the dough before rolling. The little pockets of melted chocolate are a nice surprise, and they don’t affect the black color. I tried this on a whim one rainy afternoon, and it’s now my favorite variation.
Vegan Adaptation: Use vegan butter (I like Earth Balance) and a flax egg (1 tablespoon ground flaxseed mixed with 3 tablespoons water, let sit for 5 minutes). The cookies will be slightly less tender, but still delicious. Use plant-based milk in the glaze.
Spiced Halloween Cat: Add ½ teaspoon of cinnamon and ¼ teaspoon of nutmeg to the dry ingredients. The warm spices complement the cocoa powder and give the cookies a subtle fall flavor. This is perfect for Thanksgiving or autumn gatherings.
Serving & Storage Suggestions
These cookies are best served at room temperature, which lets the glaze set properly and the texture shine. Arrange them on a black or orange platter for maximum Halloween effect. I like to stack them in a pyramid or arrange them in a circle around a small pumpkin centerpiece.
They pair beautifully with a glass of cold milk, a warm cup of apple cider, or a cozy chai latte. For a Halloween party spread, serve them alongside spiderweb dip or pumpkin spice bark for a dessert table that looks straight out of a magazine.
Storage: Keep the cookies in an airtight container at room temperature for up to 5 days. Place a sheet of parchment paper between layers to prevent the glaze from sticking. Don’t refrigerate them—the cold can make the cookies dry out and the glaze might crack.
Freezing: You can freeze the baked, unglazed cookies for up to 3 months. Wrap them tightly in plastic wrap and then foil. When you’re ready to serve, thaw at room temperature for about 30 minutes, then glaze and decorate. The glaze doesn’t freeze well, so always add it fresh.
Reheating: If you want that just-baked warmth, pop a cookie in the microwave for 5-7 seconds. Don’t go longer, or the glaze will melt. The edges will crisp up slightly, and the center will be soft and warm.
The flavors actually deepen after a day or two. The cocoa powder and vanilla meld together, and the cookies become more tender. I honestly think they taste better on day two than day one.
Nutritional Information & Benefits
Let’s be real—these are cookies, not health food. But they’re made with real ingredients, and that counts for something. Here’s the estimated breakdown per cookie (based on 24 cookies):
- Calories: 145
- Total Fat: 6g
- Saturated Fat: 3.5g
- Carbohydrates: 22g
- Sugar: 12g
- Protein: 2g
- Fiber: 0.5g
The cocoa powder in these cookies provides a small amount of antioxidants, including flavonoids that can support heart health. The butter gives you a little vitamin A, and the egg adds a touch of protein. But honestly, this is a treat—something to enjoy in moderation as part of a balanced diet.
If you’re watching your sugar intake, you can reduce the granulated sugar to ¾ cup. The cookies will be slightly less sweet and a bit more crumbly, but still delicious. For a lower-fat option, substitute half the butter with unsweetened applesauce. The texture will be more cake-like, but the flavor will still be there.
These cookies are not gluten-free, vegan, or dairy-free in their standard form, but the adaptations I shared above make them accessible for most dietary needs.
Conclusion
These Classic Black Cat Sugar Cookies have become my go-to Halloween treat, and I think they’ll become yours too. They’re simple enough for a last-minute party, but impressive enough to make people think you spent hours on them. The best part? That happy accident story—the batch that went wrong and turned into something I now look forward to making every year.
I love how these cookies bring people together. There’s something about a tray of black cats that makes everyone smile, from the littlest trick-or-treaters to the adults who claim they’re too old for Halloween. They’re a reminder that the best recipes often come from the messiest moments.
I’d love to hear how yours turn out. Did you try a different variation? Did your kids help decorate? Did you find a way to make them your own? Drop a comment below and share your Halloween cookie story. And if you’re looking for more spooky treats, check out these mummy meatball bites or this witches’ brew punch for a full Halloween spread. Happy baking, and may your kitchen be full of happy accidents.
Frequently Asked Questions
Can I use liquid food coloring instead of gel?
You can, but I wouldn’t recommend it. Liquid food coloring adds extra moisture to the dough, which can make the cookies spread too much and become thin and crispy. You’d also need a lot more liquid coloring to achieve a true black, which could affect the texture and flavor. Gel food coloring is concentrated, so you use less and get better results. It’s worth the small investment.
Why did my cookies turn out gray instead of black?
This usually happens when the food coloring isn’t mixed thoroughly or when you don’t use enough. Make sure you’re mixing the dough until the color is completely uniform. Also, check that your cocoa powder is unsweetened and not Dutch-processed, as Dutch-processed cocoa has a different pH that can affect the color. If your dough still looks gray after mixing, add more black gel coloring, ½ teaspoon at a time, until it reaches the desired shade.
Can I freeze the dough for later?
Absolutely. Shape the dough into a disc, wrap it tightly in plastic wrap, and place it in a freezer-safe bag. It will keep for up to 3 months. When you’re ready to bake, thaw the dough in the refrigerator overnight, then roll, cut, and bake as directed. The cookies might spread slightly more after freezing, so you can add an extra tablespoon of flour to the dough before freezing to compensate.
How do I prevent the cookies from spreading too much?
If your cookies are spreading into blobs instead of keeping their cat shape, the dough might be too warm. Pop it in the refrigerator for 20-30 minutes before rolling and cutting. Also, make sure your butter is softened but not melted. If the butter is too soft, the cookies will spread more. Finally, check that your baking powder is fresh—old baking powder can lose its leavening power and cause spreading.
Can I make these cookies ahead of time for a party?
Yes, and I actually recommend it. Bake the cookies up to 3 days in advance and store them in an airtight container at room temperature. Glaze and decorate them the day of your party for the freshest look. The glaze can be made a day ahead and stored in the refrigerator—just whisk it well before using. If you’re really pressed for time, you can glaze them up to 2 days ahead, but the cookies might absorb some moisture from the glaze and become slightly softer.
Pin This Recipe!

Classic Black Cat Sugar Cookies – Easy Halloween Treat Recipe

These black cat sugar cookies are a happy accident turned Halloween tradition. With a subtle cocoa richness and a perfect balance of crispy edges and soft centers, they’re the star of any spooky gathering.
- Prep Time: 15 minutes
- Cook Time: 9 minutes
- Total Time: 45 minutes
- Yield: 24 cookies 1x
- Category: Dessert
- Cuisine: American
Ingredients
- 1 cup (2 sticks) unsalted butter, softened
- 1 cup (200g) granulated sugar
- 1 large egg, room temperature
- 1 teaspoon vanilla extract
- 2 ½ cups (312g) all-purpose flour
- 2 tablespoons (10g) unsweetened cocoa powder
- ½ teaspoon baking powder
- ¼ teaspoon fine sea salt
- 1–2 teaspoons black gel food coloring
- 1 ½ cups (180g) powdered sugar
- 2–3 tablespoons whole milk
- Candy eyes (optional, for decoration)
Instructions
- Cream the butter and sugar. In your mixing bowl, beat the softened butter and granulated sugar together on medium speed until light and fluffy, about 3-4 minutes. Scrape down the sides of the bowl once halfway through.
- Add the egg and vanilla. Crack in the room-temperature egg and pour in the vanilla extract. Beat on low until just combined. Don’t overmix.
- Mix the dry ingredients separately. In a separate bowl, whisk together the flour, cocoa powder, baking powder, and salt.
- Combine wet and dry. Gradually add the dry mixture to the wet mixture, mixing on low speed. Stop as soon as the dough comes together.
- Add the black food coloring. Squeeze in about 1 teaspoon of black gel food coloring. Mix on low until evenly distributed. Add more coloring, ½ teaspoon at a time, until you reach a deep, true black (about 2 teaspoons total).
- Preheat the oven to 350°F (175°C). Line your baking sheets with parchment paper or silicone mats.
- Roll out the dough. Lightly flour your work surface and rolling pin. Roll the dough to about ¼-inch thickness.
- Cut out the cat shapes. Press your cat-shaped cookie cutter firmly into the dough. Transfer the cut cookies to your prepared baking sheets, spacing them about 2 inches apart.
- Bake for 8-10 minutes. At 8 minutes, the edges should be just barely set and the centers will still look slightly soft. At 10 minutes, the edges will be golden brown and the cookies will be fully set. I prefer 9 minutes for that perfect chewy center.
- Cool completely. Let the cookies cool on the baking sheet for 5 minutes, then transfer them to a wire rack to cool completely.
- Make the glaze. In a small bowl, whisk together the powdered sugar and milk. Start with 2 tablespoons of milk and add more, ½ teaspoon at a time, until you get a thick but pourable consistency.
- Decorate the cat faces. Transfer the glaze to a small piping bag or zip-top bag with a tiny corner snipped off. Pipe simple cat faces on each cookie: two small triangles for ears, two dots for eyes, a tiny triangle for a nose, and a little curved line for a mouth. If you’re using candy eyes, press them into the wet glaze gently. Let the glaze set for about 30 minutes before serving.
Notes
Don’t skip the cocoa powder—it deepens the black color naturally. Watch baking time carefully since black cookies are hard to judge for doneness. Chill the dough for 30 minutes if you have time for cleaner edges. Use a light touch with the rolling pin for even thickness. Don’t overmix the glaze to avoid air bubbles.
Nutrition
- Serving Size: 1 cookie
- Calories: 145
- Sugar: 12
- Sodium: 50
- Fat: 6
- Saturated Fat: 3.5
- Carbohydrates: 22
- Fiber: 0.5
- Protein: 2
Keywords: Halloween cookies, black cat cookies, sugar cookies, easy Halloween treats, spooky cookies


