Love this? Save it for later!
Share the inspiration with your friends
The neighborhood Halloween block party was in six hours and I’d completely forgotten about the cookie contest. Everyone else would be bringing those elaborate, multi-layered bakery creations that look like they belong on a magazine cover. My friend Jen had spent three days on her haunted gingerbread mansion—I’d seen the photos on Instagram. I had a stick of butter, some powdered sugar, and about an hour of daylight left.
Let me tell you, there’s nothing quite like the panic of staring into your pantry while mentally calculating if you can pass off store-bought cookies as homemade. I was this close to giving up and just bringing a bag of chips when my eyes landed on a black food coloring bottle I’d bought for a failed galaxy cake experiment months ago. And that’s when the idea hit me—black cats.
Now, I’m not the most artistic person. My pipe dreams (pun intended) usually end up looking like abstract blobs. But these cookies? They came together in a way that genuinely surprised me. I finished decorating the last one with about fifteen minutes to spare, threw on a costume that was really just a witch hat and my regular clothes, and rushed over.
You know that awkward moment when you’re the last one to arrive and everyone’s already oohing and aahing over the elaborate entries? Yeah, that was me. I plopped my tray of black cat cookies on the table next to Jen’s gingerbread mansion, feeling like I’d brought a crayon drawing to an art gallery. But here’s the thing—by the end of the night, my tray was empty. Completely empty. Jen actually asked me for the recipe, and she’s the one who spends weekends on complicated French pastries.
Maybe you’ve been in a similar spot—wanting to participate in the fun but not having the time or energy for a multi-day project. These adorable black cat Halloween sugar cookies became my go-to for exactly that reason. They’re simple enough that you can make them in thirty minutes flat, but cute enough that people genuinely think you put in way more effort than you did. Honestly, I haven’t kept that secret very well, but I’m okay with that.
Why You’ll Love This Recipe
I’ve tested this recipe more times than I’d like to admit—through burnt edges, frosting disasters, and one particularly memorable incident where my cat actually sat on a cooling cookie. Through all those trials, I can confidently say these are the easiest, most reliable Halloween cookies you’ll ever make.
- Quick & Easy: From start to finish, you’re looking at about 30 minutes. No chilling dough, no complicated techniques—just mix, roll, bake, and decorate.
- Simple Ingredients: You probably have most of these in your kitchen right now. The only special item is black food coloring, and you can find that at any grocery store.
- Perfect for Halloween: Whether it’s a school party, office gathering, or just a fun activity with kids, these cookies fit every spooky occasion.
- Crowd-Pleaser: I’ve made these for three different Halloween events now, and they always disappear first. Kids especially love the cute cat faces.
- Unbelievably Delicious: The sugar cookie base is soft, buttery, and perfectly sweet—the kind that makes you reach for just one more.
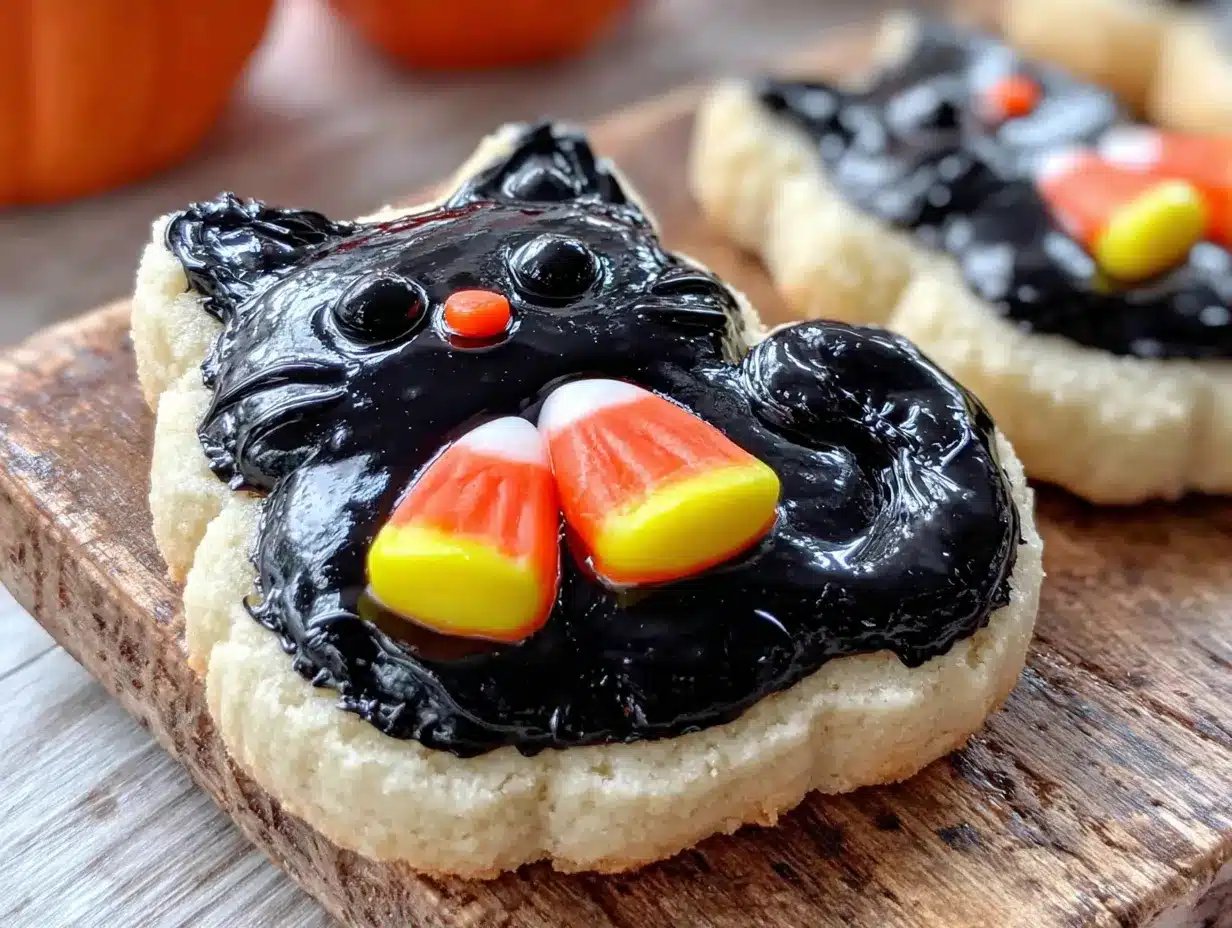
What makes these different from every other Halloween cookie recipe out there? It’s the frosting technique. Instead of trying to pipe perfect cat shapes (which I failed at spectacularly the first time), you’ll use a simple flooding method that creates smooth, glossy black cats every single time. No artistic talent required—I promise.
These cookies aren’t just good—they’re the kind that make you smile when you see them on the plate. There’s something about those little black cat faces with their perky ears and tiny whiskers that just feels like Halloween. It’s comfort food with a spooky twist, and honestly, that’s the best kind of holiday baking.
What Ingredients You Will Need
This recipe uses simple, everyday ingredients to create cookies that taste like they came from a fancy bakery. No weird specialty items, no hard-to-find extracts—just honest, good baking ingredients that work together perfectly.
For the Sugar Cookies
- 2 ½ cups all-purpose flour (spooned and leveled—don’t scoop straight from the bag or you’ll get too much)
- 1 cup unsalted butter, softened to room temperature (I prefer Kerrygold for the richest flavor)
- 1 cup granulated sugar
- 1 large egg, room temperature
- 1 teaspoon vanilla extract (use pure, not imitation, if you can)
- ½ teaspoon baking powder
- ¼ teaspoon salt
For the Black Frosting
- 2 cups powdered sugar, sifted (sifting prevents lumps—trust me on this one)
- 3-4 tablespoons milk (whole milk works best, but any kind will do)
- 1 teaspoon vanilla extract
- Black gel food coloring (I use Wilton brand—liquid coloring won’t give you that deep, true black)
For the Cat Faces
- White candy melts or white frosting (for eyes and whiskers)
- Pink candy melts or pink frosting (for little noses—optional but adorable)
- Black sprinkles or edible glitter (for extra sparkle, if you’re feeling fancy)
A note on the food coloring: regular liquid food coloring will give you a grayish-purple color that looks more like a bruised cat than a sleek black one. Gel food coloring is where it’s at. It’s more concentrated, so you use less, and it gives that deep, rich black that makes these cookies look professional. You can find it in the baking aisle at most grocery stores or online.
If you’re making these with kids, you might want to have extra powdered sugar on hand. The first time I made these with my niece, we went through three batches of frosting because she kept “taste-testing” it. No judgment here.
Equipment Needed
You don’t need a fancy kitchen to make these cookies. Here’s what you’ll need:
- Mixing bowls (one large, one medium)
- Electric mixer (handheld or stand mixer—I’ve used both and they work equally well)
- Rolling pin (if you don’t have one, a wine bottle works in a pinch—I’ve done it)
- Cat-shaped cookie cutter (I found mine at a craft store for $3, but you can also use a round cutter and add ears by hand)
- Baking sheets (lined with parchment paper or silicone mats)
- Cooling rack
- Piping bags or zip-top bags (for the frosting)
- Small offset spatula (helps with smooth frosting application)
If you don’t have a cat-shaped cookie cutter, don’t worry. You can easily cut out circles and pinch the top to form ears. They won’t be perfect, but honestly, imperfect cats have more personality. My very first batch looked like lumpy potatoes with ears, and they still got eaten.
For the piping bags, I just use zip-top bags with a tiny corner snipped off. It’s budget-friendly and works perfectly. No need to buy fancy decorating tips unless you really want to.
Preparation Method
Step 1: Make the Cookie Dough
In a large mixing bowl, cream together the softened butter and granulated sugar until light and fluffy—about 2-3 minutes with an electric mixer. You want it to look pale and feel airy. Add the egg and vanilla extract, then beat until well combined. The mixture might look a little separated at this point, but that’s normal.
In a separate bowl, whisk together the flour, baking powder, and salt. Gradually add the dry ingredients to the wet mixture, mixing on low speed until a soft dough forms. Don’t overmix—stop as soon as you don’t see any more streaks of flour. Overmixing makes tough cookies, and nobody wants that.
Step 2: Roll and Cut
Lightly flour your work surface and rolling pin. Roll the dough out to about ¼-inch thickness. If the dough feels too sticky, dust it with a little more flour. If it’s too dry, add a teaspoon of milk. Dough is forgiving—it’ll let you know what it needs.
Press your cat-shaped cookie cutter firmly into the dough and lift straight up. Place the cut cookies onto your prepared baking sheets, spacing them about 2 inches apart. They’ll spread a little, but not much. Gather the scraps, re-roll, and keep cutting until you’ve used all the dough. I usually get about 24 cookies, depending on the size of my cutter.
Step 3: Bake
Preheat your oven to 350°F (175°C). Bake the cookies for 8-10 minutes, or until the edges are just barely golden. The centers should still look soft and slightly underdone—they’ll continue cooking on the hot baking sheet after you pull them out.
Here’s a tip I learned the hard way: let the cookies cool on the baking sheet for 5 minutes before transferring them to a wire rack. If you move them too soon, they’ll crumble. If you wait too long, they’ll stick. Five minutes is the sweet spot.
Step 4: Make the Frosting
While the cookies cool, make your frosting. In a medium bowl, whisk together the sifted powdered sugar, 3 tablespoons of milk, and vanilla extract. Start with less milk and add more until you get a smooth, spreadable consistency. You want it thick enough to hold its shape but thin enough to spread easily.
Add the black gel food coloring one drop at a time, stirring well after each addition. It will look gray at first—don’t panic. Keep adding until you get that deep, true black. I usually use about 10-12 drops, but it depends on the brand.
Step 5: Decorate the Cats
Once the cookies are completely cool (this is important—warm cookies will melt your frosting), it’s time to decorate. Spoon the black frosting into a piping bag or zip-top bag and snip off a tiny corner. Pipe an outline around each cookie, then fill in the center with more frosting. Use your offset spatula to spread it smooth.
While the frosting is still wet, add the eyes and nose. For the eyes, I use two small dots of white frosting or place a white candy melt on each side. For the nose, a tiny pink dot in the center of the face. Then, using a toothpick or the tip of a knife, draw three tiny whiskers on each side of the face.
Let the frosting set for about 15-20 minutes before serving or storing. If you’re in a hurry (and let’s face it, who isn’t during Halloween season?), pop them in the fridge for 5 minutes.
Cooking Tips & Techniques
I’ve made enough mistakes with these cookies to fill a small book. Let me save you some trouble.
Don’t skip the chilling step. I know I said this recipe doesn’t require chilling, but if your kitchen is warm or your dough feels sticky, pop it in the fridge for 15 minutes. It makes cutting so much easier. I once made the mistake of trying to cut warm dough and ended up with cat-shaped blobs that looked more like deformed potatoes.
Use a light hand with the flour. When rolling out your dough, use just enough flour to prevent sticking. Too much flour makes dry, crumbly cookies that don’t hold their shape. I learned this after a batch that literally fell apart when I tried to pick them up.
Watch the oven like a hawk. Sugar cookies go from perfectly baked to burnt in about 30 seconds. Set a timer for 8 minutes and check them. If they’re not golden around the edges, give them another minute. Every oven runs differently—mine runs hot, so I always check early.
Patience with the frosting. The first time I made black frosting, I added too much liquid and ended up with a runny mess that dripped off the cookies. Start with less milk than you think you need. You can always add more, but you can’t take it out.
Practice your cat faces. My first few cookies looked like they had a serious allergic reaction—swollen eyes, crooked whiskers, missing noses. But here’s the thing: kids don’t care. They’ll eat a lopsided cat just as happily as a perfect one. And honestly, imperfect cats have more charm.
Variations & Adaptations
One of the best things about this recipe is how flexible it is. Here are some variations I’ve tried and loved:
Gluten-Free Version
Swap the all-purpose flour for a 1:1 gluten-free baking flour blend. I’ve used Bob’s Red Mill with great results. The texture is slightly more delicate, so handle the cookies gently when moving them.
Vegan Option
Use vegan butter (I like Earth Balance) and a flax egg (1 tablespoon ground flaxseed mixed with 3 tablespoons water, let sit for 5 minutes). The cookies won’t be quite as rich, but they’re still delicious. For the frosting, use plant-based milk.
Different Shapes
Don’t limit yourself to cats! This dough works beautifully with any Halloween-shaped cutter—pumpkins, ghosts, bats, you name it. Just adjust the decorating accordingly. I made a batch of ghosts last year that were a huge hit.
Spiced Version
Add ½ teaspoon of cinnamon and ¼ teaspoon of nutmeg to the dry ingredients for a warm, cozy flavor. It pairs surprisingly well with the black frosting and gives the cookies a fall vibe that’s perfect for October.
Chocolate Base
Replace ¼ cup of the flour with unsweetened cocoa powder for a chocolate sugar cookie. The black frosting looks even more striking against a dark cookie. My chocolate-loving husband declared this his favorite version.
Serving & Storage Suggestions
These cookies are best served at room temperature, which lets the frosting soften slightly and the cookie stay tender. Arrange them on a Halloween-themed platter or in a cute cookie tin for gifting.
For a party presentation, I like to arrange them in a circle on a black cake stand with some orange sprinkles scattered around. It looks festive without being over-the-top. If you’re serving them alongside other treats, they pair wonderfully with hot apple cider or a pumpkin spice latte.
Storage: Keep the cookies in an airtight container at room temperature for up to 5 days. Layer them between sheets of parchment paper to prevent the frosting from smudging. Don’t refrigerate them—the fridge dries out sugar cookies and makes them hard.
Freezing: You can freeze the undecorated baked cookies for up to 3 months. Just wrap them tightly in plastic wrap and then foil. When you’re ready to decorate, thaw them at room temperature and proceed with the frosting. I do this every year so I have cookies ready for last-minute Halloween parties.
One thing I’ve noticed: the cookies actually taste better on day two. The flavors meld together and the texture softens slightly. So if you can resist eating them all immediately, they’ll reward you.
Nutritional Information & Benefits
Let’s be real—these are cookies, not health food. But here’s what you’re looking at per cookie (based on 24 cookies):
- Calories: 145
- Fat: 7g
- Carbohydrates: 20g
- Sugar: 12g
- Protein: 2g
The butter provides a small amount of vitamin A, and the eggs add a bit of protein. But honestly, the real benefit here is the joy factor. There’s something genuinely mood-boosting about biting into a cute black cat cookie. It’s comfort food at its finest.
If you’re watching your sugar intake, you can reduce the sugar in the cookie dough by ¼ cup without affecting the texture too much. The frosting is harder to adjust, but you can use a sugar-free powdered sugar substitute if needed.
For those with dietary restrictions, the gluten-free and vegan variations I mentioned earlier work beautifully. My sister-in-law has celiac disease, and she’s been known to hide these cookies from her kids so she can have them all to herself.
Conclusion
These adorable black cat Halloween sugar cookies have become a staple in my October baking rotation. They’re quick enough for a last-minute party, simple enough for kids to help with, and cute enough to impress even the most discerning Halloween enthusiasts. Honestly, I don’t think I’ve ever had a batch that didn’t get devoured within hours.
The best part? You can make them your own. Add different decorations, try different shapes, experiment with flavors—the possibilities are endless. I’d love to hear how yours turn out. Did you add a fun twist? Did your kids come up with their own cat face designs? Drop a comment below and share your creations.
Happy Halloween, and happy baking! May your cookies be spooky, your frosting be smooth, and your kitchen be filled with the smell of butter and sugar. Trust me—once you make these, you’ll wonder why you ever stressed about Halloween baking in the first place.
Frequently Asked Questions
Can I make the dough ahead of time?
Absolutely. You can prepare the dough up to 3 days in advance and keep it wrapped in plastic wrap in the refrigerator. Let it sit at room temperature for about 10 minutes before rolling it out so it’s soft enough to work with.
Why did my cookies spread too much?
This usually happens when the butter is too soft or the dough wasn’t chilled enough. Make sure your butter is softened but not melted, and if your kitchen is warm, chill the cut cookies on the baking sheet for 10 minutes before baking.
Can I use regular food coloring instead of gel?
You can, but you’ll need a lot more to get a true black color, which will thin out your frosting and make it runny. Gel food coloring is more concentrated and gives a much better result. It’s worth the extra dollar or two.
How do I get the frosting perfectly smooth?
The key is the consistency of your frosting. It should be thick enough to hold its shape but thin enough to spread easily. If it’s too thick, add a drop of milk. If it’s too thin, add more powdered sugar. Practice on a spare cookie first to test the consistency.
Can I freeze the decorated cookies?
I don’t recommend freezing decorated cookies because the frosting can get condensation and become sticky when thawed. Freeze the undecorated cookies instead, then frost them after they’ve thawed at room temperature.
Pin This Recipe!

Adorable Black Cat Halloween Sugar Cookies: Easy 30-Minute Recipe
Quick and easy black cat Halloween sugar cookies that come together in just 30 minutes. These adorable cookies feature a soft, buttery sugar cookie base with smooth black frosting and cute cat faces, perfect for last-minute Halloween parties or cookie contests.
- Prep Time: 15 minutes
- Cook Time: 10 minutes
- Total Time: 30 minutes
- Yield: 24 servings 1x
- Category: Dessert
- Cuisine: American
Ingredients
- 2 ½ cups all-purpose flour (spooned and leveled)
- 1 cup unsalted butter, softened to room temperature
- 1 cup granulated sugar
- 1 large egg, room temperature
- 1 teaspoon vanilla extract (pure preferred)
- ½ teaspoon baking powder
- ¼ teaspoon salt
- 2 cups powdered sugar, sifted
- 3–4 tablespoons milk (whole milk preferred)
- 1 teaspoon vanilla extract
- Black gel food coloring (e.g., Wilton brand)
- White candy melts or white frosting (for eyes and whiskers)
- Pink candy melts or pink frosting (for noses, optional)
- Black sprinkles or edible glitter (optional)
Instructions
- In a large mixing bowl, cream together the softened butter and granulated sugar until light and fluffy, about 2-3 minutes with an electric mixer.
- Add the egg and vanilla extract, then beat until well combined.
- In a separate bowl, whisk together the flour, baking powder, and salt.
- Gradually add the dry ingredients to the wet mixture, mixing on low speed until a soft dough forms. Do not overmix.
- Lightly flour your work surface and rolling pin. Roll the dough out to about ¼-inch thickness.
- Press a cat-shaped cookie cutter firmly into the dough and lift straight up. Place cut cookies onto prepared baking sheets, spacing them about 2 inches apart. Gather scraps, re-roll, and repeat until all dough is used.
- Preheat oven to 350°F (175°C). Bake cookies for 8-10 minutes, or until edges are just barely golden. Centers should still look soft.
- Let cookies cool on the baking sheet for 5 minutes, then transfer to a wire rack to cool completely.
- While cookies cool, make the frosting: In a medium bowl, whisk together sifted powdered sugar, 3 tablespoons milk, and vanilla extract. Add more milk as needed for a smooth, spreadable consistency.
- Add black gel food coloring one drop at a time, stirring well after each addition, until deep black color is achieved (about 10-12 drops).
- Once cookies are completely cool, spoon black frosting into a piping bag or zip-top bag and snip off a tiny corner. Pipe an outline around each cookie, then fill in the center with more frosting. Use an offset spatula to spread smooth.
- While frosting is still wet, add eyes using two small dots of white frosting or white candy melts, and a tiny pink dot for the nose. Use a toothpick to draw three tiny whiskers on each side of the face.
- Let frosting set for 15-20 minutes before serving or storing. For faster setting, refrigerate for 5 minutes.
Notes
Use gel food coloring for deep black color; liquid coloring will result in grayish-purple. If dough is sticky, chill for 15 minutes before rolling. Watch cookies closely as they bake—sugar cookies go from perfect to burnt quickly. For best results, let cookies cool completely before frosting. Cookies taste even better on day two. Store in an airtight container at room temperature for up to 5 days. Freeze undecorated cookies for up to 3 months.
Nutrition
- Serving Size: 1 cookie
- Calories: 145
- Sugar: 12
- Fat: 7
- Carbohydrates: 20
- Protein: 2
Keywords: Halloween cookies, black cat cookies, sugar cookies, easy Halloween recipe, 30-minute cookies, spooky treats, kid-friendly Halloween


