Love this? Save it for later!
Share the inspiration with your friends
Introduction
There used to be this tiny ice cream shop tucked away on a quiet street corner in downtown Asheville that made the most unforgettable salted caramel ice cream. When they suddenly closed one chilly autumn afternoon, I was honestly crushed. That ice cream was more than just a treat—it was the kind of rich, creamy indulgence that made you pause and savor every bite. After several attempts—many of which ended with a freezer full of icy disappointment—I finally got it right. The texture was smooth as silk, the caramel had just the right salty kick, and no fancy ice cream maker was needed. I mean, you know that feeling when you chase a memory through food? This recipe is exactly that—a little victory, a little nostalgia, and a whole lot of sweet satisfaction. Maybe you’ve been there, chasing a flavor that vanished, only to find it again in your own kitchen.
Why You’ll Love This Recipe
This creamy no-churn salted caramel ice cream recipe isn’t just a simple dessert—it’s a little homemade luxury that anyone can whip up. I’ve tested this recipe multiple times, tweaking salt levels and caramel consistency to get it just right. Here’s why it’s a keeper:
- Quick & Easy: Comes together in under 20 minutes, perfect for those last-minute dessert cravings.
- Simple Ingredients: Uses pantry staples like sweetened condensed milk and heavy cream—no exotic items required.
- Perfect for Summer Gatherings: Ideal for backyard barbecues, family dinners, or a solo indulgence on a warm evening.
- Crowd-Pleaser: The balance of sweet and salty always gets rave reviews from both kids and adults alike.
- Unbelievably Delicious: The luscious, creamy texture combined with rich salted caramel makes every spoonful feel like a treat.
What sets this recipe apart is the no-churn method that delivers ice cream worthy of a scoop shop without the fuss of an ice cream machine. Also, the salted caramel is homemade, giving it a deep, buttery flavor that’s far from the overly sweet, artificial syrup you sometimes find. Honestly, this is the kind of recipe you’ll want to make again and again, especially when you need a little comfort in a bowl.
What Ingredients You Will Need
This recipe uses simple, wholesome ingredients to create that rich, creamy texture and bold salted caramel flavor without any fuss. Most are pantry staples, making this a dessert you can pull together anytime.
- Heavy Cream (2 cups / 480 ml): Chilled, to whip into soft peaks and give the ice cream its creamy body.
- Sweetened Condensed Milk (1 can / 14 oz / 396 g): Adds sweetness and smoothness, plus helps with freezing without ice crystals.
- Granulated Sugar (3/4 cup / 150 g): For making the caramel sauce; I prefer Domino for consistent caramelization.
- Unsalted Butter (4 tbsp / 60 g): Adds richness and silkiness to the caramel.
- Sea Salt (1 tsp): Use flaky sea salt like Maldon for that perfect salty crunch and balanced flavor.
- Vanilla Extract (1 tsp): Adds depth and warmth to the ice cream base.
Optional:
- Chopped toasted pecans or walnuts: For added texture and a nutty twist.
- Drizzle of caramel sauce on top: To amp up the presentation and flavor.
If you need a dairy-free version, swap heavy cream with full-fat coconut cream and use a plant-based sweetened condensed milk alternative—though texture might be a bit different. For a lower-sugar option, try a sugar substitute in the caramel, but be wary of how it affects caramelization.
Equipment Needed
Making this creamy no-churn salted caramel ice cream requires minimal equipment, which is part of its charm. Here’s what you’ll want to have handy:
- Mixing Bowls: One large bowl for whipping cream and another for combining ingredients.
- Electric Hand Mixer or Stand Mixer: Vital for whipping the heavy cream to soft peaks quickly and evenly.
- Medium Saucepan: For carefully making the caramel sauce—you want one with a heavy bottom to prevent burning.
- Rubber Spatula: For folding ingredients gently without deflating the whipped cream.
- Loaf Pan or Freezer-Safe Container: To freeze the ice cream. A metal pan helps it freeze faster, but any freezer-safe container works.
For those on a budget, a sturdy whisk can replace an electric mixer, but expect a bit more elbow grease. I’ve tried glass and metal bowls for whipping cream; metal tends to chill better, making whipping easier. Keep your bowl and beaters cold by popping them in the freezer for 10 minutes before starting—trust me, it makes a difference!
Preparation Method
- Prepare the caramel sauce (about 15 minutes): In a medium saucepan over medium heat, combine 3/4 cup (150 g) granulated sugar. Stir constantly as the sugar melts and turns a deep amber color—this usually takes around 8-10 minutes. Be patient; rushing leads to burnt bits. Once melted, immediately remove from heat and stir in 4 tablespoons (60 g) unsalted butter until melted and fully combined.
- Add salt and vanilla: Stir in 1 teaspoon flaky sea salt and 1 teaspoon vanilla extract. Set the caramel aside to cool slightly (about 10 minutes). It should be warm but not hot enough to melt the cream when mixed.
- Whip the heavy cream (about 5 minutes): In a chilled large mixing bowl, beat 2 cups (480 ml) heavy cream with an electric mixer on medium-high speed until soft peaks form. Watch closely—the cream should be fluffy but not overwhipped or turning grainy.
- Combine sweetened condensed milk and caramel (about 3 minutes): In a separate bowl, stir together 1 can (14 oz / 396 g) sweetened condensed milk and the cooled caramel sauce until smooth and fully incorporated.
- Fold caramel mixture into whipped cream (2-3 minutes): Gently fold the caramel-condensed milk mixture into the whipped cream using a rubber spatula. Fold carefully to keep the mixture light and airy, folding just until combined.
- Transfer and freeze: Pour the mixture into a loaf pan or freezer-safe container. Smooth the top with a spatula. Cover tightly with plastic wrap or a lid.
- Freeze for at least 6 hours or overnight: For best texture, freeze overnight. The no-churn method means it won’t get icy, but still firm enough to scoop.
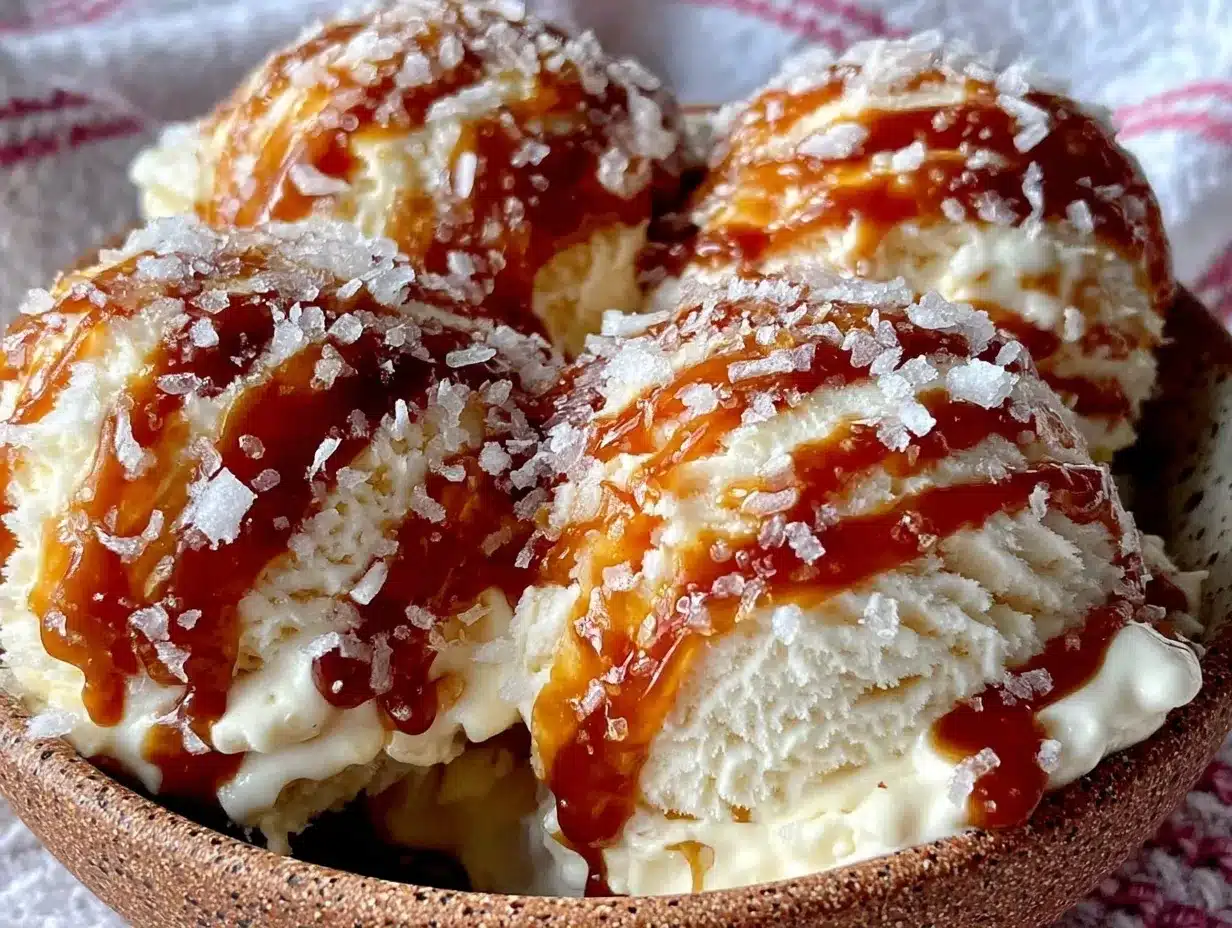
- Serve: Remove from freezer 5-10 minutes before scooping to soften slightly. Scoop into bowls or cones, and if you like, drizzle extra caramel sauce or sprinkle a pinch of flaky sea salt on top.
If your caramel hardens too much before mixing, gently warm it again but don’t boil. And if you find your cream isn’t whipping properly, make sure it’s cold enough and try chilling your mixing bowl next time. This recipe’s simplicity means a few small tweaks can make a big difference!
Cooking Tips & Techniques
- Caramelizing sugar: Stirring constantly is key to prevent burning, but once the sugar melts, resist stirring and just swirl the pan gently. This stops crystals from forming and keeps the caramel smooth.
- Whipping cream perfectly: Keep your cream and bowl cold. Stop whipping as soon as soft peaks form—overwhipping can cause it to break and turn buttery.
- Folding technique: Use slow, gentle motions to fold the caramel mixture into the whipped cream. You want to keep as much air as possible for that fluffy texture.
- Salt balance: Don’t skip the flaky sea salt on top—it adds texture and balances the sweetness. Taste your caramel before mixing to adjust salt levels.
- Timing multitasking: While your caramel cools, whip the cream. This keeps the prep moving smoothly without waiting around.
One time, I accidentally added hot caramel straight into the cream and it deflated everything—lesson learned! Let the caramel cool but stay pourable. Also, if your ice cream freezes too hard, try softening it in the fridge for 20 minutes before serving next time.
Variations & Adaptations
- Nutty Twist: Fold in 1/2 cup chopped toasted pecans or walnuts for a delightful crunch that pairs beautifully with caramel.
- Chocolate Swirl: Drizzle melted dark chocolate over the ice cream before freezing and gently swirl with a knife for a marbled effect.
- Dairy-Free Version: Swap heavy cream for full-fat coconut cream and use a dairy-free condensed milk alternative. The flavor shifts slightly but remains indulgently creamy.
- Spiced Caramel: Add a pinch of cinnamon or cayenne to the caramel for a warm or spicy kick—perfect for cooler evenings.
- Salted Caramel Coffee: Stir in 1-2 tablespoons of instant espresso powder to the caramel mixture for a coffee-flavored treat.
I once tried mixing in chopped candied ginger—unexpected but delicious! Feel free to experiment and find what hits your sweet spot.
Serving & Storage Suggestions
Serve this creamy no-churn salted caramel ice cream slightly softened, about 5-10 minutes out of the freezer, so it scoops easily. Presentation-wise, a sprinkle of flaky sea salt or a gentle caramel drizzle can make it look just as good as it tastes. Pair it with warm brownies, apple pie, or even alongside a crispy garlic chicken dinner for a sweet finish that surprises.
Store leftovers tightly covered in the freezer for up to two weeks. The texture stays creamy without ice crystals forming, thanks to the sweetened condensed milk. To re-soften, transfer the ice cream to the fridge for 15-20 minutes before serving.
Interestingly, the flavors deepen if left for a day—salt and caramel notes become more pronounced, making it a great make-ahead dessert for gatherings.
Nutritional Information & Benefits
This no-churn salted caramel ice cream is rich and indulgent but surprisingly straightforward in ingredients. Each serving (about ½ cup / 125 ml) contains approximately 250 calories, 18 grams of fat, and 20 grams of sugar. While it’s a treat best enjoyed in moderation, the recipe uses real butter and cream, avoiding artificial additives often found in store-bought ice creams.
Sea salt adds trace minerals often missing in processed sugars, and the caramel is homemade, letting you control sugar content. For those avoiding gluten or dairy, simple substitutions can make this recipe fit your diet without sacrificing creaminess.
From a wellness perspective, making this at home means you know exactly what’s going in—and honestly, the joy it brings is part of feeling good!
Conclusion
This creamy no-churn salted caramel ice cream recipe is a keeper for anyone who loves rich, buttery desserts but doesn’t want the hassle of fancy equipment. It’s simple, reliable, and downright delicious. Make it your own by adjusting the salt level, adding nuts, or swirling in chocolate—there’s room to play here.
Personally, this recipe reminds me of that tiny ice cream shop in Asheville and the joy of recreating something special with my own hands. If you give it a try, I’d love to hear how it turns out or what twists you add—drop a comment below and share your salted caramel stories!
Now go get that freezer ready—sweet satisfaction awaits!
FAQs
Can I make this salted caramel ice cream without an ice cream maker?
Absolutely! This recipe is designed specifically as a no-churn ice cream, so no ice cream maker is needed. Just whip the cream and fold in the caramel mixture before freezing.
How do I prevent ice crystals from forming?
The sweetened condensed milk helps keep the ice cream smooth by reducing ice crystal formation. Also, folding the whipped cream gently keeps air in, which improves texture.
Can I prepare this ice cream in advance?
Yes, it freezes well for up to two weeks. For best taste and texture, make it a day ahead to let flavors meld.
What if my caramel sauce hardens too quickly?
If the caramel cools and hardens, gently warm it over low heat until pourable again. Avoid boiling, as it can affect texture.
Is there a way to make this recipe vegan?
Yes! Use full-fat coconut cream instead of heavy cream and a vegan sweetened condensed milk alternative. The texture will be slightly different but still creamy and delicious.
Pin This Recipe!
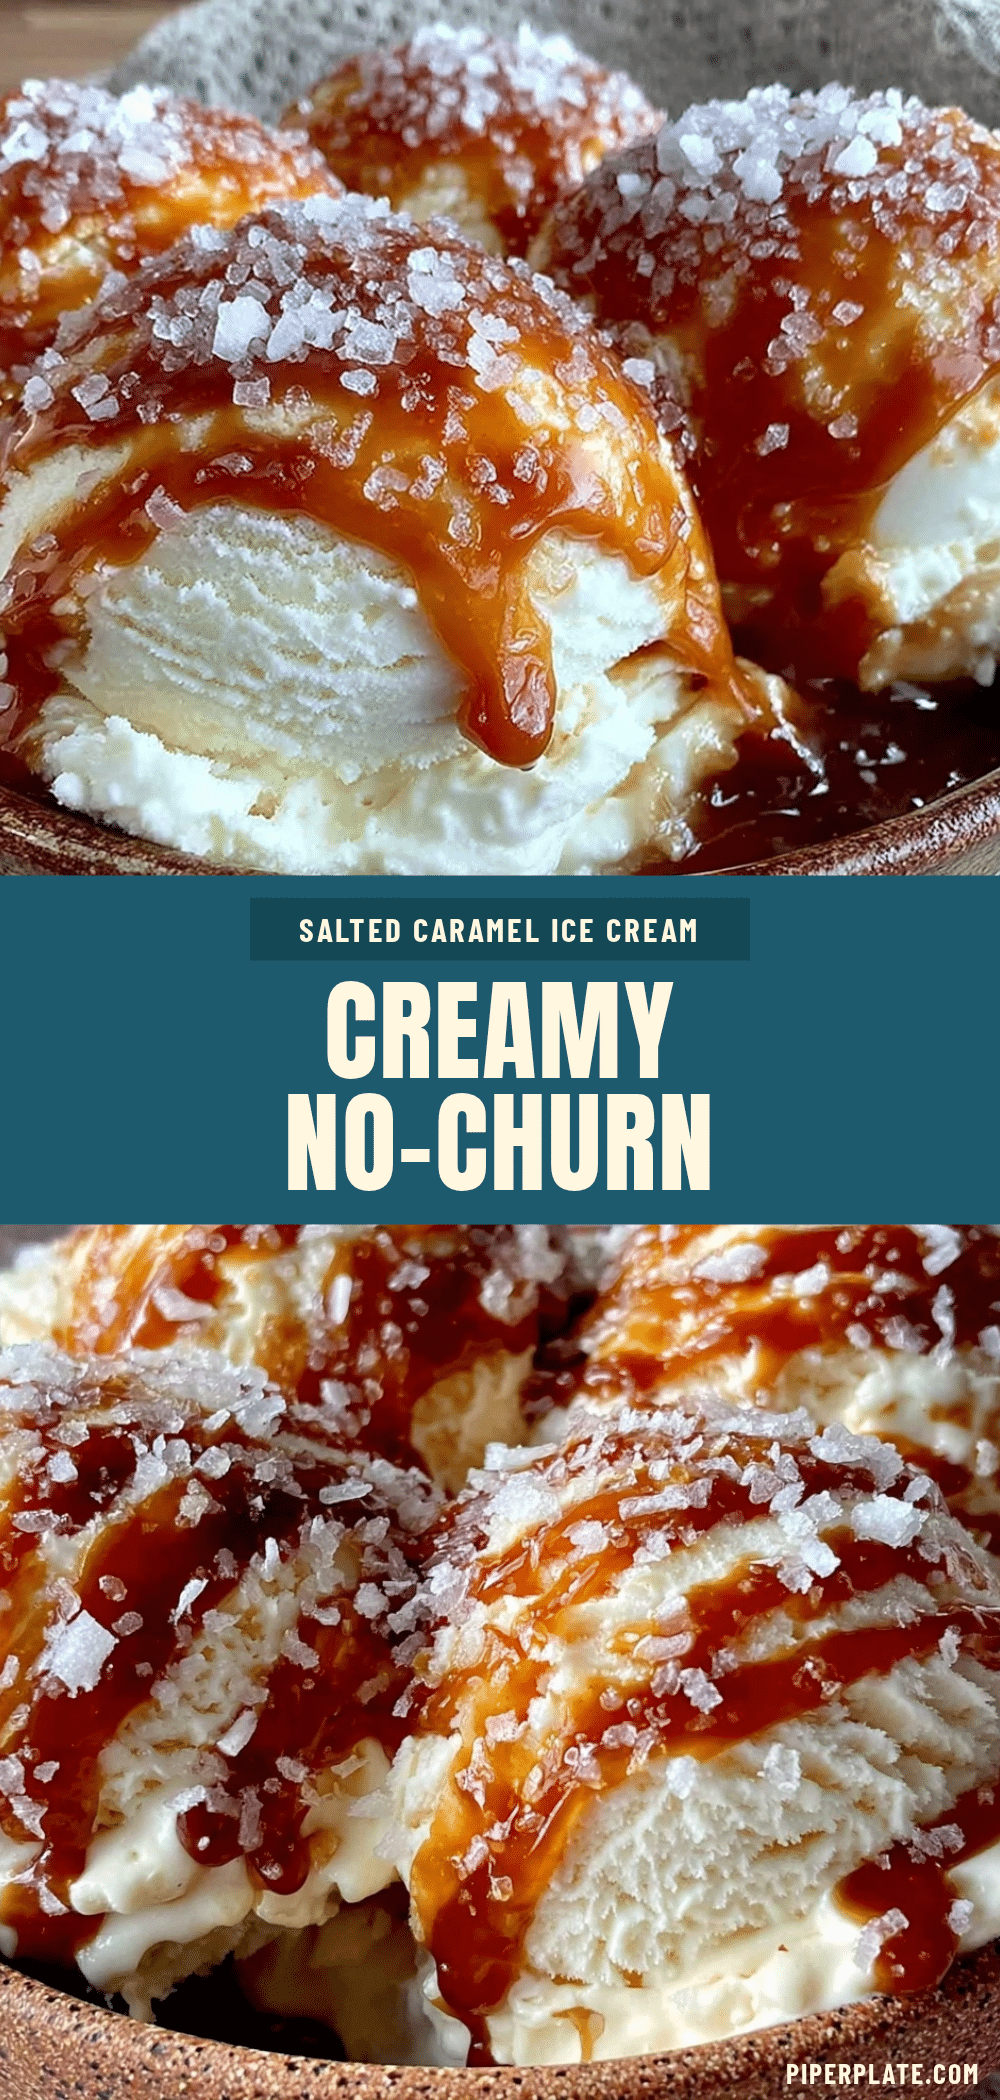
Creamy No-Churn Salted Caramel Ice Cream
A rich and creamy no-churn salted caramel ice cream recipe that requires no ice cream maker and uses simple pantry ingredients for a luscious homemade dessert.
- Prep Time: 20 minutes
- Cook Time: 15 minutes
- Total Time: 6 hours 35 minutes
- Yield: 8 servings 1x
- Category: Dessert
- Cuisine: American
Ingredients
- 2 cups (480 ml) heavy cream, chilled
- 1 can (14 oz / 396 g) sweetened condensed milk
- 3/4 cup (150 g) granulated sugar
- 4 tablespoons (60 g) unsalted butter
- 1 teaspoon flaky sea salt
- 1 teaspoon vanilla extract
- Optional: 1/2 cup chopped toasted pecans or walnuts
- Optional: Drizzle of caramel sauce on top
Instructions
- Prepare the caramel sauce: In a medium saucepan over medium heat, combine 3/4 cup (150 g) granulated sugar. Stir constantly as the sugar melts and turns a deep amber color (about 8-10 minutes). Remove from heat immediately.
- Stir in 4 tablespoons (60 g) unsalted butter until melted and fully combined.
- Add 1 teaspoon flaky sea salt and 1 teaspoon vanilla extract to the caramel. Set aside to cool slightly (about 10 minutes).
- Whip the heavy cream: In a chilled large mixing bowl, beat 2 cups (480 ml) heavy cream with an electric mixer on medium-high speed until soft peaks form (about 5 minutes).
- In a separate bowl, stir together 1 can (14 oz / 396 g) sweetened condensed milk and the cooled caramel sauce until smooth.
- Gently fold the caramel-condensed milk mixture into the whipped cream using a rubber spatula, folding just until combined (2-3 minutes).
- Pour the mixture into a loaf pan or freezer-safe container. Smooth the top and cover tightly with plastic wrap or a lid.
- Freeze for at least 6 hours or overnight for best texture.
- Remove from freezer 5-10 minutes before serving to soften slightly. Scoop into bowls or cones and optionally drizzle extra caramel sauce or sprinkle flaky sea salt on top.
Notes
Keep cream and bowl cold for easier whipping. Stir sugar constantly when making caramel but swirl pan gently once melted to avoid crystals. Let caramel cool but stay pourable before mixing with cream. Freeze overnight for best texture. Soften ice cream 5-10 minutes before serving. For dairy-free version, substitute heavy cream with full-fat coconut cream and use plant-based sweetened condensed milk.
Nutrition
- Serving Size: 1/2 cup (125 ml)
- Calories: 250
- Sugar: 20
- Fat: 18
- Carbohydrates: 20
Keywords: no-churn ice cream, salted caramel, homemade ice cream, easy dessert, no ice cream maker, creamy ice cream, caramel sauce