Love this? Save it for later!
Share the inspiration with your friends
The neighborhood welcome party was in three hours and I’d completely forgotten. Everyone else would be bringing their signature dishes—the famous baked ziti from the Italian family three doors down, the slow-cooked brisket from the retired pitmaster across the street, the elaborate layered dip that took my neighbor Susan all afternoon. I had a pound of ground beef thawing on the counter, a half-empty box of long-grain rice, and honestly, a growing sense of panic. I mean, what was I supposed to do? Show up with a sad bowl of cereal?
I opened the pantry and just stared for a good minute. Canned tomatoes, an onion that was starting to look a little sad, some garlic that had definitely seen better days. And then it hit me—I could make that one-pan ground beef and rice skillet my mom used to throw together when we were kids. The one that somehow always disappeared before anyone could get seconds. I grabbed the skillet, cranked the heat, and just started cooking. No plan, no recipe pulled up on my phone, just muscle memory and a prayer that it wouldn’t be a total disaster. I burned my finger on the skillet handle—classic me—and the onions made me tear up so bad I looked like I’d been crying for an hour.
Here’s the thing about this easy one-pan ground beef and rice recipe. It’s not fancy. It doesn’t have a dozen exotic ingredients or a complicated technique that requires a culinary degree. But when I walked into that party with my humble skillet dish, still warm and smelling like home, people actually stopped talking to ask what it was. The brisket guy came back for thirds. Someone asked for the recipe before they even asked my name. And I stood there, a little sheepish, realizing that sometimes the simplest things are the ones that hit hardest. That’s why this recipe has stayed with me—it’s the one I make when I need to feed people without the stress, and it never lets me down. Maybe you’ve been there too, staring at an almost-empty kitchen, wondering how you’re going to pull it off.
Why You’ll Love This Recipe
Let me tell you why this one-pan ground beef and rice skillet has become my go-to for everything from frantic weeknights to lazy Sunday meal prep. I’ve tested this recipe more times than I can count, tweaking the seasoning ratios and the liquid amounts until it hit that sweet spot of perfectly cooked rice and seasoned beef. It’s the kind of recipe that makes you look like a kitchen hero without actually having to work that hard.
- Quick & Easy: From start to finish, this comes together in about 30 minutes. No separate pots, no draining pasta, no complicated steps. Just one skillet and a whole lot of flavor.
- Simple Ingredients: You probably have everything you need right now. Ground beef, rice, canned tomatoes, basic spices—nothing fancy required. No trips to specialty grocery stores.
- Perfect for Busy Weeknights: This is the recipe you turn to when you have exactly zero energy left but still need to get dinner on the table. It’s forgiving, it’s fast, and it’s satisfying.
- Crowd-Pleaser: I’ve served this to picky kids, hungry teenagers, and adults who claim they don’t eat “simple” food. Every single time, the skillet comes back empty.
- Unbelievably Delicious: The magic here is in the way the rice absorbs all that beefy, tomatoey goodness as it cooks. Every bite is packed with flavor, and the texture is just right—tender rice, savory beef, a little bit of richness from the cooking process.
What makes this recipe different from the dozens of other skillet dinners out there? It’s the technique. Instead of cooking the rice separately and mixing it in at the end, we’re letting it simmer right in the pan with the beef and tomatoes. This means the rice soaks up all those savory juices, becoming incredibly flavorful from the inside out. It’s not just another version of beef and rice—it’s the best version, the one that tastes like it’s been simmering for hours when it really only took half an hour.
Honestly, this recipe isn’t just good—it’s the kind that makes you close your eyes after the first bite. It’s comfort food at its finest, the kind that warms you from the inside and makes you forget whatever kind of day you’ve had. Perfect for impressing guests without the stress, or turning a simple Tuesday night into something memorable.
What Ingredients You Will Need
This recipe uses simple, wholesome ingredients that work together to create something truly satisfying. Most of these are pantry staples, which is exactly why this dish is so reliable when you need it most.
- Ground beef – 1 pound (450g), 80/20 or 85/15 blend works best. The fat adds flavor, but you can use lean if that’s what you have. I personally prefer 85/15 for the right balance of flavor and not too much grease.
- Long-grain white rice – 1 cup (200g), uncooked. Don’t use minute rice or instant rice here—they’ll turn mushy. Basmati or jasmine work beautifully too. Brown rice won’t cook in the same time frame, so stick with white for this recipe.
- Yellow onion – 1 medium, diced. About 1 cup. Sweet onion works fine too. If you’re in a rush, frozen diced onions are a perfectly acceptable shortcut.
- Garlic – 3 cloves, minced. Fresh is best, but jarred minced garlic works in a pinch. Use about 1 teaspoon if going the jarred route.
- Canned diced tomatoes – 1 can (14.5 oz / 400g), with their juices. Fire-roasted tomatoes add an extra layer of flavor that I absolutely love. Don’t drain them—the liquid is essential for cooking the rice.
- Beef broth – 1 cup (240ml). Low-sodium is ideal so you can control the salt level. Chicken broth works too if that’s what you have, though the flavor will be slightly different.
- Tomato paste – 2 tablespoons. This adds depth and richness that canned tomatoes alone can’t provide. I recommend Cento or Mutti brands for the best flavor.
- Worcestershire sauce – 1 tablespoon. This is the secret ingredient that makes the beef taste beefier. Don’t skip it if you can help it.
- Paprika – 1 teaspoon. Smoked paprika adds a wonderful depth, but regular works perfectly too.
- Dried oregano – 1 teaspoon. Italian seasoning works as a substitute.
- Salt – 1 teaspoon, plus more to taste. Start with less and adjust at the end.
- Black pepper – ½ teaspoon, freshly ground.
- Olive oil – 1 tablespoon, for sautéing.
- Optional garnishes: Fresh parsley, chopped, shredded cheddar cheese, or a squeeze of lemon juice at the end.
Ingredient Selection Tips: For the ground beef, look for bright red color and avoid packages with excessive liquid. For the rice, I’ve found that generic store-brand long-grain rice works just as well as the fancy stuff. And for the canned tomatoes, fire-roasted really does make a difference—it adds a subtle smokiness that elevates the whole dish.
Substitution Guidance: Need a gluten-free option? This recipe is naturally gluten-free as written, but double-check your Worcestershire sauce and beef broth labels. For a dairy-free version, skip the cheese garnish. Want to use ground turkey instead? Go for it—just add an extra tablespoon of olive oil since turkey is leaner.
Equipment Needed
The beauty of this recipe is that you really don’t need much. Here’s what you’ll want to have on hand:
- Large skillet or deep sauté pan – 12-inch with a tight-fitting lid. A Dutch oven works too. I use my trusty Lodge cast iron skillet for this—it holds heat beautifully and gives the beef a nice sear. If you don’t have a lid, aluminum foil works as a makeshift cover.
- Wooden spoon or spatula – For breaking up the ground beef and stirring everything together. A silicone spatula works too.
- Chef’s knife and cutting board – For dicing the onion and mincing the garlic. Nothing fancy needed.
- Measuring cups and spoons – For accurate measurements, especially the rice and liquid ratios.
- Can opener – Unless you’re using the pull-tab cans.
If you don’t have a 12-inch skillet, you can use a 10-inch, but you’ll need to watch the liquid level more carefully—it might take a bit longer for the rice to absorb everything. I’ve also made this in a large saucepan in a pinch, and while it worked, the browning wasn’t as good. For budget-friendly options, a basic non-stick skillet from any kitchen store will do the job perfectly fine. Just make sure it’s oven-safe if you ever want to finish it under the broiler with cheese on top.
Preparation Method
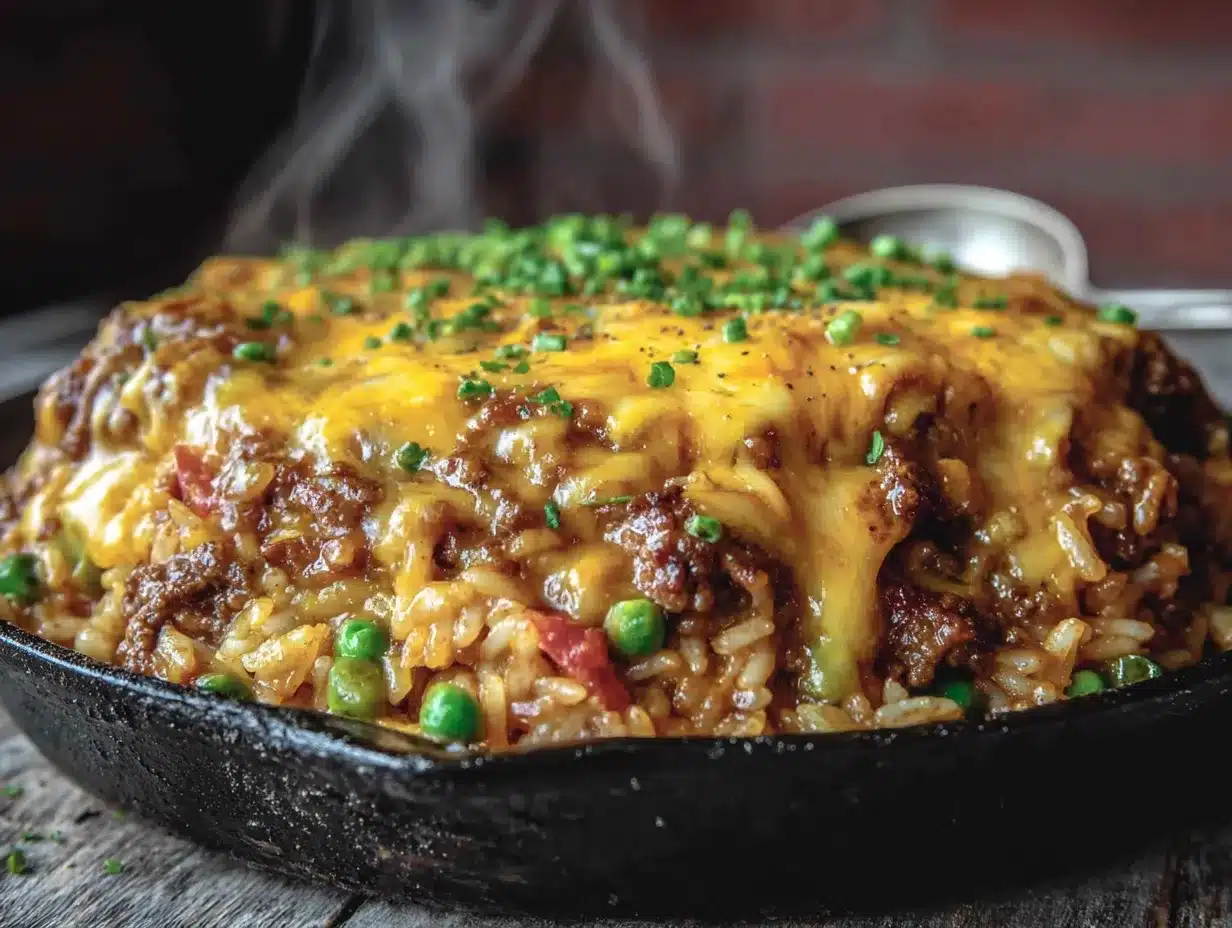
Let’s get cooking. This comes together faster than you think, and I’ll walk you through every step so you don’t end up with mushy rice or dry beef. Trust me, I’ve made both mistakes so you don’t have to.
- Heat the oil and cook the onion. Place your skillet over medium-high heat and add the olive oil. Once it shimmers—about 30 seconds—add the diced onion. Cook for 3-4 minutes, stirring occasionally, until the onion turns translucent and starts to soften. You’ll know it’s ready when it smells sweet and looks a little glossy. Don’t rush this step; the onion is the foundation of flavor here.
- Add the garlic. Toss in the minced garlic and cook for about 30 seconds, just until fragrant. Garlic burns fast, so keep it moving. If you smell anything acrid, you’ve gone too far—pull the pan off the heat for a second.
- Brown the ground beef. Add the ground beef to the skillet, breaking it up with your wooden spoon as it cooks. Let it sit undisturbed for about 2 minutes before stirring—this gives you those nice brown bits that pack so much flavor. Continue cooking for 5-6 minutes total, until the beef is fully browned and no longer pink. If there’s excess grease, carefully spoon it out or tilt the pan and soak it up with a paper towel. Don’t remove all of it; a little fat carries flavor.
- Season the beef. Sprinkle the paprika, oregano, salt, and pepper over the beef. Stir everything together and let it cook for another minute. This toasts the spices and wakes up their flavors. Add the tomato paste and Worcestershire sauce, stirring to coat the beef evenly. Cook for 1-2 minutes until the tomato paste darkens slightly—this deepens the flavor.
- Add the rice and liquids. Pour in the uncooked rice and stir it around for about a minute, letting it toast slightly in the pan. This step is optional but highly recommended—it gives the rice a nuttier flavor and helps it stay separate. Then add the canned diced tomatoes (with their juices) and the beef broth. Stir everything together, scraping up any browned bits from the bottom of the pan. Those bits are gold—they dissolve into the cooking liquid and flavor the rice.
- Bring to a boil, then simmer. Turn the heat to high and bring the mixture to a full boil. You should see bubbles breaking the surface all over. Once it’s boiling, immediately reduce the heat to low, cover the skillet with the lid, and let it simmer gently. Set a timer for 18 minutes. Resist the urge to lift the lid and peek—the steam is what cooks the rice perfectly.
- Check the rice. After 18 minutes, remove the lid carefully (steam is hot!). The rice should be tender and most of the liquid should be absorbed. If the rice is still a little firm and there’s still liquid, cover and cook for another 2-3 minutes. If the rice is tender but there’s still some liquid, that’s okay—it will thicken as it rests.
- Rest and fluff. Turn off the heat and let the skillet sit, covered, for 5 minutes. This allows the rice to finish absorbing any remaining liquid and relaxes the grains. After resting, fluff the rice with a fork—not a spoon, which can mash the grains. Taste and adjust seasoning with more salt and pepper if needed.
- Garnish and serve. Sprinkle with fresh parsley, shredded cheese, or a squeeze of lemon if you’re feeling fancy. Serve straight from the skillet for maximum comfort food vibes.
Troubleshooting Tip: If your rice is still crunchy after 20 minutes, you might have had the heat too low or your lid wasn’t tight enough. Add a splash of broth or water, re-cover, and cook on low for another 5 minutes. If the rice is mushy, you used too much liquid or cooked it too long—next time, reduce the broth by a quarter cup.
Cooking Tips & Techniques
Here’s where I share the things I’ve learned the hard way so you don’t have to. Trust me, I’ve made every mistake in the book with this one-pan ground beef and rice skillet.
Don’t skip browning the beef properly. I used to stir the beef constantly while it cooked, thinking I was being efficient. Turns out, that steams the meat instead of browning it. Let it sit for a couple of minutes before breaking it up—you want those deep brown crusty bits. That’s where the flavor lives.
Toast the rice. This is a game-changer that I stumbled upon by accident. One day I got distracted and left the rice in the pan with the beef for a few extra minutes before adding the liquid. The rice turned slightly golden and the final dish had this incredible nutty undertone. Now I always do it. Just a minute of toasting makes a noticeable difference.
Resist the urge to stir. Once you’ve covered the skillet and reduced the heat, leave it alone. Every time you lift that lid, you release steam that the rice needs to cook properly. I know it’s tempting to check, but trust the process. Set a timer and walk away.
Use the right pan size. A 12-inch skillet gives the rice room to spread out and cook evenly. If your pan is too small, the rice will be crowded and might cook unevenly. If it’s too large, the liquid will evaporate too quickly before the rice has a chance to absorb it.
Season in layers. Don’t just dump all the salt in at the end. Season the beef as it browns, add more with the spices, then adjust at the end. Layered seasoning creates depth that you can’t get from a single addition.
My biggest failure: I once tried to double this recipe in the same skillet. Big mistake. The rice took forever to cook, the bottom burned, and the top was still crunchy. If you need to feed a crowd, make it in batches or use a very large Dutch oven.
Variations & Adaptations
This recipe is incredibly flexible, and I’ve tried more variations than I can count. Here are some of my favorites:
Cheesy Tex-Mex Version: After the rice is cooked, stir in 1 cup of shredded cheddar or Monterey Jack cheese until melted. Top with diced jalapeños, a dollop of sour cream, and fresh cilantro. Use taco seasoning instead of the paprika and oregano for a Mexican-inspired twist. I make this version at least once a month—it’s that good.
Vegetable-Packed Version: Add 1 cup of diced bell peppers (any color) along with the onion. Stir in 1 cup of frozen peas and carrots during the last 5 minutes of cooking. You can also add a cup of chopped zucchini or spinach right before covering the skillet. The veggies add color, nutrients, and texture without overwhelming the dish.
Spicy Cajun Version: Replace the paprika and oregano with 1-2 teaspoons of Cajun seasoning. Add a diced celery stalk and a diced green bell pepper with the onion—this is the classic “holy trinity” of Cajun cooking. For extra heat, add a pinch of cayenne pepper or a diced andouille sausage along with the beef. This version is perfect for when you want something with a kick.
Dietary Adaptations: For a lower-carb option, swap the rice for cauliflower rice—but add it at the very end and cook just until heated through, about 3-4 minutes. For a gluten-free version, this recipe is naturally gluten-free as long as you verify your Worcestershire sauce and broth. For dairy-free, simply skip any cheese garnishes.
Different Grains: You can use quinoa instead of rice—use the same amount of liquid and cook for about 15 minutes. Or try farro for a chewier texture, though you’ll need to increase the cooking time to about 25-30 minutes and add an extra half cup of broth.
Serving & Storage Suggestions
This one-pan ground beef and rice skillet is incredibly versatile when it comes to serving. Here’s how I like to enjoy it:
Serving Temperature: Serve it hot, straight from the skillet. It’s at its best within the first 15 minutes after cooking, when the rice is fluffy and the beef is tender. If it sits too long, the rice will continue to absorb liquid and the dish will become thicker—still delicious, just denser.
Presentation Ideas: For a casual weeknight dinner, just bring the skillet to the table with a few spoons and let everyone help themselves. For something a bit more polished, spoon it onto plates and top with fresh parsley, a sprinkle of cheese, and maybe a lemon wedge on the side. A simple side salad with a vinaigrette balances the richness perfectly.
Complementary Dishes: This pairs beautifully with a crisp green salad, steamed broccoli, or roasted green beans. For a heartier meal, serve with warm cornbread or crusty bread to soak up any extra juices. A dollop of Greek yogurt or sour cream on top adds a nice cool contrast.
Storage Instructions: Let the skillet cool completely, then transfer leftovers to an airtight container. It will keep in the refrigerator for up to 4 days. The flavors actually meld and deepen overnight, so leftovers might taste even better the next day—if there are any left.
Freezer Instructions: This freezes beautifully. Portion it into freezer-safe containers or zip-top bags, removing as much air as possible. It will keep for up to 3 months. Thaw overnight in the refrigerator before reheating.
Reheating Methods: The best way to reheat is in a skillet over medium-low heat with a splash of water or broth to loosen it up. Stir occasionally until heated through, about 5-7 minutes. You can also microwave individual portions for 1-2 minutes, stirring halfway through. Avoid high heat, which can dry out the rice.
Flavor Development: Here’s something interesting—the rice continues to absorb liquid as the dish sits. So if you’re making this ahead of time, you might want to slightly undercook the rice or add an extra splash of broth when reheating. The flavors do get better with time, though, so don’t be afraid to make it a day in advance.
Nutritional Information & Benefits
Here’s a rough estimate of what you’re getting in each serving. Remember, these numbers can vary based on the specific ingredients you use and any modifications you make.
| Nutrient | Amount Per Serving (approx. 1.5 cups) |
|---|---|
| Calories | 420-480 |
| Protein | 28g |
| Carbohydrates | 45g |
| Fat | 15g |
| Saturated Fat | 5g |
| Fiber | 3g |
| Sodium | 650-750mg (varies with broth and added salt) |
| Iron | 4mg (22% DV) |
Health Benefits: This dish packs a solid protein punch from the ground beef, which also provides iron and B vitamins. The tomatoes are rich in lycopene, an antioxidant that supports heart health. Garlic and onions offer anti-inflammatory properties. And the rice provides energy-sustaining carbohydrates—perfect for refueling after a long day.
Dietary Considerations: This recipe is naturally gluten-free and nut-free. To make it lower in sodium, use low-sodium broth and skip the added salt until the end, then season to taste. For a lower-fat version, use lean ground beef (90/10) and drain any excess fat after browning.
Potential Allergens: None of the top allergens are present in this recipe as written. However, always check your Worcestershire sauce label if you have a fish allergy, as some brands contain anchovies. The dish is dairy-free unless you add cheese at the end.
Conclusion
This easy one-pan ground beef and rice skillet is the kind of recipe that saves dinner again and again. It’s simple enough for a beginner cook to nail on the first try, but packed with enough flavor to impress even the pickiest eaters. I’ve made it on frantic Tuesday nights when I had nothing planned, on lazy Sunday afternoons when I wanted something comforting, and even for that neighborhood party where I showed up empty-handed and panicked. It never lets me down.
What I love most about this recipe is how customizable it is. You can spice it up, load it with veggies, make it cheesy, or keep it simple. It adapts to whatever you have in your pantry and whatever mood you’re in. That’s the mark of a truly great recipe—one that works for you, not the other way around.
I’d love to hear how this turns out for you. Did you add your own twist? Did your family go back for seconds? Drop a comment below and let me know—I read every single one and I genuinely love hearing about your kitchen victories. And if you’re looking for another quick weeknight dinner, you might enjoy this creamy garlic parmesan chicken that comes together just as fast. Happy cooking, friends!
Frequently Asked Questions
Can I use brown rice instead of white rice?
Brown rice requires a longer cooking time and more liquid. If you want to use brown rice, increase the beef broth to 1 ½ cups and cook for about 40-45 minutes instead of 18. Keep an eye on the liquid level and add more if needed. The texture will be chewier but still delicious.
Why is my rice still crunchy after 20 minutes?
This usually happens when the heat was too low or the lid wasn’t tight enough, allowing steam to escape. Add a splash of broth or water (about ¼ cup), cover tightly, and cook on low for another 5-7 minutes. If you’re at high altitude, you might need to increase both the liquid and cooking time by about 20%.
Can I make this ahead of time for meal prep?
Absolutely! This recipe is perfect for meal prep. Cook it as directed, let it cool completely, then portion it into containers. It will keep in the refrigerator for up to 4 days. When reheating, add a tablespoon of water or broth per serving to restore moisture. The flavors actually get better after a day in the fridge.
How can I make this recipe spicier?
There are several ways to add heat. Add ½ teaspoon of cayenne pepper with the other spices, use hot paprika instead of sweet, or stir in a diced jalapeño (seeds and all) with the onion. You can also serve it with hot sauce on the side—I recommend Cholula or Tabasco for a vinegary kick.
Can I freeze this dish?
Yes, this freezes beautifully. Let the skillet cool completely, then transfer to freezer-safe containers or zip-top bags. It will keep for up to 3 months. Thaw overnight in the refrigerator and reheat in a skillet with a splash of water or broth. I like to freeze individual portions for easy lunches—just grab and go.
Pin This Recipe!

Easy One-Pan Ground Beef and Rice Skillet Recipe

A quick and easy one-pan ground beef and rice skillet that’s perfect for busy weeknights. Made with simple pantry ingredients, this comforting dish comes together in about 30 minutes and is always a crowd-pleaser.
- Prep Time: 10 minutes
- Cook Time: 30 minutes
- Total Time: 40 minutes
- Yield: 4 servings 1x
- Category: Main Course
- Cuisine: American
Ingredients
- 1 pound (450g) ground beef (80/20 or 85/15 blend)
- 1 cup (200g) long-grain white rice, uncooked
- 1 medium yellow onion, diced (about 1 cup)
- 3 cloves garlic, minced
- 1 can (14.5 oz / 400g) diced tomatoes, with juices
- 1 cup (240ml) beef broth, low-sodium
- 2 tablespoons tomato paste
- 1 tablespoon Worcestershire sauce
- 1 teaspoon paprika (smoked or regular)
- 1 teaspoon dried oregano
- 1 teaspoon salt, plus more to taste
- ½ teaspoon black pepper, freshly ground
- 1 tablespoon olive oil
- Optional garnishes: fresh parsley, chopped; shredded cheddar cheese; lemon juice
Instructions
- Heat the olive oil in a large 12-inch skillet over medium-high heat. Add the diced onion and cook for 3-4 minutes until translucent and softened.
- Add the minced garlic and cook for about 30 seconds until fragrant.
- Add the ground beef, breaking it up with a wooden spoon. Let it sit undisturbed for 2 minutes to brown, then continue cooking for 5-6 minutes until fully browned. Drain excess grease if desired.
- Season the beef with paprika, oregano, salt, and pepper. Stir and cook for 1 minute. Add tomato paste and Worcestershire sauce, stirring to coat. Cook for 1-2 minutes until the tomato paste darkens slightly.
- Add the uncooked rice and stir for about 1 minute to toast lightly. Pour in the diced tomatoes (with juices) and beef broth. Stir, scraping up any browned bits from the bottom.
- Bring the mixture to a full boil over high heat. Immediately reduce heat to low, cover the skillet, and simmer for 18 minutes. Do not lift the lid.
- After 18 minutes, remove the lid. The rice should be tender and most liquid absorbed. If needed, cover and cook for another 2-3 minutes.
- Turn off the heat and let the skillet rest, covered, for 5 minutes. Fluff the rice with a fork. Adjust seasoning with salt and pepper if needed.
- Garnish with fresh parsley, shredded cheese, or a squeeze of lemon juice. Serve hot.
Notes
For best results, use long-grain white rice (not instant). Toast the rice briefly for a nuttier flavor. Resist lifting the lid while simmering to ensure proper steam cooking. If rice is still crunchy after 20 minutes, add a splash of broth, cover, and cook 5 more minutes. Leftovers keep in the fridge for up to 4 days and freeze for up to 3 months.
Nutrition
- Serving Size: 1.5 cups
- Calories: 450
- Sugar: 6
- Sodium: 700
- Fat: 15
- Saturated Fat: 5
- Carbohydrates: 45
- Fiber: 3
- Protein: 28
Keywords: one-pan ground beef and rice, easy skillet dinner, ground beef recipe, weeknight dinner, comfort food, one pot meal


