Love this? Save it for later!
Share the inspiration with your friends
There used to be a tiny bakery tucked between a laundromat and a tax prep office in my old neighborhood that made the most wonderfully unsettling cookies I’ve ever seen. They called them “Goblins’ Fingers” and they appeared every October first like clockwork. When the bakery closed suddenly two years ago — the owner retired to Florida, of all places — I felt a genuine pang of loss. After six attempts — some looking more like arthritic thumbs than elegant witch fingers — I finally got it.
The first batch I made looked like something a toddler sculpted out of playdough. The almonds kept falling off, and the “knuckles” looked more like warts. Honestly, I almost gave up. But then I remembered that specific crackle of the dough, that slightly sweet almond flavor against the buttery shortbread, and I knew I had to keep trying. You know that feeling when a specific food memory just won’t let you go?
These spooky witch finger cookies with almond nails are the result of that obsession. They’re creepy in the best way — perfect for Halloween parties, school bake sales, or just making your family do a double-take when they walk through the kitchen. I mean, there’s something deeply satisfying about watching someone’s face go from “what is THAT” to “wait, that’s actually delicious.”
The secret is in the dough temperature and the almond placement technique. Get those right, and you’ll have cookies that look genuinely ghoulish but taste like buttery, almond-scented heaven. Let me tell you, the first time I nailed the look — my neighbor actually screamed. That’s when I knew I had it.
Why You’ll Love This Recipe
These aren’t just another Halloween cookie. After testing this recipe more times than I care to admit, I can confidently say these spooky witch finger cookies with almond nails are the real deal. Here’s why they belong in your fall baking rotation:
- Surprisingly Simple : The dough comes together in about 15 minutes with just a handful of basic baking ingredients. No fancy equipment needed.
- Naturally Creepy : The shape does all the work. No food coloring, no fondant, no complicated decorating. Just dough, almonds, and a little jam.
- Perfect Halloween Party Food : These are the kind of treats people photograph before they eat. They’re instant conversation starters.
- Kid-Friendly to Make : My niece helped shape an entire batch last weekend. She kept giggling and saying “look, grandma’s fingers!” Kids find the shaping process hilarious.
- Actually Delicious : Here’s the thing — many “spooky” cookies taste like cardboard with sugar. These are buttery shortbread cookies with a subtle almond flavor that’s genuinely crave-worthy.
What makes this recipe different from the other versions floating around the internet? It’s the technique. Most recipes tell you to chill the shaped fingers before baking. I found that a brief freezer stint on the baking sheet itself works better — the cookies hold their shape perfectly without getting rock hard. Also, I use a specific egg wash ratio that gives the cookies that slightly mottled, aged appearance without making them shiny.
This recipe isn’t just good — it’s the kind that makes you close your eyes after the first bite. It’s comfort food with a spooky twist, perfect for getting into the Halloween spirit without spending hours in the kitchen.
What Ingredients You Will Need
This recipe uses simple, mostly pantry-staple ingredients to create cookies that look genuinely unsettling but taste wonderfully buttery. Most of these you probably already have on hand, which makes these perfect for last-minute Halloween cravings.
For the Cookie Dough
- 1 cup (226g) unsalted butter, softened to room temperature (I prefer Kerrygold for its rich flavor, but any good-quality butter works)
- 1 cup (200g) granulated sugar
- 1 large egg, room temperature (cold eggs can make the dough seize up)
- 1 teaspoon almond extract (this is non-negotiable for that authentic marzipan-like flavor)
- 1/2 teaspoon vanilla extract
- 2 1/2 cups (312g) all-purpose flour, spooned and leveled
- 1/2 teaspoon salt
- 1/2 teaspoon baking powder (helps the cookies spread just slightly for a more realistic finger shape)
For the “Nails” and Details
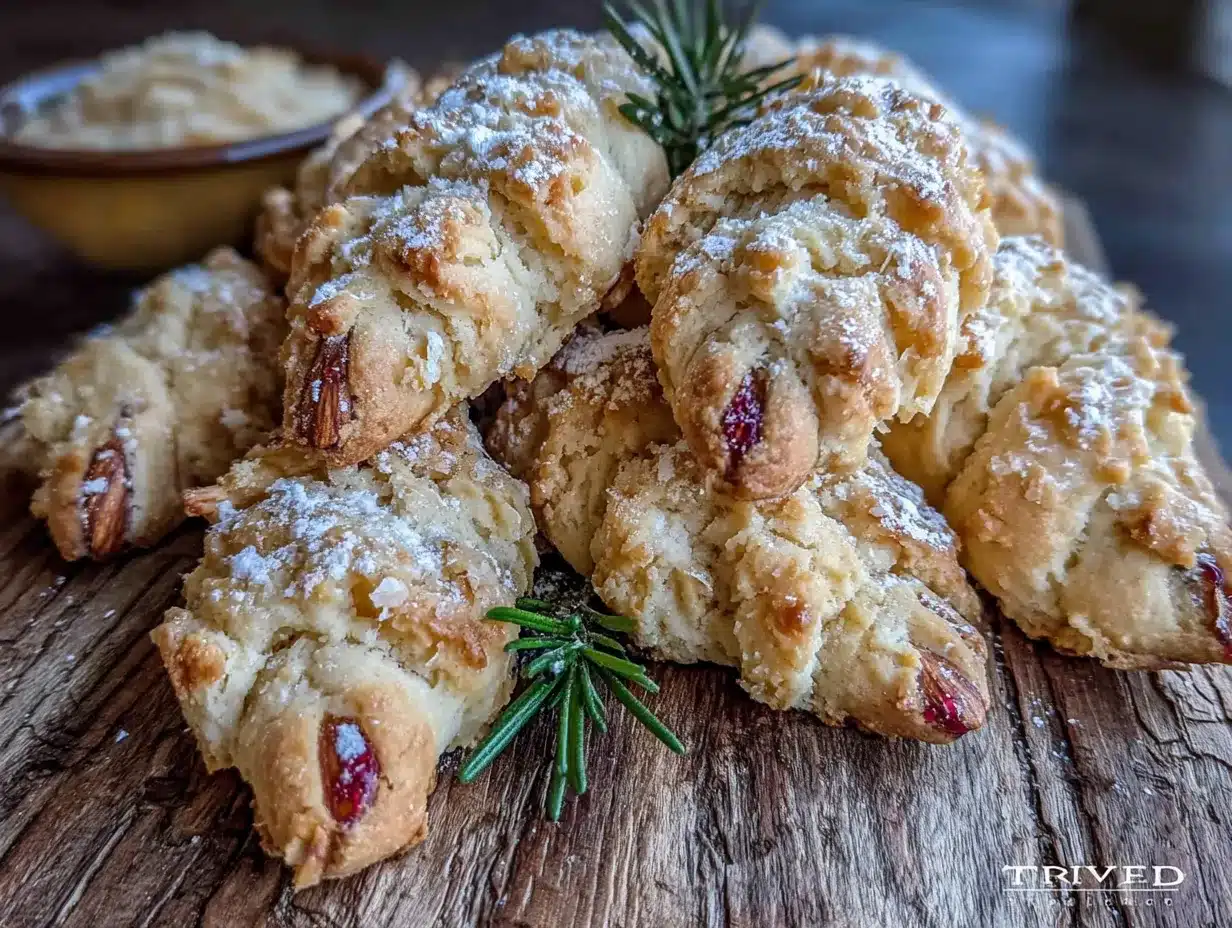
- About 30 whole almonds, skin on (the brown skin looks more like dirty fingernails — trust me on this)
- 2-3 tablespoons strawberry or raspberry jam (red jam looks like blood at the nail bed; apricot works too but isn’t as gruesome)
- 1 egg yolk + 1 tablespoon water, beaten together for egg wash
- Red food coloring (optional) , for that extra gory look around the “cut” ends
Ingredient Tips and Substitutions
For the butter, make sure it’s truly softened — you should be able to press a finger into it easily. Cold butter won’t cream properly with the sugar, and you’ll end up with dense, flat cookies. If you’re dairy-free, I’ve had good results with Earth Balance buttery sticks; just note the texture will be slightly less tender.
The almond extract is where the magic happens. Don’t skip it or substitute with more vanilla — the almond flavor is what makes these cookies taste like something from a fancy bakery. I’ve tried making these with pure almond extract versus imitation, and honestly, for baking, the artificial stuff works fine and is much cheaper. Nielsen-Massey makes a lovely pure version if you want to splurge.
For the jam, strawberry gives the most realistic “blood” color, but raspberry works too. Avoid jelly — it’s too firm and won’t create that oozy, slightly wet look around the almond nail.
Equipment Needed
The beauty of these spooky witch finger cookies with almond nails is that they don’t require any specialized equipment. Here’s what you’ll need:
- Electric mixer (stand mixer or hand mixer both work; I’ve made these with a hand mixer for years and never had issues)
- Large mixing bowl
- Baking sheets (2-3, if you have them — otherwise you’ll need to work in batches)
- Parchment paper or silicone baking mats (parchment is easier for cleanup)
- Small knife or bench scraper (for making the knuckle marks)
- Pastry brush (for the egg wash)
- Small offset spatula (helpful for transferring the delicate shaped cookies)
- Wire cooling rack
If you don’t have a pastry brush, use a clean fingertip to dab on the egg wash — it actually works better for getting into the creases. And if you don’t have a bench scraper, a butter knife works perfectly for making the knuckle indentations. I’ve also used the back of a chopstick in a pinch!
One tip: if your baking sheets are dark-colored, reduce the oven temperature by 25°F. Dark pans absorb more heat and can brown the bottoms of your cookies before the tops are done. I learned this the hard way with my first batch — the bottoms were almost burnt while the tops were still pale.
Preparation Method
Making these spooky witch finger cookies with almond nails is actually quite straightforward. The key is working with cool dough and taking your time with the shaping. Here’s how to do it:
- Cream the butter and sugar — In a large bowl, beat the softened butter and granulated sugar together until light and fluffy, about 3-4 minutes. Scrape down the sides of the bowl halfway through. You want the mixture to look pale and almost doubled in volume. This step is crucial for tender cookies.
- Add the wet ingredients — Beat in the egg, almond extract, and vanilla extract until fully combined. The mixture might look slightly curdled at this point — don’t panic, that’s normal. It’ll come together once you add the flour.
- Mix the dry ingredients — In a separate bowl, whisk together the flour, salt, and baking powder. Add this to the wet mixture in two additions, mixing on low speed until just combined. Stop as soon as the flour disappears — overmixing develops gluten and makes tough cookies. The dough should be soft but not sticky.
- Chill the dough — Divide the dough in half, flatten each half into a disk, wrap in plastic wrap, and refrigerate for at least 1 hour. I’ve pushed it to 30 minutes in a pinch, but the longer chill makes shaping much easier. The dough needs to be firm enough to hold its shape when you form the fingers.
- Preheat and prepare — Preheat your oven to 325°F (163°C). Line your baking sheets with parchment paper. Take one disk of dough out of the fridge — keep the other chilled until you’re ready for it.
- Shape the fingers — Here’s where the fun begins. Take a small piece of dough, about the size of a walnut, and roll it into a log about 3 inches long. It should be slightly thicker at one end (the “wrist” end) and tapered at the other (the “fingertip” end). Place it on the prepared baking sheet. Don’t worry if they look uneven — real fingers aren’t perfectly uniform either! Use a small knife to gently press lines into the dough for knuckles — make 2-3 indentations per finger, curving slightly to mimic natural joint creases.
- Add the almond nail — Take a whole almond and press it firmly into the tapered end of the finger, pointed side facing out. The almond should be embedded about 1/4 inch into the dough. Press a small amount of jam around the base of the almond to look like blood or cuticle. This is what makes them truly creepy!
- Apply the egg wash — Gently brush each finger with the egg wash mixture. This gives them a slightly aged, skin-like appearance after baking. Don’t oversaturate — a light coating is enough.
- Chill again — Place the baking sheet with the shaped fingers in the freezer for 10-15 minutes. This is the secret to maintaining their shape during baking. I’ve skipped this step before, and the fingers puffed up into fat little sausages instead of slender witch fingers.
- Bake — Bake for 12-15 minutes, until the cookies are just set and the edges are barely golden. The bottoms should be light golden brown. They’ll look slightly soft when you take them out — that’s perfect. Let them cool on the baking sheet for 5 minutes, then transfer to a wire rack.
- Add extra gore (optional) — Once cooled, you can dab a tiny bit more red jam at the “cut” end of the finger for an even more gruesome effect. I sometimes add a drop of red food coloring mixed with a bit of corn syrup for that glossy, fresh-from-the-wound look. My kids love this part.
Repeat with the remaining dough. You should get about 30-35 cookies total, depending on how large you make them.
Cooking Tips & Techniques
After making these spooky witch finger cookies with almond nails more times than I’d like to admit, I’ve collected a few hard-won lessons. Let me save you some trouble.
The dough temperature is everything. If your dough gets too warm while you’re shaping, pop the whole baking sheet in the fridge for 10 minutes. Warm dough spreads in the oven, and spread fingers look more like mutant slugs than witch fingers. I speak from experience — my first batch looked like something from a horror movie for all the wrong reasons.
Don’t overwork the dough. When you’re rolling the fingers, use gentle pressure. If you compress the dough too much, the cookies will be tough. Think of it like you’re gently coaxing the dough into shape, not wrestling it into submission.
Position the almond carefully. The almond should be pressed in so about half of it is visible. If you push it in too far, it’ll disappear during baking. Not far enough, and it’ll fall off when you pick up the cookie. I lost about 5 almonds to the oven floor before I figured out the right depth.
Make the knuckle marks deeper than you think. They’ll soften and spread slightly during baking. I press mine in about 1/8 inch deep, and they come out looking just right — subtle but noticeable.
Work in small batches. Don’t try to shape all 30 fingers at once. The dough will warm up, and your later fingers will look different from your first ones. I shape one baking sheet at a time, keeping the rest of the dough in the fridge.
One mistake I still make — I sometimes forget to rotate the baking sheet halfway through baking. These cookies are pale enough that it’s hard to tell if they’re browning unevenly. Set a timer to remind yourself.
Variations & Adaptations
These spooky witch finger cookies with almond nails are surprisingly versatile. Here are some variations I’ve tried and loved:
Chocolate Witch Fingers — Replace 1/4 cup of the flour with cocoa powder. The chocolate version looks even more sinister, especially with the red jam. I made these for a Halloween party last year, and they were gone before the plain ones.
Gluten-Free Version — Substitute the all-purpose flour with a good 1:1 gluten-free baking flour blend. I’ve used Bob’s Red Mill with great results. Add 1/4 teaspoon xanthan gum if your blend doesn’t already include it. The texture is slightly more crumbly but still delicious.
Vegan Witch Fingers — Use vegan butter (I like Miyoko’s) and replace the egg with a flax egg (1 tablespoon ground flaxseed + 3 tablespoons water). For the egg wash, use a mixture of maple syrup and non-dairy milk. The cookies won’t be quite as tender, but they’ll still be tasty and creepy.
Different Nut Nails — If you don’t have almonds or have a nut allergy, use whole cashews or even candy corn for a sweeter version. Pistachios create a green nail effect that’s surprisingly unsettling in a different way.
Spiced Version — Add 1 teaspoon of pumpkin pie spice to the dough for a fall-flavored twist. The warm spices pair beautifully with the almond extract. This is my personal favorite for October baking.
Extra Gory Version — After baking, brush a little corn syrup mixed with red food coloring around the “cut” end of the finger. It creates a glossy, wet look that’s genuinely disturbing. My teenagers love this version for scaring their friends.
Serving & Storage Suggestions
These cookies are best served at room temperature, arranged on a platter in a way that maximizes their creep factor. I like to pile them haphazardly, as if someone just dropped a handful of severed fingers on the plate. A few extra almonds scattered around adds to the effect.
For a Halloween party, arrange them on a black platter with a small sign warning “Witch Fingers — Eat at Your Own Risk.” I’ve seen guests literally hesitate before picking one up, which is exactly the reaction you want.
Storage: These cookies keep beautifully in an airtight container at room temperature for up to a week. The flavor actually improves after a day or two — the almond extract mellows and melds with the butter. Layer them between sheets of wax paper to prevent the almonds from getting knocked off.
Freezer Instructions: You can freeze the baked cookies for up to 3 months. Place them in a single layer on a baking sheet, freeze until solid, then transfer to a freezer bag. Thaw at room temperature for about 30 minutes before serving. The almonds might soften slightly, but they’ll still taste great.
Make-Ahead Tip: The dough can be refrigerated for up to 3 days or frozen for up to 2 months. If freezing, shape the dough into a log, wrap tightly, and slice and shape when partially thawed. This is a lifesaver for busy Halloween weeks.
One thing I’ve noticed — these cookies develop a slightly softer texture after a day or two, which actually makes them more realistic. Fresh from the oven, they’re crisp. Day-old fingers have a more tender, almost cake-like texture that’s somehow more unsettling to bite into.
Nutritional Information & Benefits
Let’s be honest — these are cookies, not health food. But here’s the breakdown if you’re curious:
| Per Cookie (based on 32 cookies) | Amount |
|---|---|
| Calories | ~145 |
| Total Fat | 8g |
| Saturated Fat | 5g |
| Carbohydrates | 17g |
| Sugar | 8g |
| Protein | 2g |
| Sodium | 65mg |
On the positive side, almonds are a good source of vitamin E, magnesium, and healthy fats. The butter provides vitamin A, and the egg adds a bit of protein. Are these a health food? Absolutely not. But for a Halloween treat, they’re not the worst option either.
If you’re watching your sugar intake, you can reduce the sugar to 3/4 cup without significantly affecting the texture. I’ve tested this, and the cookies are still sweet enough to satisfy but won’t send anyone into a sugar coma.
These cookies are vegetarian but not vegan (in their standard form). They contain gluten, dairy, eggs, and tree nuts (almonds). If you’re serving at a party where allergies are a concern, make sure to label them clearly.
Frequently Asked Questions
Can I make these cookies ahead of time?
Absolutely! You can make the dough up to 3 days ahead and keep it refrigerated. You can also bake the cookies up to a week in advance and store them in an airtight container. They actually taste better after a day or two.
My almonds keep falling off during baking. What am I doing wrong?
This is the most common issue. Make sure you’re pressing the almond firmly into the dough — about 1/4 inch deep. Also, the jam helps act as glue. Don’t skip it! If almonds are still falling off, try pressing them in after baking while the cookies are still warm.
Can I use almond flour instead of all-purpose flour?
I don’t recommend it. Almond flour doesn’t have enough structure to hold the finger shape. The cookies will spread into flat discs. Stick with all-purpose flour or a gluten-free blend designed for cookies.
How do I make the cookies look more realistic?
Focus on the details. Make the knuckle indentations deeper than you think they need to be. Vary the length and thickness of each finger — real fingers aren’t all the same size. And don’t forget to add a little jam around the nail bed for that gruesome touch.
Can I freeze the unbaked shaped cookies?
Yes! Shape the fingers, place them on a baking sheet, and freeze until solid. Transfer to a freezer bag. When you’re ready to bake, place them on a parchment-lined sheet and bake straight from frozen, adding 2-3 minutes to the baking time.
Conclusion
These spooky witch finger cookies with almond nails are the kind of recipe that makes Halloween baking genuinely fun. They’re creepy enough to impress, simple enough to make with kids, and delicious enough that people actually want to eat them — not just take photos for Instagram.
I still think about that little bakery every time I make these. But you know what? My version is better. It’s more reliable, the flavor is spot-on, and I’ve perfected the technique so anyone can make them at home. There’s something deeply satisfying about recreating a lost food memory and making it your own.
I’d love to hear how yours turn out! Did you add any creepy twists? Did your family scream or laugh? Drop a comment below and share your witch finger cookie creations. And if you’re looking for more Halloween baking ideas, check out our Halloween cookie recipes collection for more spooky treats. Happy haunting — and happy baking!
Pin This Recipe!
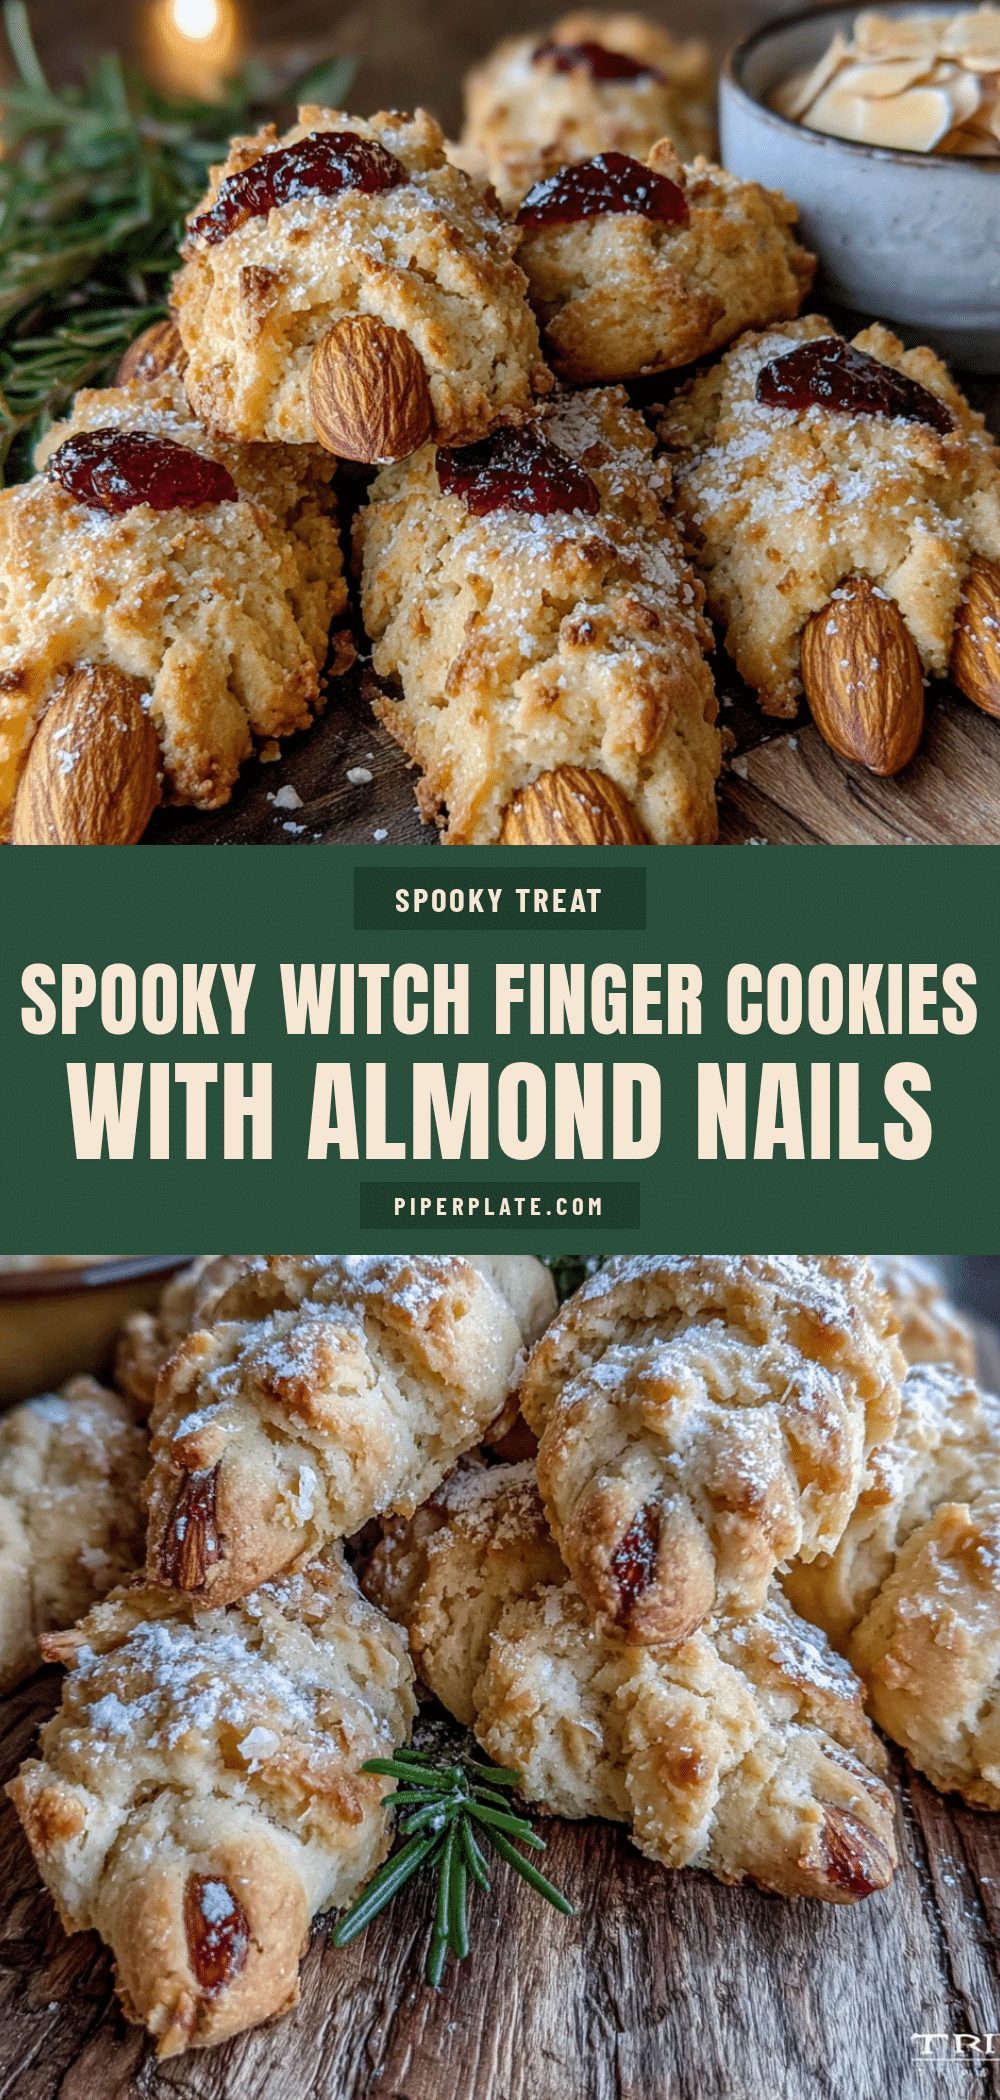
Easy Spooky Witch Finger Cookies with Almond Nails

These spooky witch finger cookies with almond nails are creepy in the best way—perfect for Halloween parties, school bake sales, or just making your family do a double-take. They’re buttery shortbread cookies with a subtle almond flavor that’s genuinely crave-worthy.
- Prep Time: 15 minutes
- Cook Time: 15 minutes
- Total Time: 1 hour 30 minutes (includes chilling time)
- Yield: 30-35 cookies 1x
- Category: Dessert
- Cuisine: American
Ingredients
- 1 cup (226g) unsalted butter, softened to room temperature
- 1 cup (200g) granulated sugar
- 1 large egg, room temperature
- 1 teaspoon almond extract
- 1/2 teaspoon vanilla extract
- 2 1/2 cups (312g) all-purpose flour, spooned and leveled
- 1/2 teaspoon salt
- 1/2 teaspoon baking powder
- About 30 whole almonds, skin on
- 2–3 tablespoons strawberry or raspberry jam
- 1 egg yolk + 1 tablespoon water, beaten together for egg wash
- Red food coloring (optional)
Instructions
- Cream the butter and sugar: In a large bowl, beat the softened butter and granulated sugar together until light and fluffy, about 3-4 minutes. Scrape down the sides of the bowl halfway through.
- Add the wet ingredients: Beat in the egg, almond extract, and vanilla extract until fully combined.
- Mix the dry ingredients: In a separate bowl, whisk together the flour, salt, and baking powder. Add this to the wet mixture in two additions, mixing on low speed until just combined.
- Chill the dough: Divide the dough in half, flatten each half into a disk, wrap in plastic wrap, and refrigerate for at least 1 hour.
- Preheat and prepare: Preheat your oven to 325°F (163°C). Line your baking sheets with parchment paper.
- Shape the fingers: Take a small piece of dough, about the size of a walnut, and roll it into a log about 3 inches long, slightly thicker at one end and tapered at the other. Place on the prepared baking sheet. Use a small knife to gently press lines into the dough for knuckles—make 2-3 indentations per finger.
- Add the almond nail: Take a whole almond and press it firmly into the tapered end of the finger, pointed side facing out, embedded about 1/4 inch into the dough. Press a small amount of jam around the base of the almond.
- Apply the egg wash: Gently brush each finger with the egg wash mixture.
- Chill again: Place the baking sheet with the shaped fingers in the freezer for 10-15 minutes.
- Bake: Bake for 12-15 minutes, until the cookies are just set and the edges are barely golden. Let them cool on the baking sheet for 5 minutes, then transfer to a wire rack.
- Add extra gore (optional): Once cooled, dab a tiny bit more red jam at the ‘cut’ end of the finger for an even more gruesome effect.
Notes
The dough temperature is everything. If your dough gets too warm while shaping, pop the whole baking sheet in the fridge for 10 minutes. Don’t overwork the dough. Position the almond carefully—about half visible. Make knuckle marks deeper than you think. Work in small batches, keeping remaining dough chilled. Rotate baking sheet halfway through baking.
Nutrition
- Serving Size: 1 cookie
- Calories: 145
- Sugar: 8
- Sodium: 65
- Fat: 8
- Saturated Fat: 5
- Carbohydrates: 17
- Protein: 2
Keywords: witch finger cookies, Halloween cookies, spooky cookies, almond cookies, shortbread cookies, Halloween baking, creepy cookies


