Love this? Save it for later!
Share the inspiration with your friends
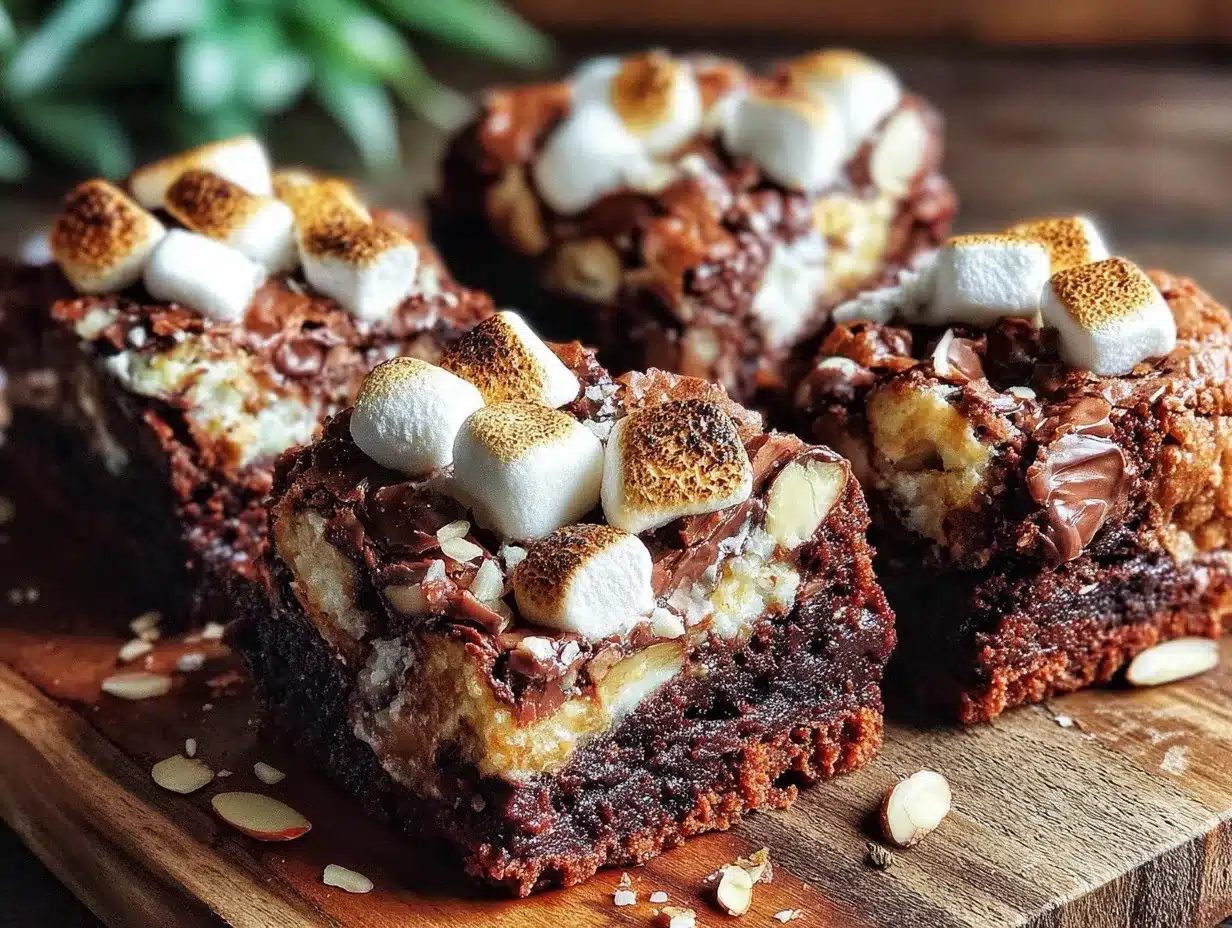
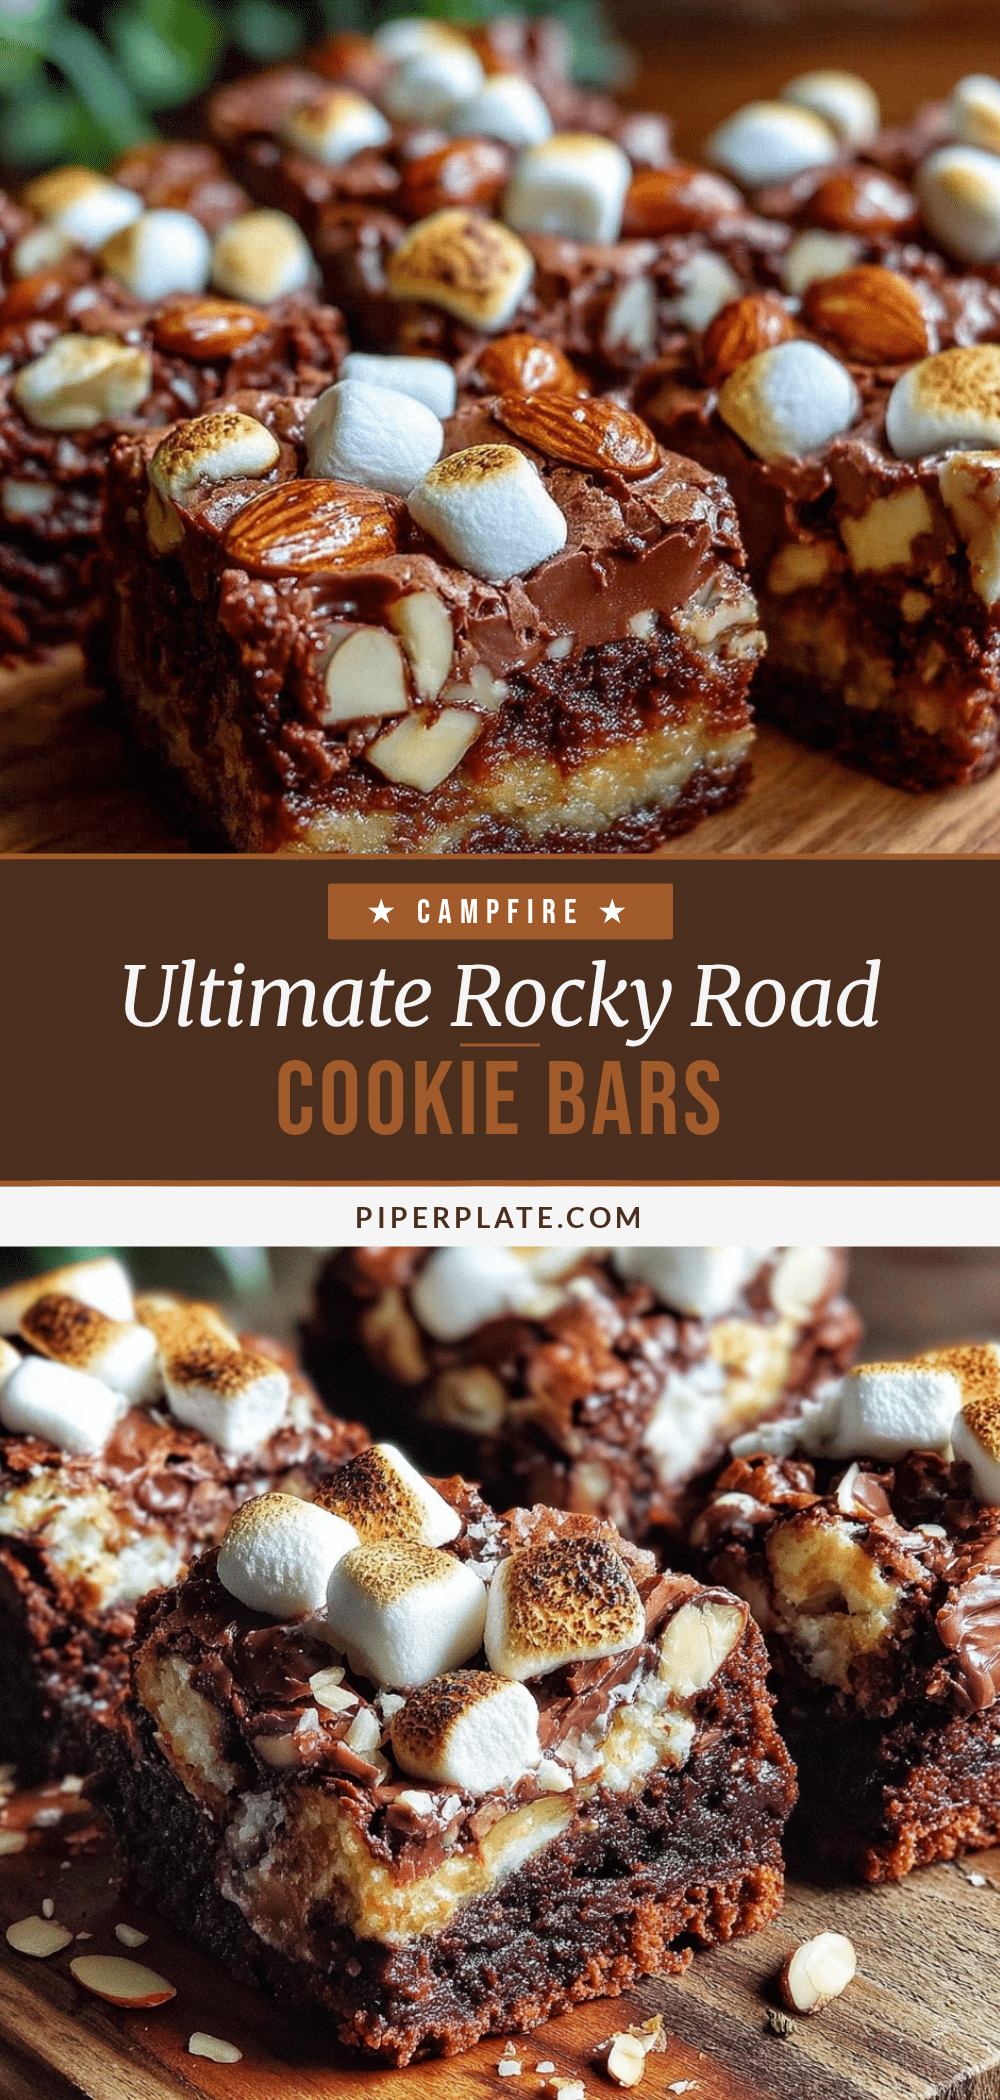
“The crackle of the campfire, the chill in the night air, and the smell of something sweet melting over the flames—those moments stick with you,” my old hiking buddy Mark said one September evening as we sat around the firepit in his backyard. I wasn’t expecting a food revelation during what was supposed to be a simple get-together, but that’s when he pulled out a pan of these Ultimate Cozy Campfire Rocky Road Cookie Bars. Honestly, I thought it was just another gooey treat, but the way the marshmallows toasted perfectly while the chocolate melted into the cookie base was next-level comfort food magic.
It wasn’t just the taste, though—there was something about eating these bars straight from the pan, under the stars, with a slightly smoky edge that made them unforgettable. You know that feeling when a recipe surprises you so much you scribble it down on whatever you have handy? For me, it was the back of a crumpled napkin, right there beside the firepit. I kept thinking about how these rocky road bars could turn any camping trip, backyard bonfire, or even a cozy night in into something special. Let me tell you, this recipe has stuck around my kitchen repertoire ever since—because sometimes, the simplest sweet treats are the ones that bring the most warmth, both literally and figuratively.
Why You’ll Love This Recipe
Having tested this recipe more times than I can count (with a few slightly burnt batches along the way, truth be told), I can say the Ultimate Cozy Campfire Rocky Road Cookie Bars are a winner for so many reasons. Here’s why you might just find yourself making these over and over:
- Quick & Easy: Ready in about 35 minutes, these bars fit perfectly into busy evenings or spontaneous cravings.
- Simple Ingredients: You probably have most of these in your pantry already—nothing fancy required.
- Perfect for Outdoor Gatherings: Whether it’s a camping trip, bonfire night, or backyard hangout, these bars are crowd-pleasers.
- Crowd-Pleaser: Kids and adults alike rave about the gooey marshmallow chunks and rich chocolate.
- Unbelievably Delicious: The soft, chewy cookie base combined with toasted marshmallows and crunchy nuts makes every bite a comforting experience.
This isn’t some run-of-the-mill rocky road recipe, either. I use a special blend of semi-sweet and milk chocolate chips for a balanced flavor that’s neither too bitter nor too sweet. Plus, toasting the marshmallows right on the bars (before baking!) gives a toasty, slightly caramelized edge that’s just heavenly. Honestly, it’s the kind of recipe that makes you close your eyes after the first bite and say, “Yep, this was worth the wait.” Whether you’re impressing friends or just treating yourself after a long day, these bars hit the spot every single time.
What Ingredients You Will Need
This recipe relies on straightforward, wholesome ingredients that come together for a rich, cozy treat. Most of these are pantry staples, so you don’t have to run to the store unless you’re out of basics. Here’s what you’ll need:
- For the Cookie Base:
- All-purpose flour (2 cups / 250g) – provides structure; sift before measuring for best results
- Baking soda (1 teaspoon) – helps with a slight rise and chewiness
- Salt (1/2 teaspoon) – balances sweetness
- Unsalted butter (3/4 cup / 170g), softened – I like Land O’Lakes for a creamy texture
- Light brown sugar (3/4 cup / 150g), packed – adds moisture and caramel notes
- Granulated sugar (1/4 cup / 50g) – for crisp edges
- Large eggs (2), room temperature – eggs bind and add richness
- Pure vanilla extract (2 teaspoons) – enhances flavors naturally
- For the Rocky Road Topping:
- Semi-sweet chocolate chips (1 cup / 170g) – I prefer Ghirardelli for melt quality
- Milk chocolate chips (1/2 cup / 85g) – adds smooth sweetness
- Mini marshmallows (1 1/2 cups / 90g) – the star gooey element
- Chopped roasted almonds or pecans (3/4 cup / 90g) – toasted for crunch and nutty flavor
If you want to swap out nuts, feel free to use walnuts or leave them out for a nut-free version. For a gluten-free twist, replacing the flour with a 1:1 gluten-free baking flour works well. And hey, if you’re dairy-free, coconut oil in place of butter combined with dairy-free chocolate chips makes a satisfying alternative.
Equipment Needed
Making these campfire rocky road cookie bars doesn’t call for fancy gadgets, but having the right tools definitely smooths the process.
- 9×13-inch baking pan: Glass or metal works fine; I prefer glass to see the edges browning.
- Mixing bowls: One large for the cookie base and a smaller one for the topping ingredients.
- Hand mixer or stand mixer: Makes creaming butter and sugars effortless, but a sturdy whisk and elbow grease can do the job too.
- Measuring cups and spoons: Accurate measurements are key here.
- Rubber spatula: For folding in ingredients without overmixing.
- Oven mitts and cooling rack: Safety and proper cooling matter, especially for gooey treats.
If you don’t own a mixer, don’t sweat it—just take your time creaming the butter and sugars by hand. Also, a good sharp knife for chopping nuts makes a difference, but pre-chopped nuts from the store work just fine.
Preparation Method
- Preheat your oven to 350°F (175°C). Grease a 9×13-inch baking pan or line it with parchment paper, leaving some overhang for easy removal later. This step saves you from a sticky mess.
- Mix dry ingredients. In a medium bowl, whisk together 2 cups (250g) all-purpose flour, 1 teaspoon baking soda, and ½ teaspoon salt. This blends the leavening evenly and prevents clumps.
- Cream butter and sugars. In a large bowl, use a mixer on medium speed to beat ¾ cup (170g) softened unsalted butter with ¾ cup (150g) packed light brown sugar and ¼ cup (50g) granulated sugar until the mixture is light and fluffy—about 3 minutes. If doing by hand, this takes a bit more muscle but is doable.
- Add eggs and vanilla. Beat in 2 large eggs, one at a time, then 2 teaspoons pure vanilla extract until combined. The batter will look glossy and smooth.
- Incorporate dry ingredients. Gradually add the flour mixture to the wet ingredients, mixing on low speed or folding with a spatula. Be careful not to overmix—stop when you see no more flour streaks. This keeps the bars tender.
- Transfer the dough to the prepared pan. Spread evenly with a spatula, pressing gently to smooth the surface. The dough will be thick and slightly sticky.
- Top with rocky road mix. Sprinkle 1 cup (170g) semi-sweet and ½ cup (85g) milk chocolate chips evenly over the dough. Then add 1 ½ cups (90g) mini marshmallows and ¾ cup (90g) chopped roasted nuts. Press lightly to embed the toppings into the dough.
- Bake for 25-30 minutes. The edges should be golden brown, and the marshmallows lightly toasted. If your oven runs hot, check at 22 minutes to prevent burning. The center might look slightly soft but will firm up as it cools.
- Cool completely. Let the bars rest in the pan on a wire rack for at least 30 minutes before slicing. This step is crucial so the gooey marshmallows set a bit and the bars hold together.
- Slice and serve. Use a sharp knife, wiping it clean between cuts for neat squares.
Pro tip: If you want that campfire toasted marshmallow flavor without the fire, pop the bars under a broiler for 30 seconds at the end—just keep an eye on them! Also, if you forget to soften your butter, cut it into small cubes and microwave for 10-second bursts, checking often.
Cooking Tips & Techniques
Rocky road bars are deceptively simple but can go sideways if you’re not careful. Here are some lessons I learned the hard way:
- Don’t skip softening the butter. Cold butter won’t cream properly, and your dough will be lumpy. Room temperature is key.
- Measure flour correctly. Too much flour makes dry bars. I spoon flour into my measuring cup and level it off for accuracy.
- Mix just enough. Overmixing the dough develops gluten, leading to tough bars. Watch for no visible flour streaks, then stop.
- Press toppings gently. You want the marshmallows and chocolate chips nestled but not buried, so they toast nicely.
- Watch your bake time. The marshmallows can burn quickly if you leave them in too long. If you want extra toasty marshmallows, use the broiler briefly instead of longer baking.
- Cooling matters. Patience here pays off. Cutting too soon leads to messy squares.
One time, I forgot to set the timer and the bars came out a bit too dark on the edges. They still tasted amazing, but I learned the importance of oven vigilance—especially with marshmallows involved!
Variations & Adaptations
If you like a little twist or want to adjust for dietary needs, here are some ideas I’ve tried and liked:
- Vegan version: Substitute dairy-free butter and use vegan chocolate chips. Swap eggs with flax eggs (1 tbsp ground flaxseed + 3 tbsp water per egg) and you’re good to go.
- Peanut butter rocky road: Swirl ½ cup creamy peanut butter into the cookie dough before baking for a nutty depth.
- Seasonal flair: Add dried cranberries or chopped candied ginger with the nuts for holiday vibes.
- Campfire twist: Instead of nuts, toss in crushed graham crackers for a s’mores-inspired bar.
- Low sugar: Use a sugar substitute like coconut sugar or a blend of erythritol and monk fruit sweetener, but expect a slightly different texture.
Personally, I once made these bars with toasted coconut flakes instead of nuts for a tropical spin that disappeared in minutes at a beach bonfire. Feel free to experiment based on what you have or prefer!
Serving & Storage Suggestions
These cookie bars are best served slightly warm, just enough for the chocolate to be melty and marshmallows soft. If you’re enjoying them at a campfire, they’re perfect fresh from the pan (or wrapped in foil to keep warm).
Pair them with a cold glass of milk, a cup of hot cocoa, or even your favorite coffee for a cozy combo. They also make great portable snacks for hikes or picnics.
To store, cover the bars tightly with plastic wrap or place them in an airtight container. They last for about 4 days at room temperature, but for longer storage, pop them in the fridge for up to 1 week or freeze for up to 3 months.
When reheating, microwave a single bar for 10-15 seconds or warm gently in a low oven (around 300°F / 150°C) for 5 minutes to revive that gooey goodness. Flavors actually develop nicely over a day or two, so if you can wait, even better!
Nutritional Information & Benefits
While these Ultimate Cozy Campfire Rocky Road Cookie Bars are definitely a treat, they do bring some nutritional perks thanks to the nuts and eggs included. Here’s a rough estimate per serving (based on 12 servings):
| Calories | 280 kcal |
|---|---|
| Fat | 14g (mostly from butter and nuts) |
| Protein | 4g |
| Carbohydrates | 35g |
| Fiber | 2g |
| Sugar | 22g |
The almonds or pecans add heart-healthy fats and a bit of protein, while eggs contribute to the overall protein content and provide essential nutrients. Of course, these bars do contain gluten, dairy, and nuts, so keep that in mind if you have allergies.
From a wellness perspective, I find that enjoying a treat like this in moderation, especially shared with friends or family around a fire, adds a lot to mental well-being—sometimes that’s just as important as the nutrition facts!
Conclusion
There’s something undeniably comforting about these Ultimate Cozy Campfire Rocky Road Cookie Bars. They bring together the nostalgic flavors of campfire treats with the simplicity and convenience of a homemade cookie bar. Whether you’re a seasoned camper looking for easy dessert ideas or just someone who loves a warm, gooey sweet, this recipe delivers every time.
Feel free to adjust the nuts, chocolate, or marshmallows to suit your taste or dietary needs—it’s forgiving and flexible. Honestly, I keep making these because they capture that perfect mix of sweet, chewy, and crunchy that’s hard to beat.
I’d love to hear how you make these bars your own or any fun campfire stories they inspire. Drop a comment below, share your favorite tweaks, and maybe even pass along the recipe to a friend who needs a cozy treat. Happy baking—and here’s to many more nights warmed by fire and rocky road bars!
FAQs
How do I prevent marshmallows from burning while baking?
To avoid burnt marshmallows, bake at the recommended temperature and check the bars at around 22 minutes. Alternatively, add the marshmallows halfway through baking or briefly broil the bars at the end for a toasted effect.
Can I make these bars ahead of time?
Absolutely! These bars store well at room temperature for a few days and even better in the fridge for up to a week. Just warm slightly before serving to bring back the gooey texture.
What can I substitute for nuts if I have allergies?
Try replacing nuts with extra mini marshmallows, crushed graham crackers, or toasted coconut flakes for texture. Just avoid nuts completely if allergies are a concern.
Can I freeze the cookie bars?
Yes, wrap them tightly in plastic wrap and foil or store in an airtight container. They freeze well for up to 3 months. Thaw overnight in the fridge and warm before serving.
Is it possible to make these bars gluten-free?
Definitely! Use a 1:1 gluten-free baking flour blend in place of all-purpose flour. The texture might be slightly different but still delicious.
Pin This Recipe!
Ultimate Cozy Campfire Rocky Road Cookie Bars

These Ultimate Cozy Campfire Rocky Road Cookie Bars combine a soft, chewy cookie base with toasted marshmallows, rich chocolate chips, and crunchy nuts for a comforting treat perfect for camping trips, bonfires, or cozy nights in.
- Prep Time: 15 minutes
- Cook Time: 25-30 minutes
- Total Time: 40-45 minutes
- Yield: 12 servings 1x
- Category: Dessert
- Cuisine: American
Ingredients
- 2 cups (250g) all-purpose flour
- 1 teaspoon baking soda
- 1/2 teaspoon salt
- 3/4 cup (170g) unsalted butter, softened
- 3/4 cup (150g) packed light brown sugar
- 1/4 cup (50g) granulated sugar
- 2 large eggs, room temperature
- 2 teaspoons pure vanilla extract
- 1 cup (170g) semi-sweet chocolate chips
- 1/2 cup (85g) milk chocolate chips
- 1 1/2 cups (90g) mini marshmallows
- 3/4 cup (90g) chopped roasted almonds or pecans
Instructions
- Preheat your oven to 350°F (175°C). Grease a 9×13-inch baking pan or line it with parchment paper, leaving some overhang for easy removal later.
- In a medium bowl, whisk together 2 cups (250g) all-purpose flour, 1 teaspoon baking soda, and 1/2 teaspoon salt.
- In a large bowl, beat 3/4 cup (170g) softened unsalted butter with 3/4 cup (150g) packed light brown sugar and 1/4 cup (50g) granulated sugar until light and fluffy, about 3 minutes.
- Beat in 2 large eggs, one at a time, then add 2 teaspoons pure vanilla extract until combined.
- Gradually add the flour mixture to the wet ingredients, mixing on low speed or folding with a spatula until no flour streaks remain. Do not overmix.
- Transfer the dough to the prepared pan and spread evenly with a spatula, pressing gently to smooth the surface.
- Sprinkle 1 cup (170g) semi-sweet and 1/2 cup (85g) milk chocolate chips evenly over the dough. Add 1 1/2 cups (90g) mini marshmallows and 3/4 cup (90g) chopped roasted nuts. Press lightly to embed the toppings.
- Bake for 25-30 minutes until edges are golden brown and marshmallows are lightly toasted. Check at 22 minutes if your oven runs hot.
- Cool completely in the pan on a wire rack for at least 30 minutes before slicing.
- Slice into bars using a sharp knife, wiping it clean between cuts.
Notes
To avoid burnt marshmallows, check bars at 22 minutes or add marshmallows halfway through baking. For extra toasted marshmallows, broil bars for 30 seconds at the end. Soften butter to room temperature before creaming. Cool bars completely before slicing to prevent messiness. Variations include vegan substitutions, peanut butter swirl, seasonal add-ins, and nut-free options.
Nutrition
- Serving Size: 1 bar (1/12th of rec
- Calories: 280
- Sugar: 22
- Fat: 14
- Carbohydrates: 35
- Fiber: 2
- Protein: 4
Keywords: rocky road, cookie bars, campfire dessert, marshmallow bars, chocolate chip bars, easy dessert, camping recipe, bonfire treat