Love this? Save it for later!
Share the inspiration with your friends
I started to explain why we couldn’t just use store-bought graham crackers and call it a day—then stopped. My younger sister had wandered into the kitchen while I was layering a traditional icebox cake for a family dinner, and she watched me fuss over homemade components with growing impatience. “But why does it have to be so complicated?” she asked, pointing at the box of honey grahams on the counter. “Isn’t the whole point that it’s supposed to be easy?”
And honestly? She had a point.
Let me tell you, I’ve made more complicated desserts than I care to count. There was that three-layer mousse situation that took an entire afternoon. The time I attempted French macarons and nearly threw my mixer out the window. But this cozy no-bake s’mores icebox cake? It humbled me in the best way possible. My sister’s simple suggestion—just use the good graham crackers, don’t overthink it—turned into one of the best desserts I’ve ever made.
It was a Tuesday evening in late October. The power flickered once during a storm, and the kitchen smelled like vanilla and chocolate. I had a cracked Pyrex bowl that I kept meaning to replace, and somewhere between layering chocolate pudding and crushed graham crackers, I realized this was exactly what comfort food should be. No stress. No perfectionism. Just honest, delicious layers that come together in about ten minutes.
Maybe you’ve been there—overcomplicating a recipe because you thought “easy” couldn’t possibly mean “good.” But this cozy no-bake s’mores icebox cake is proof that sometimes the simplest approach wins. It’s the dessert I keep making, not because it’s impressive (though it is), but because it feels like a hug on a plate. And honestly? That’s worth more than any complicated technique I’ve ever learned.
Why You’ll Love This Recipe
I’ve tested this cozy no-bake s’mores icebox cake more times than I’d like to admit—mostly because my family kept eating it before I could photograph it. After about six rounds (and some very happy taste-testers), I can confidently say this recipe delivers on every level. Here’s why it’s become my go-to dessert:
- Quick & Easy : Comes together in just 10 minutes of active prep time. No oven, no stovetop, no fuss. Perfect for those evenings when you need dessert without the production.
- Simple Ingredients : You probably have most of these in your pantry right now. No fancy chocolate, no obscure extracts, no special-order anything. Just honest ingredients that work.
- Perfect for Cozy Nights : This is the dessert you make when the weather turns cold, or you’ve had a rough day, or you just want something that feels like childhood. It’s comfort food in its purest form.
- Crowd-Pleaser : I’ve served this at family gatherings, potlucks, and quiet dinners for two. Kids love it. Adults love it. Even my picky uncle asked for seconds.
- Unbelievably Delicious : The combination of creamy chocolate pudding, crunchy graham crackers, and fluffy marshmallow topping creates something truly magical. It’s nostalgic but elevated—familiar but surprising.
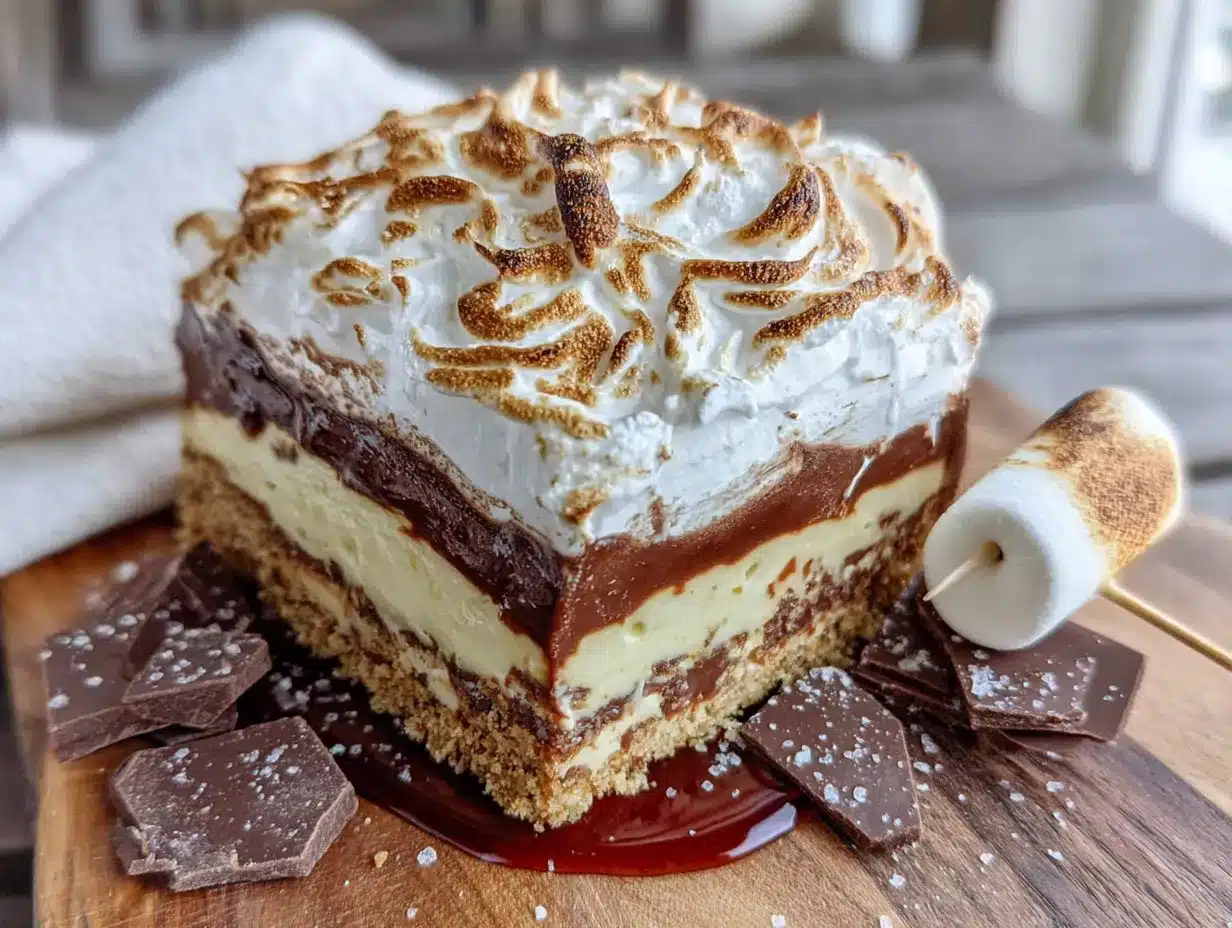
What makes this cozy no-bake s’mores icebox cake different from other versions? It’s the texture. By letting it rest in the fridge overnight, the graham crackers soften into something almost cake-like while maintaining just enough structure. The chocolate layer stays rich and smooth, and the marshmallow topping gets that perfect toasted finish under the broiler. It’s not just another icebox cake—it’s the one that makes you close your eyes after the first bite.
This is the kind of dessert that turns a regular evening into something special. It’s warm, nostalgic, and deeply satisfying—exactly what you need when you’re craving comfort.
What Ingredients You Will Need
This recipe uses simple, wholesome ingredients to deliver that classic s’mores flavor without any unnecessary fuss. Most of these are pantry staples, which means you can whip up this cozy no-bake s’mores icebox cake whenever the craving strikes.
For the Chocolate Layer
- 3 cups whole milk (cold) – Whole milk gives the pudding its rich, creamy texture. You can use 2% in a pinch, but avoid skim—it won’t set properly.
- 1 (3.9 oz) package instant chocolate pudding mix – I prefer Jell-O brand for consistency, but any brand works. Make sure it’s instant, not cook-and-serve.
- 1 cup heavy cream – This gets whipped into the pudding for extra richness. Trust me on this one—it makes a difference.
- 1/4 cup powdered sugar – Just enough to sweeten the whipped cream without making it cloying.
- 1 teaspoon vanilla extract – Pure vanilla adds warmth and depth. Imitation works if that’s what you have.
For the S’mores Layers
- 1 (14.4 oz) box honey graham crackers – I recommend Honey Maid for that classic flavor. You’ll need about 2 full sleeves.
- 1 (7 oz) jar marshmallow creme (Fluff) – This creates the creamy marshmallow layer. Don’t substitute with mini marshmallows here—the texture is different.
- 1 cup mini marshmallows – These go on top for that toasted finish. Jet-Puffed works great.
- 1/2 cup chocolate chips (optional, for garnish) – Semi-sweet or milk chocolate, depending on your preference.
Ingredient Selection Tips : Look for graham crackers that are fresh and crisp—stale ones won’t soften properly. For the pudding, I’ve found that store-brand instant pudding works fine, but the texture is slightly less creamy than name-brand. If you’re dairy-free, you can substitute the milk with oat milk and the heavy cream with canned coconut cream (chilled overnight). Just know the texture will be slightly different.
Substitution Guidance : For a gluten-free version, use gluten-free graham crackers. For a lower-sugar option, use sugar-free pudding mix and reduce the powdered sugar in the whipped cream. And if you’re out of heavy cream, you can use 2 cups of milk total and skip the whipped cream—the pudding will be thinner but still delicious.
Equipment Needed
You don’t need much for this cozy no-bake s’mores icebox cake, which is part of its charm. Here’s what you’ll need:
- 9×13 inch baking dish – Glass or ceramic works best. I’ve used both Pyrex and a ceramic dish from Target, and both performed beautifully.
- Electric mixer (hand or stand) – For whipping the cream. You can do this by hand with a whisk, but your arm will thank you for using a mixer.
- Large mixing bowl – For the pudding mixture.
- Medium mixing bowl – For whipping the cream.
- Spatula – For spreading layers evenly. A rubber spatula works perfectly.
- Measuring cups and spoons – Accuracy matters for the pudding to set properly.
- Broiler-safe dish – If you plan to toast the marshmallows under the broiler. Make sure your baking dish is broiler-safe (Pyrex is, some ceramic isn’t—check the bottom).
- Kitchen torch (optional but fun) – For toasting marshmallows without turning on the broiler.
Budget-Friendly Options : If you don’t have an electric mixer, a whisk and some elbow grease will work for the cream—it just takes about 5 minutes of vigorous whisking. No 9×13 dish? Use two 8×8 dishes or even a deep pie plate. The layers will be thicker, but it still works beautifully.
Preparation Method
This cozy no-bake s’mores icebox cake comes together in about 10 minutes of active work. The hardest part is waiting for it to chill! Here’s how to make it:
- Make the chocolate pudding base. In a large mixing bowl, whisk together the cold milk and instant chocolate pudding mix for about 2 minutes until it thickens. Set aside for 5 minutes to fully set. The mixture should be thick and creamy—if it’s runny, give it another minute of whisking.
- Whip the cream. In a separate medium bowl, combine the heavy cream, powdered sugar, and vanilla extract. Using an electric mixer on medium-high speed, whip until soft peaks form—about 2-3 minutes. You’re looking for peaks that hold their shape but still look soft and billowy. Don’t over-whip, or you’ll end up with butter!
- Fold it together. Gently fold the whipped cream into the chocolate pudding mixture using a spatula. Use a gentle hand—you want to keep the mixture light and airy. Fold until just combined; a few streaks are fine. This creates a mousse-like texture that’s incredibly luxurious.
- Layer the graham crackers. Arrange a single layer of graham crackers in the bottom of your 9×13 inch baking dish. You’ll need to break some crackers to fit—don’t worry about perfection. They’ll soften as the cake chills. I like to create a tight fit with minimal gaps.
- Add the first chocolate layer. Spread half of the chocolate pudding mixture evenly over the graham crackers. Use your spatula to get it into all the corners. Take your time here—even layers mean every bite is perfect.
- Add the marshmallow creme. Gently warm the marshmallow creme in the microwave for about 10 seconds to make it spreadable. Dollop it over the chocolate layer and spread carefully. Don’t press too hard, or you’ll mix the layers. This is the “gooey” part of the s’mores experience!
- Repeat the layers. Add another layer of graham crackers on top of the marshmallow creme. Then spread the remaining chocolate pudding mixture over the top. Finish with a final layer of graham crackers. Yes, three layers of graham crackers—trust me on this.
- Top with marshmallows. Sprinkle the mini marshmallows evenly over the top layer of graham crackers. Don’t press them down—they’ll stick on their own. If you want extra chocolate, sprinkle the chocolate chips over the marshmallows now.
- Chill. Cover the dish with plastic wrap and refrigerate for at least 6 hours, but overnight is best. This is where the magic happens—the graham crackers soften into cake-like layers while the pudding sets into a creamy, dreamy texture. I know it’s hard to wait, but it’s worth it.
- Toast the marshmallows (optional but amazing). Just before serving, remove the plastic wrap and place the dish under the broiler for 1-2 minutes until the marshmallows are golden brown and toasted. Watch carefully—they burn fast! Alternatively, use a kitchen torch for more control. Let it sit for 5 minutes before serving.
Sensory Cues : When you fold the whipped cream into the pudding, it should look like chocolate mousse—light, airy, and cloud-like. After chilling, the finished cake should feel firm but tender when you cut into it. The graham crackers should have softened completely but still offer a slight resistance to the knife. The aroma when you toast the marshmallows? Pure campfire nostalgia.
Cooking Tips & Techniques
After making this cozy no-bake s’mores icebox cake about a dozen times (and messing up at least three of those), I’ve learned a few things worth sharing.
Don’t skip the whipped cream. I tried making this once with just the pudding mix and milk—no whipped cream folded in. It was… fine. But it wasn’t great. The whipped cream adds lightness and volume that makes this dessert feel like a special occasion. Without it, you’re basically eating chocolate pudding between crackers, which is good but not life-changing.
Room temperature ingredients matter. I know, I know—you’re making a no-bake dessert, so why should temperature matter? Because the pudding sets better when the milk is properly cold, and the cream whips better when it’s cold too. I once used milk that was only slightly chilled, and the pudding never set quite right. Lesson learned.
The biggest mistake I made? The first time I made this, I forgot to warm the marshmallow creme before spreading it. Let me tell you, trying to spread cold marshmallow creme is like trying to spread concrete with a toothpick. It tore up the chocolate layer, created a huge mess, and I ended up with marshmallow chunks instead of a smooth layer. Warm it for 10-15 seconds in the microwave. It makes all the difference.
Timing strategy : Make this the day before you plan to serve it. It needs at least 6 hours to set, but overnight is truly best. The flavors meld, the textures soften, and everything becomes cohesive. I’ve made it in the morning for an evening gathering, and it was good. I’ve made it the night before, and it was incredible.
For consistent results : Use a kitchen scale if you have one. Graham crackers can vary in size between brands, and weighing them ensures you have enough. Also, chill your mixing bowl for the whipped cream—it helps the cream whip faster and hold its shape longer.
Variations & Adaptations
This cozy no-bake s’mores icebox cake is wonderfully adaptable. Here are some variations I’ve tried and loved:
1. Peanut Butter S’mores Icebox Cake : Swirl 1/2 cup of creamy peanut butter into the chocolate pudding mixture before layering. The peanut butter adds a salty-savory note that pairs beautifully with the chocolate and marshmallow. I made this for a Super Bowl party and it disappeared in minutes.
2. Mint Chocolate S’mores Icebox Cake : Add 1/2 teaspoon of peppermint extract to the chocolate pudding mixture and use chocolate-mint graham crackers if you can find them. Top with crushed candy canes or Andes mints before serving. This is my go-to for holiday gatherings.
3. Berry S’mores Icebox Cake : Add a layer of fresh raspberries or sliced strawberries between the marshmallow creme and the second layer of graham crackers. The tartness of the berries cuts through the sweetness beautifully. I tried this on a whim one summer and it’s now my favorite warm-weather version.
4. Vegan Adaptation : Use oat milk for the pudding, coconut cream (chilled overnight and whipped) instead of heavy cream, and vegan marshmallows. Most graham crackers are accidentally vegan, but check the label. The texture will be slightly different—coconut cream is less stable than dairy cream—but it’s still delicious.
5. Gluten-Free Version : Simply swap in gluten-free graham crackers. I’ve used both Schär and Kinnikinnick brands with good results. The texture is slightly crumblier, but once chilled, you won’t notice the difference.
Personal Variation : My favorite twist? Adding a layer of salted caramel sauce between the marshmallow creme and the chocolate pudding. The saltiness balances the sweetness, and the caramel adds another layer of richness. I drizzle about 1/4 cup over the marshmallow creme before adding the next layer of graham crackers. It’s indulgent, but sometimes you need that.
Serving & Storage Suggestions
This cozy no-bake s’mores icebox cake is best served cold, straight from the fridge, with those toasted marshmallows still warm on top. The contrast between the cool, creamy layers and the warm, toasty topping is what makes it special.
Serving Temperature : I like to let the cake sit at room temperature for about 10 minutes after toasting the marshmallows. This takes the chill off without melting the structure. If you prefer a firmer texture, serve it straight from the fridge.
Presentation Ideas : Cut into squares and serve on a wooden board for that rustic campfire feel. Drizzle with extra chocolate sauce and sprinkle with crushed graham crackers for texture. A dollop of whipped cream on top never hurts either. For a fun touch, serve with a side of extra marshmallows for dipping.
Complementary Dishes : This cake pairs beautifully with a hot cup of coffee or a cold glass of milk. For a full dessert spread, serve alongside fresh fruit (the acidity cuts the richness) or a simple vanilla ice cream. I’ve also served it with a side of warm caramel sauce for dipping—decadent but worth it.
Storage Instructions : Cover the dish tightly with plastic wrap or transfer leftovers to an airtight container. The cake will keep in the refrigerator for up to 5 days. The graham crackers will continue to soften over time, so the texture will be different on day 4 than it was on day 1—still delicious, just more pudding-like.
Freezing Instructions : You can freeze this cake! Wrap the entire dish (or individual portions) tightly in plastic wrap, then foil, and freeze for up to 3 months. Thaw overnight in the refrigerator before serving. Don’t toast the marshmallows until after thawing—they’ll get soggy in the freezer.
Reheating Tips : If you’ve stored leftovers without toasting the marshmallows, you can toast them just before serving. If the marshmallows are already toasted, they’ll soften in the fridge—that’s fine, they’ll still taste amazing. For a quick refresh, pop individual portions under the broiler for 30 seconds.
Flavor Development : Honestly, this cake tastes better on day 2 and even better on day 3. The flavors meld, the textures soften, and everything becomes more cohesive. If you can resist eating it all on day 1, you’re in for a treat.
Nutritional Information & Benefits
Let’s be real—this is a dessert, and it’s meant to be indulgent. But here’s the estimated nutritional breakdown per serving (based on 12 servings):
| Nutrient | Amount Per Serving |
|---|---|
| Calories | 385 |
| Total Fat | 18g |
| Saturated Fat | 10g |
| Cholesterol | 45mg |
| Sodium | 320mg |
| Total Carbohydrates | 52g |
| Dietary Fiber | 2g |
| Sugars | 34g |
| Protein | 5g |
Health Benefits of Key Ingredients : Chocolate contains antioxidants called flavonoids, which can support heart health when consumed in moderation. Graham crackers provide some whole grains (depending on the brand), and milk offers calcium and vitamin D. The marshmallows? Well, they make you happy—and that counts for something.
Dietary Considerations : This recipe contains dairy and gluten (use the adaptations above for alternatives). It’s not low-carb or keto-friendly, but for an occasional treat, it fits into most balanced diets. The protein from the milk and cream helps slow down sugar absorption, which means you get sustained energy rather than a crash.
Potential Allergens : Dairy, gluten, and soy (in some chocolate pudding mixes). Always check labels if you’re cooking for someone with allergies.
Personal Wellness Perspective : I believe in balance. This cozy no-bake s’mores icebox cake is a celebration dessert, not an everyday snack. It’s meant to be shared with people you love on evenings that call for something special. And honestly? The joy it brings is its own kind of nourishment.
Conclusion
This cozy no-bake s’mores icebox cake is proof that you don’t need complicated techniques or fancy ingredients to create something truly memorable. It’s humble, honest, and deeply satisfying—the kind of dessert that makes you slow down and savor the moment.
What I love most about this recipe is how adaptable it is. You can make it exactly as written, or you can experiment with different flavors and add-ins. Add peanut butter. Throw in some berries. Drizzle caramel on top. Make it your own—that’s the beauty of a simple recipe done well.
I hope you give this cozy no-bake s’mores icebox cake a try. Whether you’re making it for a family gathering, a quiet night in, or just because you need a little comfort, I promise it will deliver. And when you take that first bite—with the creamy chocolate, the softened graham crackers, and the toasted marshmallow all coming together—I think you’ll understand why this recipe has become a staple in my kitchen.
If you make this, I’d love to hear about it! Leave a comment below and let me know how it turned out. Did you add any fun variations? Did your family love it as much as mine does? Share your experience—I read every comment and I’m always inspired by your creativity. Happy cooking, friend. You deserve something sweet.
Frequently Asked Questions
Can I make this s’mores icebox cake ahead of time?
Absolutely! In fact, I recommend it. This cake needs at least 6 hours to set, but overnight is ideal. You can make it up to 2 days in advance and keep it covered in the refrigerator. Just wait to toast the marshmallows until right before serving for the best texture.
Can I use homemade chocolate pudding instead of instant?
You can, but the texture will be different. Instant pudding sets firmly and creates distinct layers. Homemade pudding is softer and may blend with the graham crackers more. If you want to use homemade, make sure it’s fully chilled and thickened before layering, and expect a creamier, less structured result.
Why did my graham crackers stay crunchy?
This usually happens when the cake hasn’t chilled long enough. The moisture from the pudding needs time to soften the crackers. Give it at least 6 hours, but 12-24 hours is better. Also, make sure your pudding mixture isn’t too thick—if it’s overly stiff, it won’t release enough moisture to soften the crackers.
Can I use a different size pan?
Yes! An 8×8 pan will give you thicker layers and may need fewer graham crackers. A 9×13 is ideal for the proportions in this recipe. If using a different size, adjust the number of graham cracker layers accordingly—you still want three layers, just with different dimensions.
How do I get clean slices?
Use a sharp knife and wipe it clean between cuts. For the cleanest slices, chill the cake for the full 24 hours and let it sit at room temperature for about 10 minutes before cutting. Run the knife under hot water, dry it, and make one smooth cut. Repeat for each slice.
Pin This Recipe!
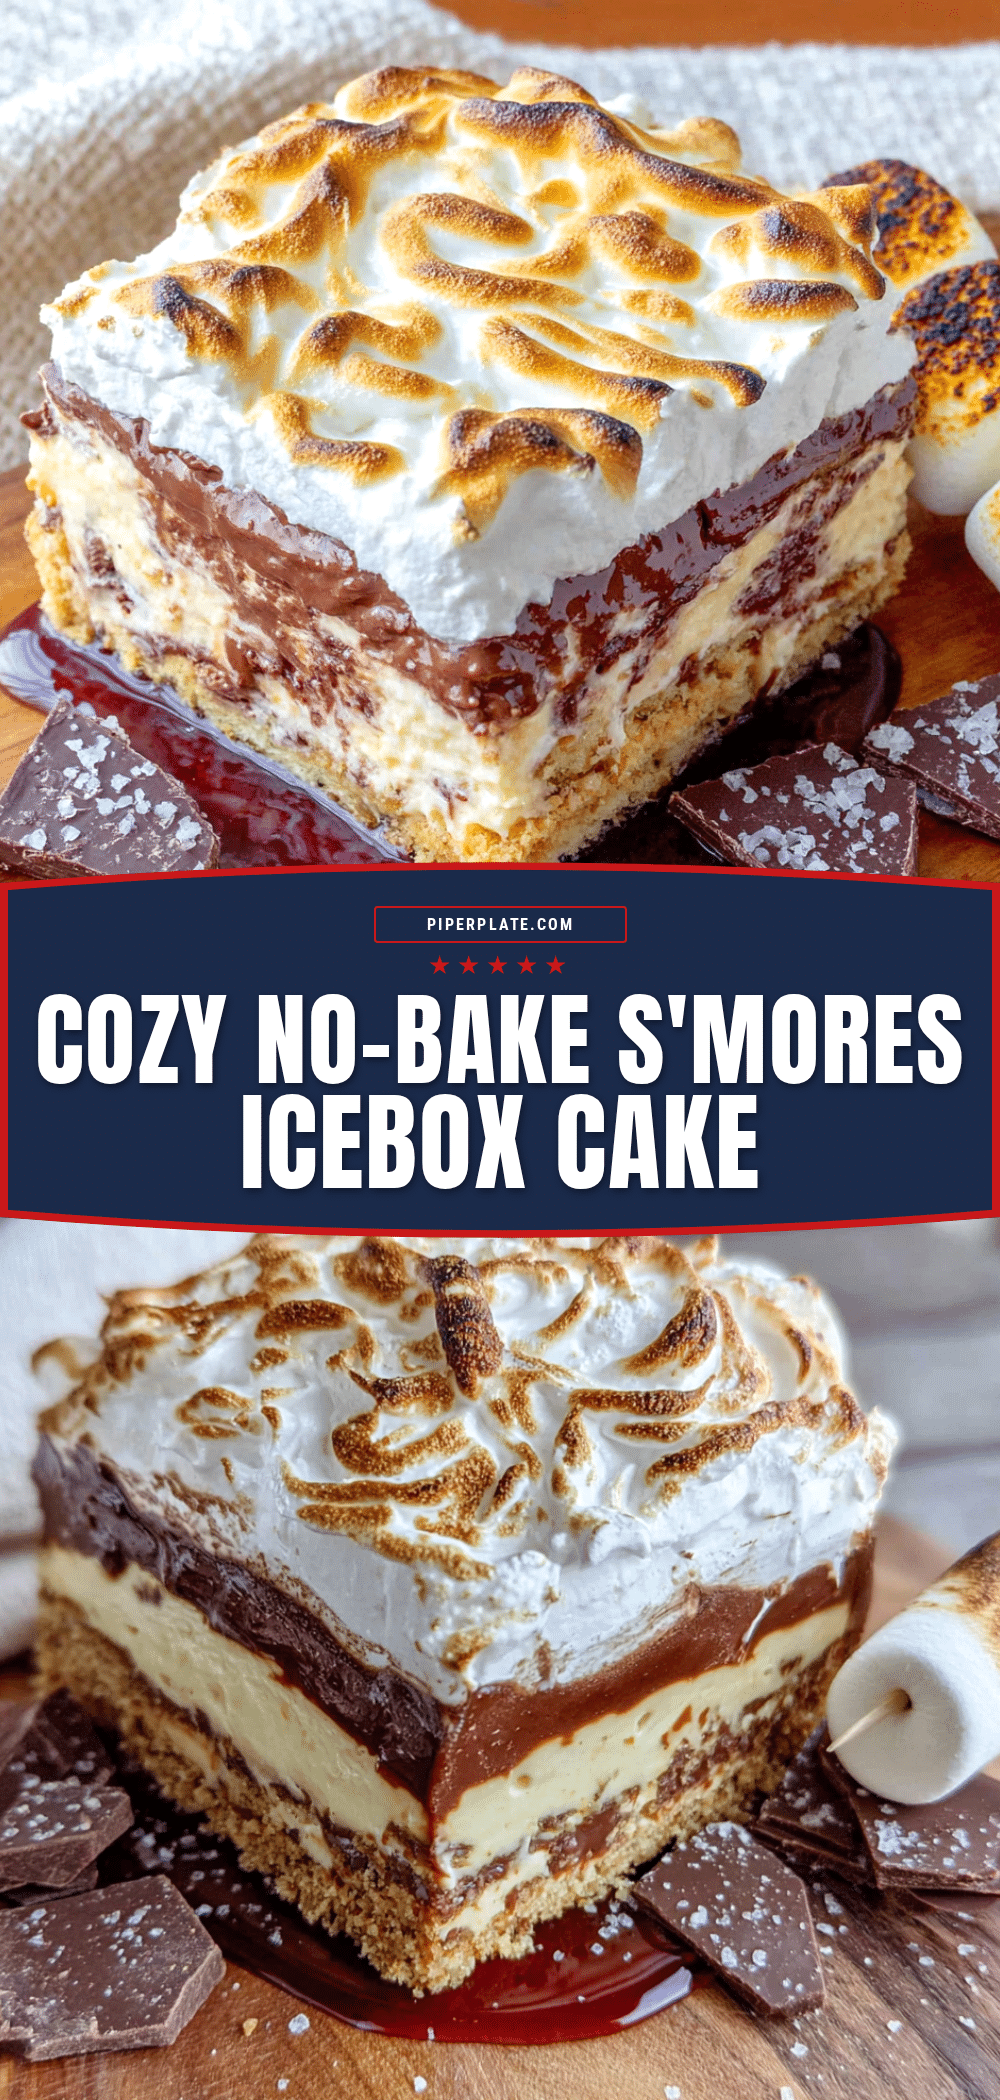
Cozy No-Bake S’mores Icebox Cake: Easy 10-Minute Dessert
This cozy no-bake s’mores icebox cake comes together in just 10 minutes of active prep time. Layers of creamy chocolate pudding, crunchy graham crackers, and fluffy marshmallow topping create a nostalgic, crowd-pleasing dessert that’s perfect for any occasion.
- Prep Time: 10 minutes
- Cook Time: 0 minutes
- Total Time: 6 hours 10 minutes (includes chilling)
- Yield: 12 servings 1x
- Category: Dessert
- Cuisine: American
Ingredients
- 3 cups whole milk (cold)
- 1 (3.9 oz) package instant chocolate pudding mix
- 1 cup heavy cream
- 1/4 cup powdered sugar
- 1 teaspoon vanilla extract
- 1 (14.4 oz) box honey graham crackers
- 1 (7 oz) jar marshmallow creme (Fluff)
- 1 cup mini marshmallows
- 1/2 cup chocolate chips (optional, for garnish)
Instructions
- Make the chocolate pudding base. In a large mixing bowl, whisk together the cold milk and instant chocolate pudding mix for about 2 minutes until it thickens. Set aside for 5 minutes to fully set.
- Whip the cream. In a separate medium bowl, combine the heavy cream, powdered sugar, and vanilla extract. Using an electric mixer on medium-high speed, whip until soft peaks form—about 2-3 minutes.
- Fold it together. Gently fold the whipped cream into the chocolate pudding mixture using a spatula until just combined.
- Layer the graham crackers. Arrange a single layer of graham crackers in the bottom of your 9×13 inch baking dish, breaking some to fit tightly.
- Add the first chocolate layer. Spread half of the chocolate pudding mixture evenly over the graham crackers.
- Add the marshmallow creme. Gently warm the marshmallow creme in the microwave for about 10 seconds to make it spreadable. Dollop it over the chocolate layer and spread carefully.
- Repeat the layers. Add another layer of graham crackers on top of the marshmallow creme. Then spread the remaining chocolate pudding mixture over the top. Finish with a final layer of graham crackers.
- Top with marshmallows. Sprinkle the mini marshmallows evenly over the top layer of graham crackers. If desired, sprinkle chocolate chips over the marshmallows.
- Chill. Cover the dish with plastic wrap and refrigerate for at least 6 hours, but overnight is best.
- Toast the marshmallows (optional but amazing). Just before serving, remove the plastic wrap and place the dish under the broiler for 1-2 minutes until the marshmallows are golden brown and toasted. Alternatively, use a kitchen torch. Let it sit for 5 minutes before serving.
Notes
For best results, chill overnight. The graham crackers soften into a cake-like texture. Toast marshmallows just before serving. Can be made up to 2 days in advance. Freezes well for up to 3 months.
Nutrition
- Serving Size: 1 square (1/12 of ca
- Calories: 385
- Sugar: 34
- Sodium: 320
- Fat: 18
- Saturated Fat: 10
- Carbohydrates: 52
- Fiber: 2
- Protein: 5
Keywords: no-bake dessert, icebox cake, s'mores, easy dessert, chocolate pudding, graham crackers, marshmallow, comfort food, 10-minute dessert


