Love this? Save it for later!
Share the inspiration with your friends
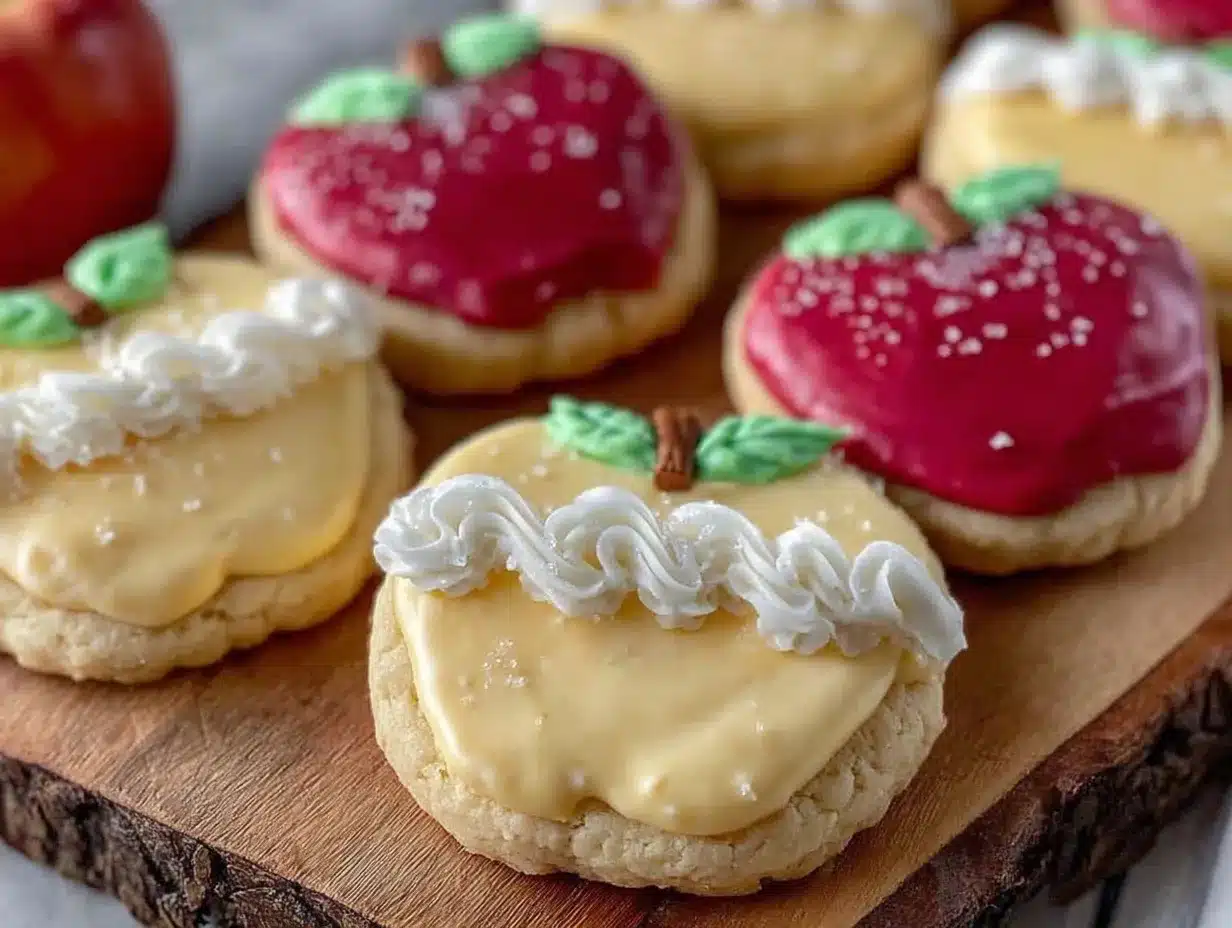
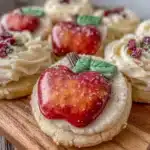
“I wasn’t expecting to find the perfect teacher gift recipe during a last-minute school event,” I remember telling my friend on a hectic Thursday afternoon. It was one of those days when I had forgotten the PTA meeting reminder, and panic was setting in fast. I needed something sweet, thoughtful, and, honestly, quick. That’s when I stumbled upon this gem — the perfect decorated teacher apple sugar cookies with royal icing. The idea hit me as I browsed through a dusty cookbook at a local thrift shop, flipping through pages filled with forgotten family treats.
The charm wasn’t just in the recipe but in the story behind it. The original scribbles on the page hinted at a teacher’s appreciation baked into every cookie. I tried the recipe that evening with a few tweaks, and the results were nothing short of magical. The way the royal icing set perfectly to create crisp apple shapes and delicate leaves was honestly something I hadn’t expected from a simple sugar cookie.
Maybe you’ve been there — scrambling for a gift that says “thank you” without the fuss. These cookies have since become my go-to for teacher gifts, classroom parties, and even neighborhood gatherings. They’re sweet, festive, and just the right size to carry that warm, grateful feeling every bite of apple sugar cookie delivers. Let me tell you, watching those little apple shapes come to life with vibrant red icing and tiny green leaves is genuinely satisfying, even if you forget the rolling pin once in a while (which I totally did the first time!).
So, why do these decorated teacher apple sugar cookies stick around in my kitchen year after year? Because they’re more than just cookies — they’re a little celebration of gratitude wrapped in sugary sweetness and bright, cheerful design. And honestly, they make saying “thank you” feel a lot more delicious.
Why You’ll Love This Recipe
After countless baking sessions and a few trial-and-error mornings, this recipe has become a favorite for so many reasons:
- Quick & Easy: These cookies come together in under an hour, perfect for those busy school mornings or last-minute gift ideas.
- Simple Ingredients: You probably already have everything in your pantry — flour, sugar, butter, eggs — no fancy ingredients needed.
- Perfect for Teacher Gifts: Nothing says appreciation like a homemade apple-shaped cookie decorated with care and bright royal icing.
- Crowd-Pleaser: Kids love the fun shapes and vibrant colors, while adults can’t resist the buttery sugar cookie base.
- Unbelievably Delicious: The buttery, tender texture combined with smooth royal icing makes these cookies a real treat.
This recipe stands out because of the royal icing technique that creates a smooth, glassy finish — not too shiny, just perfectly matte, which makes the apple design pop. I love sharing these cookies at school events where they always get compliments for looking so professional yet homemade. Honestly, the balance of sweet apple and buttery cookie is just right, and the decorating process is surprisingly doable, even for beginners.
If you want to impress without stress, these cookies are your best bet. They’re a heartfelt way to say thanks and a fun project that brings out the artist in you. Plus, who doesn’t love an apple for the teacher with a little sweet twist?
What Ingredients You Will Need
This recipe uses simple, wholesome ingredients to deliver bold flavor and a satisfying texture without the fuss. Most of these are pantry staples, and the royal icing calls for just a few basics you might already have.
- For the Sugar Cookies:
- 2 ¾ cups (345g) all-purpose flour (I prefer King Arthur for consistent results)
- 1 teaspoon baking powder
- ½ teaspoon salt
- 1 cup (225g) unsalted butter, softened (room temperature is key for easy mixing)
- 1 ½ cups (300g) granulated sugar
- 1 large egg, room temperature
- 1 teaspoon vanilla extract (pure vanilla makes a big difference)
- 1 tablespoon milk (adds a little moisture for soft edges)
- For the Royal Icing:
- 3 cups (360g) powdered sugar, sifted (to avoid lumps)
- 2 large egg whites or 4 tablespoons meringue powder + 6 tablespoons water (I use meringue powder for safety and convenience)
- 1 teaspoon lemon juice (adds brightness and helps set the icing)
- Gel food coloring in red, green, and brown (I recommend AmeriColor gels for vibrant, stable colors)
- Water to thin the icing if needed
- Optional Decorations:
- Edible gold or white sprinkles for a little sparkle
- Small leaf-shaped molds or piping tips for extra detail
Substitutions: Use almond flour for a gluten-free option, but note the texture will be softer. For dairy-free, swap butter with coconut oil and milk with almond or oat milk. If you want to skip egg whites in royal icing, there are commercial eggless royal icing mixes, but I prefer the traditional method for taste and texture.
Equipment Needed
- Mixing bowls (preferably glass or metal for royal icing mixing)
- Electric mixer or stand mixer with paddle and whisk attachments
- Rolling pin (a silicone one works great to prevent sticking)
- Apple-shaped cookie cutters (available in most baking stores or online)
- Parchment paper or silicone baking mats (keeps cookies from sticking and aids even baking)
- Piping bags (disposable or reusable) and small round piping tips for precise royal icing application
- Small spatula or butter knife for smoothing icing
- Sifter for powdered sugar (important to avoid clumps in royal icing)
If you don’t have a stand mixer, a hand mixer works just fine. For rolling pins, a wooden one is classic, but I personally find silicone easier for cleanup and less mess. Piping bags can be intimidating, but even a small zip-top bag with a tiny snip in the corner gets the job done. I once decorated a whole batch with an old sandwich bag—talk about improvising!
Preparation Method
- Preheat your oven to 350°F (175°C). Line baking sheets with parchment paper or silicone mats to prevent sticking.
- Mix dry ingredients: In a medium bowl, whisk together 2 ¾ cups flour, 1 teaspoon baking powder, and ½ teaspoon salt. Set aside.
- Cream butter and sugar: In a large bowl, beat 1 cup softened butter and 1 ½ cups sugar with an electric mixer on medium speed until light and fluffy, about 3-4 minutes. This step is key for tender cookies.
- Add egg and vanilla: Beat in 1 large egg and 1 teaspoon vanilla extract until combined. Scrape down the sides if needed.
- Combine wet and dry: Gradually add the dry ingredients to the butter mixture, alternating with 1 tablespoon milk. Mix on low speed until just combined. Don’t overmix or cookies will get tough.
- Chill the dough: Form the dough into a disk, wrap in plastic wrap, and chill for at least 1 hour (or overnight). This helps manage spreading during baking and makes rolling easier.
- Roll and cut: Lightly flour your surface and rolling pin. Roll the dough to about ¼ inch (6 mm) thickness. Use apple-shaped cookie cutters to cut shapes and transfer gently to prepared sheets.
- Bake: Bake cookies for 8-10 minutes, or until edges just begin to turn golden. The centers should remain pale. Let cool on sheets for 5 minutes, then transfer to wire racks to cool completely before decorating.
- Prepare royal icing: In a clean bowl, beat 3 cups powdered sugar with 2 egg whites (or meringue powder mix), and 1 teaspoon lemon juice until stiff peaks form, about 5-7 minutes. Divide and color portions with gel food colors.
- Decorate: Fill piping bags with colored icing. Outline the apple shape in red, then flood the center with thinner icing. Use green for leaves and brown for stems. Let each color set slightly before adding the next to avoid bleeding. Patience is key here!
- Dry and store: Allow iced cookies to dry completely at room temperature, ideally overnight. Store in an airtight container for up to a week or freeze for longer storage.
Pro tip: If your royal icing is too thick to flood, add water a few drops at a time. Too thin? Add more powdered sugar. I learned this the hard way during my first batch when the icing ran right off the cookie edges. Also, rolling the dough between two sheets of parchment paper helps keep it even and mess-free.
Cooking Tips & Techniques
Royal icing can be intimidating, but a few tricks make all the difference:
- Use room temperature ingredients: Egg whites and butter behave better and mix more smoothly when not cold.
- Sift powdered sugar: Always sift before mixing to avoid lumps that clog your piping bags.
- Control icing consistency: For outlining, keep icing thick; for flooding, thin it with water until it flows smoothly but isn’t watery. Practice on parchment if you’re unsure.
- Work in small batches: Color and prepare icing in small portions so you don’t waste or dry it out.
- Allow drying time: Let outlines dry for 15-20 minutes before flooding to keep edges crisp. Patience pays off!
- Store decorated cookies properly: Air-tight containers prevent drying out, but avoid stacking until icing is fully set.
Common mistake? Rushing the drying process. I once stacked my cookies too soon and ended up with smudged designs and sticky messes. Lesson learned! Also, don’t be afraid to experiment with piping tips for leaves and stems — a small leaf tip makes such a difference. Lastly, multitask by prepping dough one day and decorating the next if timing is tight.
Variations & Adaptations
These decorated teacher apple sugar cookies are wonderfully versatile:
- Dietary adaptation: Swap all-purpose flour with a gluten-free blend for a celiac-friendly treat. Use dairy-free butter and almond milk for lactose intolerance.
- Seasonal twist: Change up the apple colors — try green or yellow apples for variety, or add cinnamon-flavored icing for a cozy autumn feel.
- Flavor variation: Add a teaspoon of almond extract to the dough for a subtle nutty flavor that pairs beautifully with the royal icing.
- Decorating method: Instead of royal icing, try melted white chocolate with colored candy melts for a softer finish.
I once tried a batch with crushed freeze-dried apple sprinkled on the icing before it dried — it added a lovely tart crunch that was a pleasant surprise! You can also personalize the cookies by piping teacher’s names or little apples with “A+” for an extra special touch.
Serving & Storage Suggestions
These apple sugar cookies are best served at room temperature, allowing the buttery texture and sweet icing to shine. They make a beautiful addition to any teacher’s desk or classroom party table.
Pair them with a hot cup of apple cider, chai tea, or a creamy latte for a cozy treat. They also complement savory snacks like cheese plates if you’re hosting a fall gathering.
For storage, place cookies in a single layer inside an airtight container. If stacking is necessary, place parchment paper between layers to prevent sticking. They keep well for up to one week at room temperature.
If you want to keep them longer, freeze uniced cookies for up to 3 months. Decorate after thawing for best results. To reheat, simply let cookies come to room temperature naturally — avoid microwaving as it can soften the icing.
Flavors deepen slightly after 24 hours, so if you can wait, these cookies taste even better the next day. I like baking a batch in advance so I have them ready for surprise visits or quick gifts.
Nutritional Information & Benefits
Each decorated teacher apple sugar cookie contains approximately:
| Nutrient | Amount per Cookie |
|---|---|
| Calories | 150-170 kcal |
| Fat | 7-9g (mostly from butter) |
| Carbohydrates | 22-25g (mostly sugars and flour) |
| Protein | 1-2g |
The key ingredients like butter and eggs provide healthy fats and protein, while the powdered sugar and flour are the main sources of carbs. Using pure vanilla and fresh ingredients keeps the recipe clean and free from artificial additives.
For those watching allergens: contains gluten, dairy, and eggs. Gluten-free and dairy-free substitutions are possible with the adaptations mentioned earlier. From a wellness perspective, these cookies are a treat best enjoyed in moderation but bring joy and connection, which is equally important!
Conclusion
In the end, these perfect decorated teacher apple sugar cookies with royal icing are more than just a baking project—they’re a sweet way to say thank you with a personal touch. Whether you’re a baking novice or a seasoned pro, this recipe offers a fun, satisfying challenge that yields beautiful, delicious results.
Feel free to customize the colors, flavors, and designs to suit your style or the teacher’s personality. Trust me, once you give these a try, you’ll find yourself reaching for this recipe season after season.
I love these cookies because they bring together my love of baking, simple ingredients, and heartfelt gifting all in one. Now it’s your turn—give them a go, share your decorating wins or mishaps in the comments, and maybe even pass this recipe along to a fellow cookie enthusiast!
Happy baking, and here’s to making every teacher’s day a little sweeter.
FAQs
Can I make these sugar cookies ahead of time?
Absolutely! The dough can be chilled for up to 3 days before baking, and the decorated cookies keep well in an airtight container for about a week.
What if I don’t have egg whites for royal icing?
You can use meringue powder mixed with water as a safe alternative. It works just as well and is great for those concerned about raw eggs.
How do I get smooth, even royal icing on my cookies?
Use a piping bag to outline the cookie first with thick icing, let it set, then flood the inside with thinner icing. Use a toothpick to spread icing evenly.
Can I freeze these cookies?
Yes! Freeze unbaked dough for up to 3 months or freeze baked, undecorated cookies. It’s best to decorate after thawing for the freshest look.
What’s the best way to store decorated cookies?
Store them in a single layer in an airtight container at room temperature. If stacking, place parchment paper between layers to prevent sticking.
For a fun twist, if you enjoy these apple sugar cookies, you might also appreciate the crispy garlic chicken recipe that’s a hit for quick dinners, or for sweet treats with a twist, check out pumpkin spice muffins perfect for seasonal baking.
Pin This Recipe!

Perfect Decorated Teacher Apple Sugar Cookies Easy Royal Icing Recipe
These decorated apple-shaped sugar cookies with royal icing are a quick, easy, and thoughtful gift perfect for teachers, classroom parties, and gatherings. The buttery sugar cookie base pairs beautifully with smooth royal icing for a festive and delicious treat.
- Prep Time: 15 minutes
- Cook Time: 10 minutes
- Total Time: 1 hour 25 minutes
- Yield: 24 cookies 1x
- Category: Dessert
- Cuisine: American
Ingredients
- 2 ¾ cups (345g) all-purpose flour
- 1 teaspoon baking powder
- ½ teaspoon salt
- 1 cup (225g) unsalted butter, softened
- 1 ½ cups (300g) granulated sugar
- 1 large egg, room temperature
- 1 teaspoon vanilla extract
- 1 tablespoon milk
- 3 cups (360g) powdered sugar, sifted
- 2 large egg whites or 4 tablespoons meringue powder + 6 tablespoons water
- 1 teaspoon lemon juice
- Gel food coloring in red, green, and brown
- Water to thin the icing if needed
- Optional: edible gold or white sprinkles
- Optional: small leaf-shaped molds or piping tips
Instructions
- Preheat your oven to 350°F (175°C). Line baking sheets with parchment paper or silicone mats.
- In a medium bowl, whisk together flour, baking powder, and salt. Set aside.
- In a large bowl, beat softened butter and sugar with an electric mixer on medium speed until light and fluffy, about 3-4 minutes.
- Beat in the egg and vanilla extract until combined.
- Gradually add the dry ingredients to the butter mixture, alternating with milk. Mix on low speed until just combined. Do not overmix.
- Form the dough into a disk, wrap in plastic wrap, and chill for at least 1 hour or overnight.
- Lightly flour your surface and rolling pin. Roll the dough to about ¼ inch (6 mm) thickness. Use apple-shaped cookie cutters to cut shapes and transfer to prepared baking sheets.
- Bake cookies for 8-10 minutes, until edges just begin to turn golden and centers remain pale. Cool on sheets for 5 minutes, then transfer to wire racks to cool completely.
- Prepare royal icing by beating powdered sugar with egg whites (or meringue powder mix) and lemon juice until stiff peaks form, about 5-7 minutes. Divide and color portions with gel food colors.
- Fill piping bags with colored icing. Outline apple shapes in red, flood centers with thinner icing, use green for leaves and brown for stems. Let each color set slightly before adding the next.
- Allow iced cookies to dry completely at room temperature, ideally overnight. Store in an airtight container for up to a week or freeze for longer storage.
Notes
Use room temperature ingredients for best results. Sift powdered sugar before mixing royal icing to avoid lumps. Control icing consistency by thinning with water for flooding and keeping thick for outlining. Allow drying time between colors to prevent bleeding. Store cookies in a single layer with parchment paper between layers if stacking. Dough can be chilled up to 3 days before baking. Freeze unbaked dough for up to 3 months.
Nutrition
- Serving Size: 1 cookie
- Calories: 160
- Sugar: 15
- Sodium: 90
- Fat: 8
- Saturated Fat: 5
- Carbohydrates: 24
- Protein: 1.5
Keywords: apple sugar cookies, teacher gift cookies, royal icing cookies, decorated sugar cookies, easy sugar cookies, holiday cookies, school party treats